Categories
Recipes

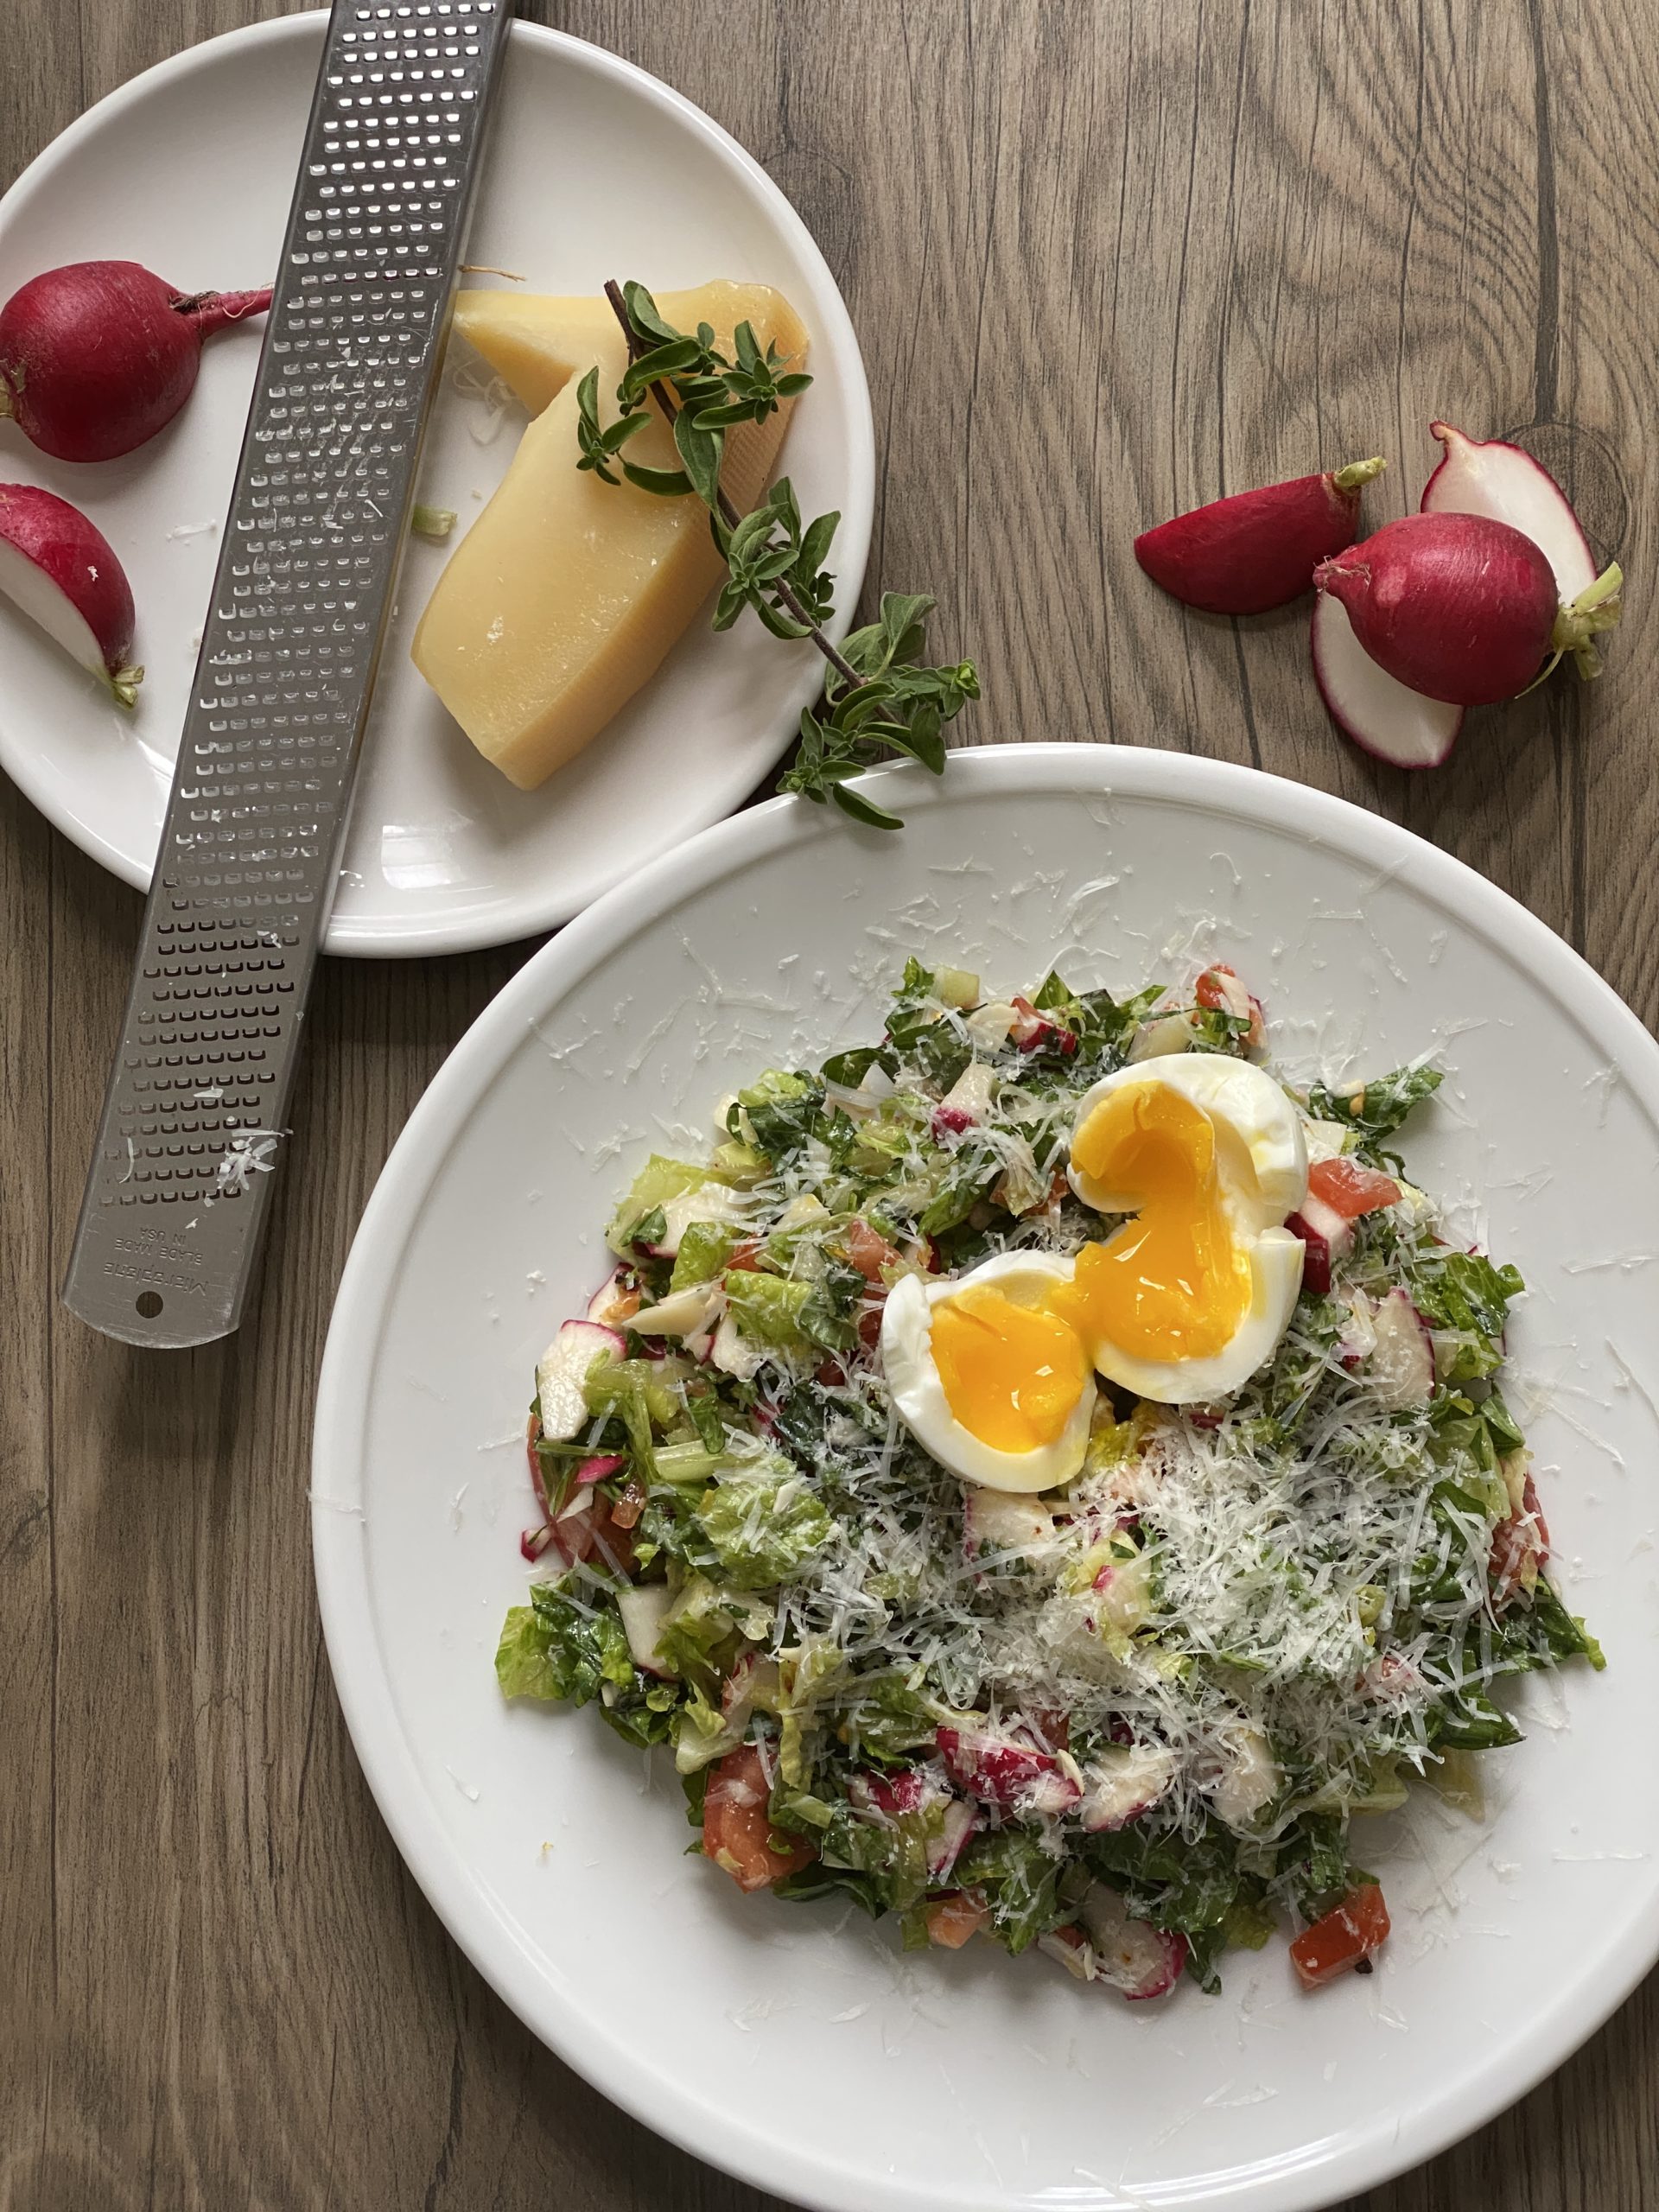
Salads – Italian Chopped Salad with Soft Boiled Egg

Italian Chopped Salad, by Reggie Soang

Chopped salad is often associated with #sad-desk-lunch. However, this Italian version is simple and delicious; Parmesan, fresh herbs and tomatoes deliver an authentic Italian flavor. Top off the salad with a soft boiled egg to make it substantial.

For the latest New Lifestyle Cooking Series:

Italian Chopped Salad with Soft Boiled Egg
Serve: 1 person

Prep Time: 5 minutes
Total Time 15 minutes

Ingredients:
1 head Romaine hearts/lettuce, leaves separated, rinsed and dried
6 radishes
1/4 cup shaved Parmesan cheese
2 Roma Tomatoes
1/4 cup basil leaves
1 lemon, zested and juiced
3 tablespoon EVOO
1 + 1/2 teaspoon salt, more to taste
1/2 teaspoon dried chilies
1 teaspoon crushed black peppercorn
2 tablespoons fresh oregano leaves
1 egg, soft boiled
2 tablespoons grated Parmesan, to finish

  1. Bring a pot of water to a boil to cook the egg. Cook the egg for 6 minutes and chill it in ice or cold water immediately. Peel and set aside. (taking the egg out of the fridge 30 minutes before cooking for the best result)
  2. Cut the cleaned Romaine lettuce into 1-inch chunks
  3. Quarter radishes and shave Parmesan cheese with a peeler.
  4. Cut Roma tomatoes into 1-inch chunks
  5. Place chopped Romaine lettuce, radishes, Parmesan, tomatoes and basil on a cutting board and use a sharp knife to chop all the ingredients together until bite-size (about 1/2 to 1/4 inch big)
  6. Put the chopped salad in a mixing bowl, add lemon zest, 2 tablespoons lemon juice, EVOO, salt, dried chilies, and crushed black pepper to taste. 
  7. Place the salad on a plate and sprinkle on the fresh oregano leaves. Place the soft-boiled egg on top and cut it open to let the yolk ooze out. 
  8. Grate more Parmesan on top to finish, bon appétit!
Categories
Recipes

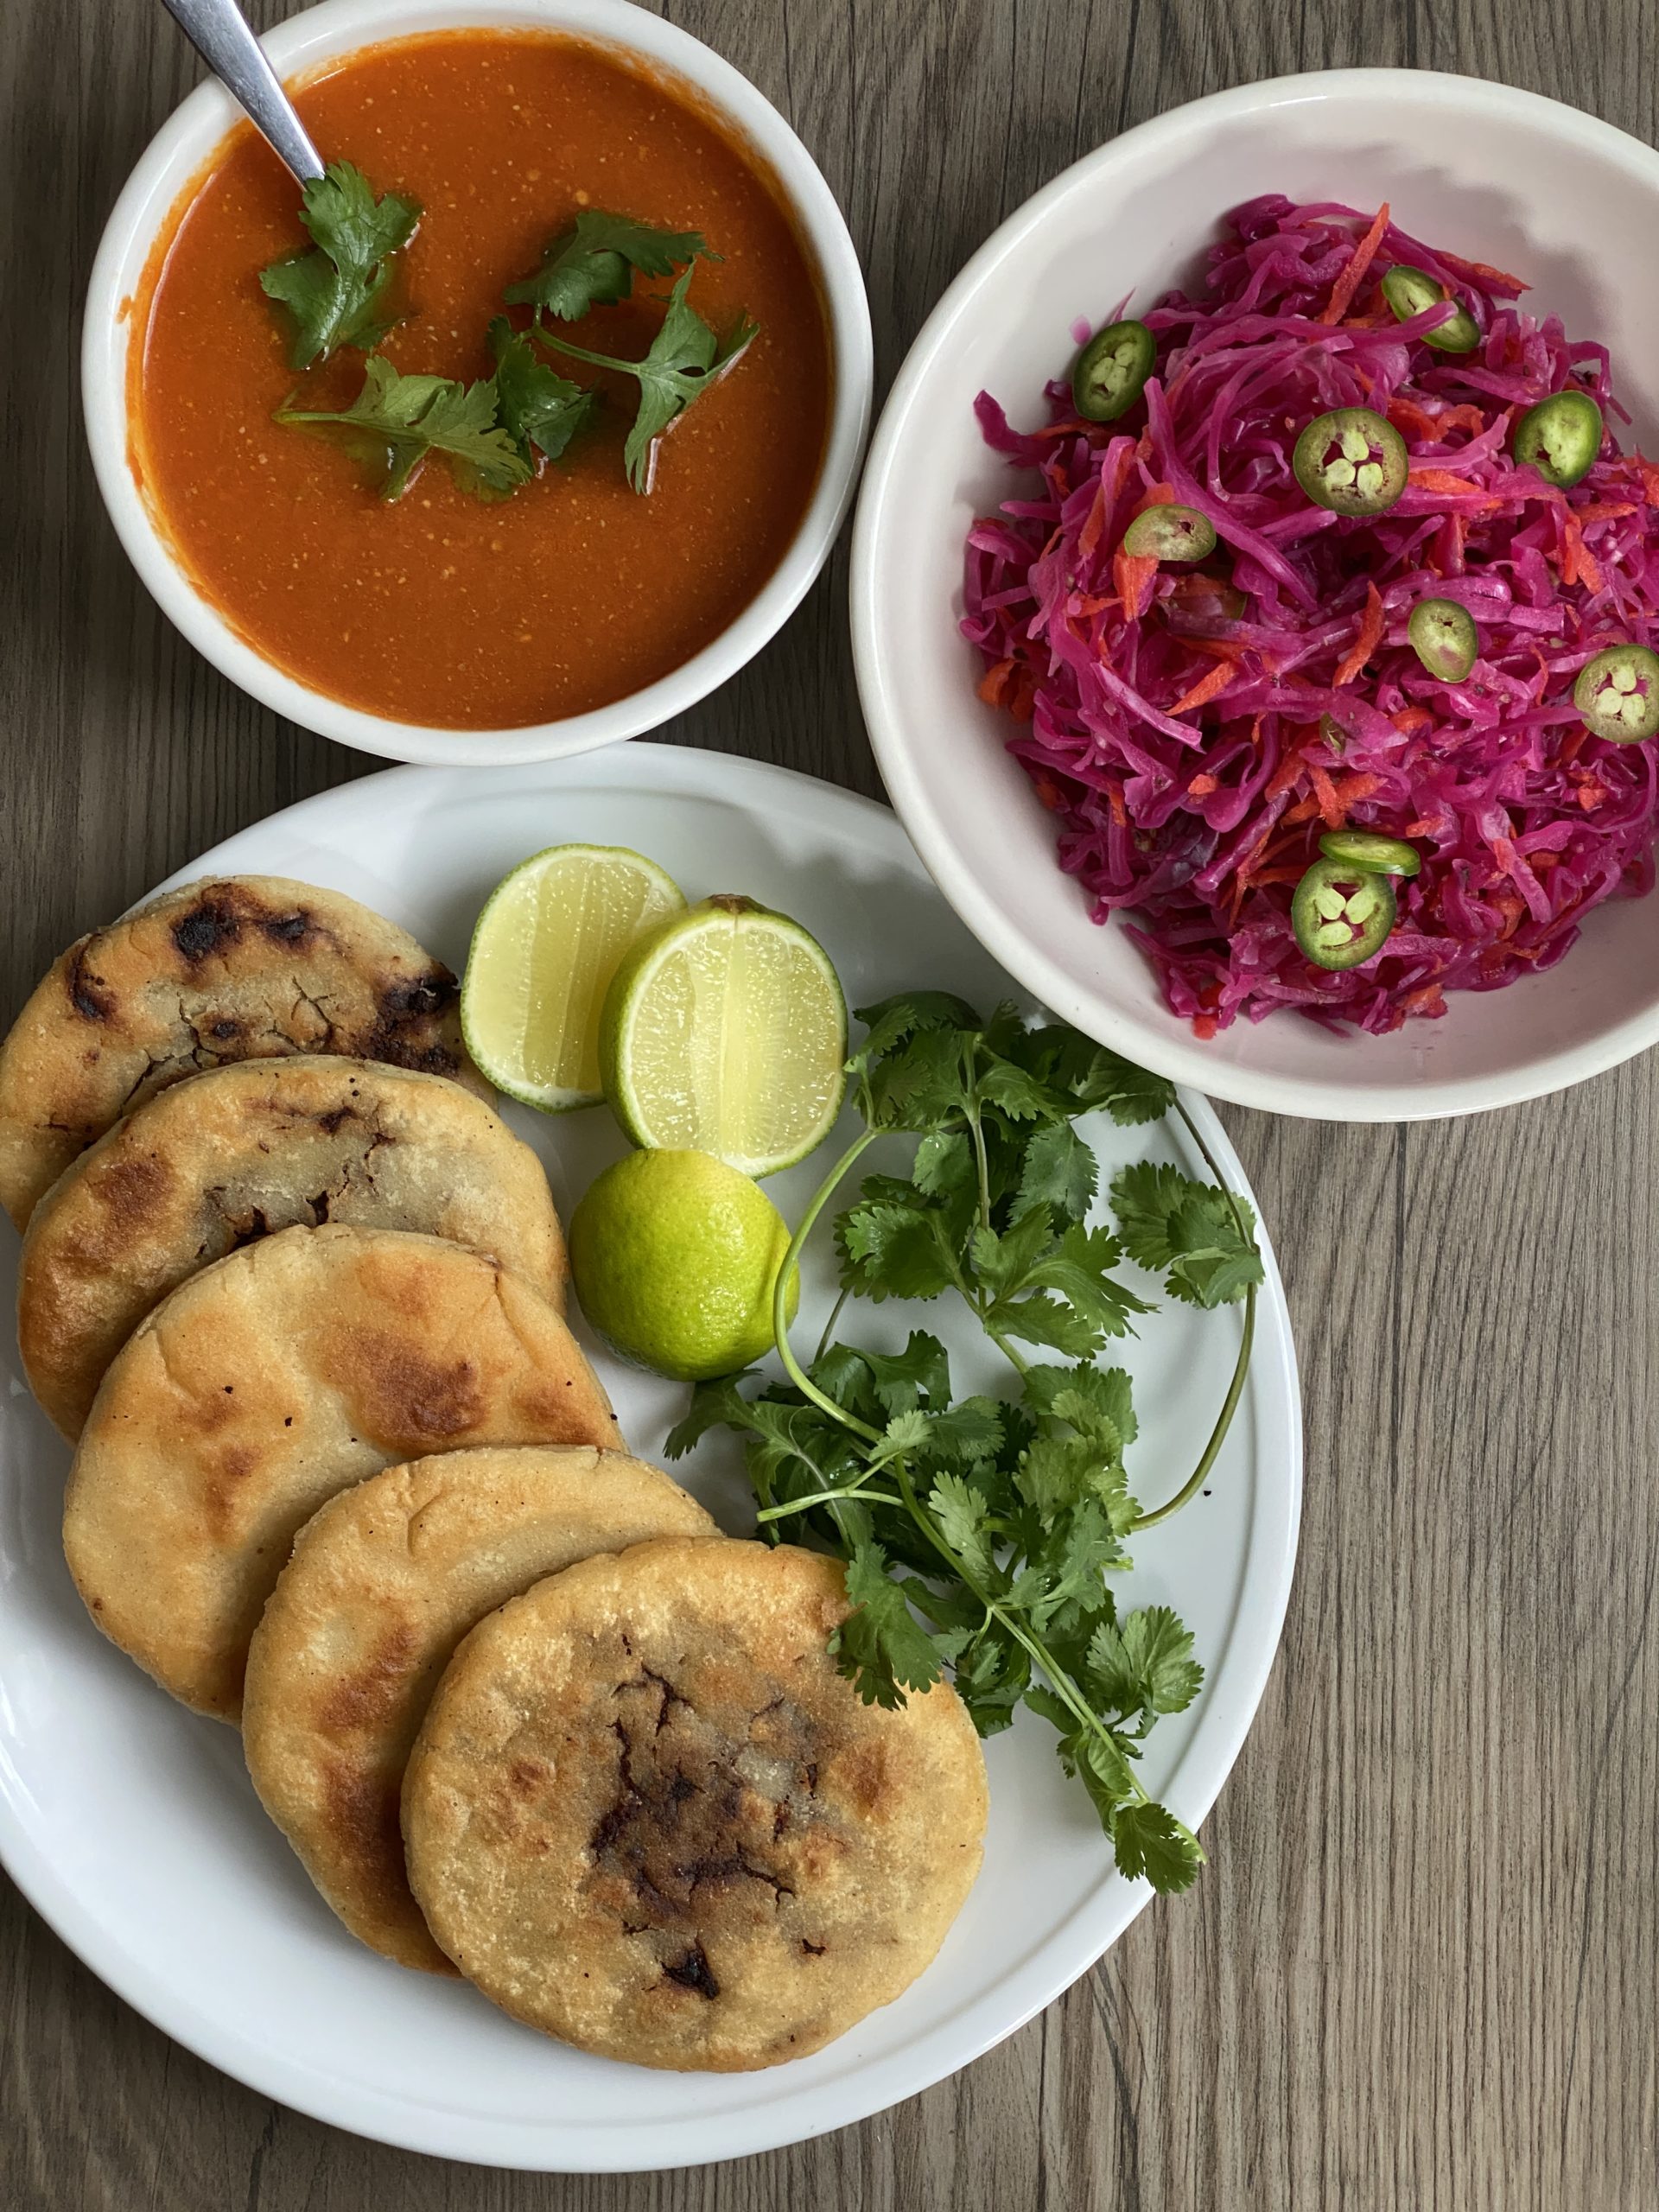
Pancakes – Pupusas, Curtido, and Tomato Salsa

Pupusas, Curtido, and Tomato Salad, by Reggie Soang (click on the image for YouTube video)

Pupusa is an El Salvadorian pancake made with masa and stuffed with refried beans or braised meat. When biting into a pupusa, it is crunchy and crumbly. Eat pupusa with the hand, and serve it with curtido, a Latin slaw, and tomato salsa placed on top.

For the latest New Lifestyle Cooking Series:

Pupusas, Curtido, and Tomato Salsa
Serves: make 15 pancakes

Prep Time: 30 minutes
Total Time: 1 hour 30 minutes

Ingredients:
For Pupusas:
3 cups (400g) masa
2 + 1/3 cup (530g) water
1 teaspoon salt

For Curtido:
1/2 head red cabbage, shaved
1 carrot, grated
4 cups boiling water
1/2 cup chopped scallions
1 cup chopped white onions
1 jalapeño, thinly sliced into rings
2 teaspoons salt
2 tablespoons dried oregano
1 cup distilled white vinegar
1 cup water

For the Fillings:
2 tablespoons oil
1/2 onion, chopped
1 Tablespoon ground cumin
1 teaspoon onion powder
1 teaspoon garlic powder
2 teaspoons chili powder
1 can (15.5 oz) canned black beans 
1 teaspoon salt
1 cup shredded Mozzarella

For Tomato Salsa:
4 Roma tomatoes
1/2 yellow or white onion
5 cloves garlic
1 tablespoon cumin
1 teaspoon sugar
1 teaspoon salt
2 tablespoon EVOO

  1. To make pupusa dough, add water gradually to masa flour while mixing it with a hand. The dough should be soft like play-doh, but not sticking to the hands. Let dough rest for all least 30 minutes at room temperature. 
  2. Prepare curtido, refried beans, and tomato salsa while masa dough is resting.
  3. Make curtido by bringing the water to a boil and then pour over red cabbages and carrots. Soak the cabbages and carrots for 5 minutes, and then strain and squeeze out as much water as possible.
  4. Add the rest of the ingredients from the curtido recipe with cabbages and carrots in a mixing bowl and mix to combine. Curtido could be eaten right away or could sit at room temperature for 4 to 6 hours for the flavor to mature. 
  5. Meanwhile, make refried beans. Heat up a non-stick skillet on medium heat, add oil and wait until it shimmers, and then add onions. Caramelize onions, and then add ground cumin, onion powder, garlic powder, and chili powder. Cook until the spices are fragrant.
  6. While the onions and spices are cooking, blitz up canned black beans until nice and smooth, and then add to the onions mixture. Add some water to loosen up the beans and season with salt. Refried beans should be creamy.
  7. To make the tomato salsa, blend Roma tomatoes, onion, garlic, cumin, sugar, and salt in a blender until smooth. Separately, heat up a pot with EVOO on medium-high heat, when EVOO starts to shimmer, add the tomato purée and let it cook for 5 minutes or so until thickened and the raw onion and garlic flavors are gone. 
  8. Go back to making pupusas. Portion pupusa dough into 4 oz. or size of a tennis ball. Flatten the ball into a 1/8-inch thick disk, and then add 1 tablespoon of refried beans and 1 tablespoon of shredded mozzarella to the middle. Fold up the sides of the disk and pinch off the excess dough on the top while forming a ball in the palm of the other hand.
  9. Flatten the ball carefully to a 1/4-inch disk. Dip the fingers in water to patch up the cracks on the edges. One side of the pupusas might show a little bit of fillings, but don’t worry as long as the fillings are not falling out.
  10. Pan fry pupusas on medium heat until both sides are golden brown. Serve pupusas with curtido and tomato salsa, bon appétit!
Categories
Recipes

Pancakes – Jianbing with Spicy Hoisin and Pickles

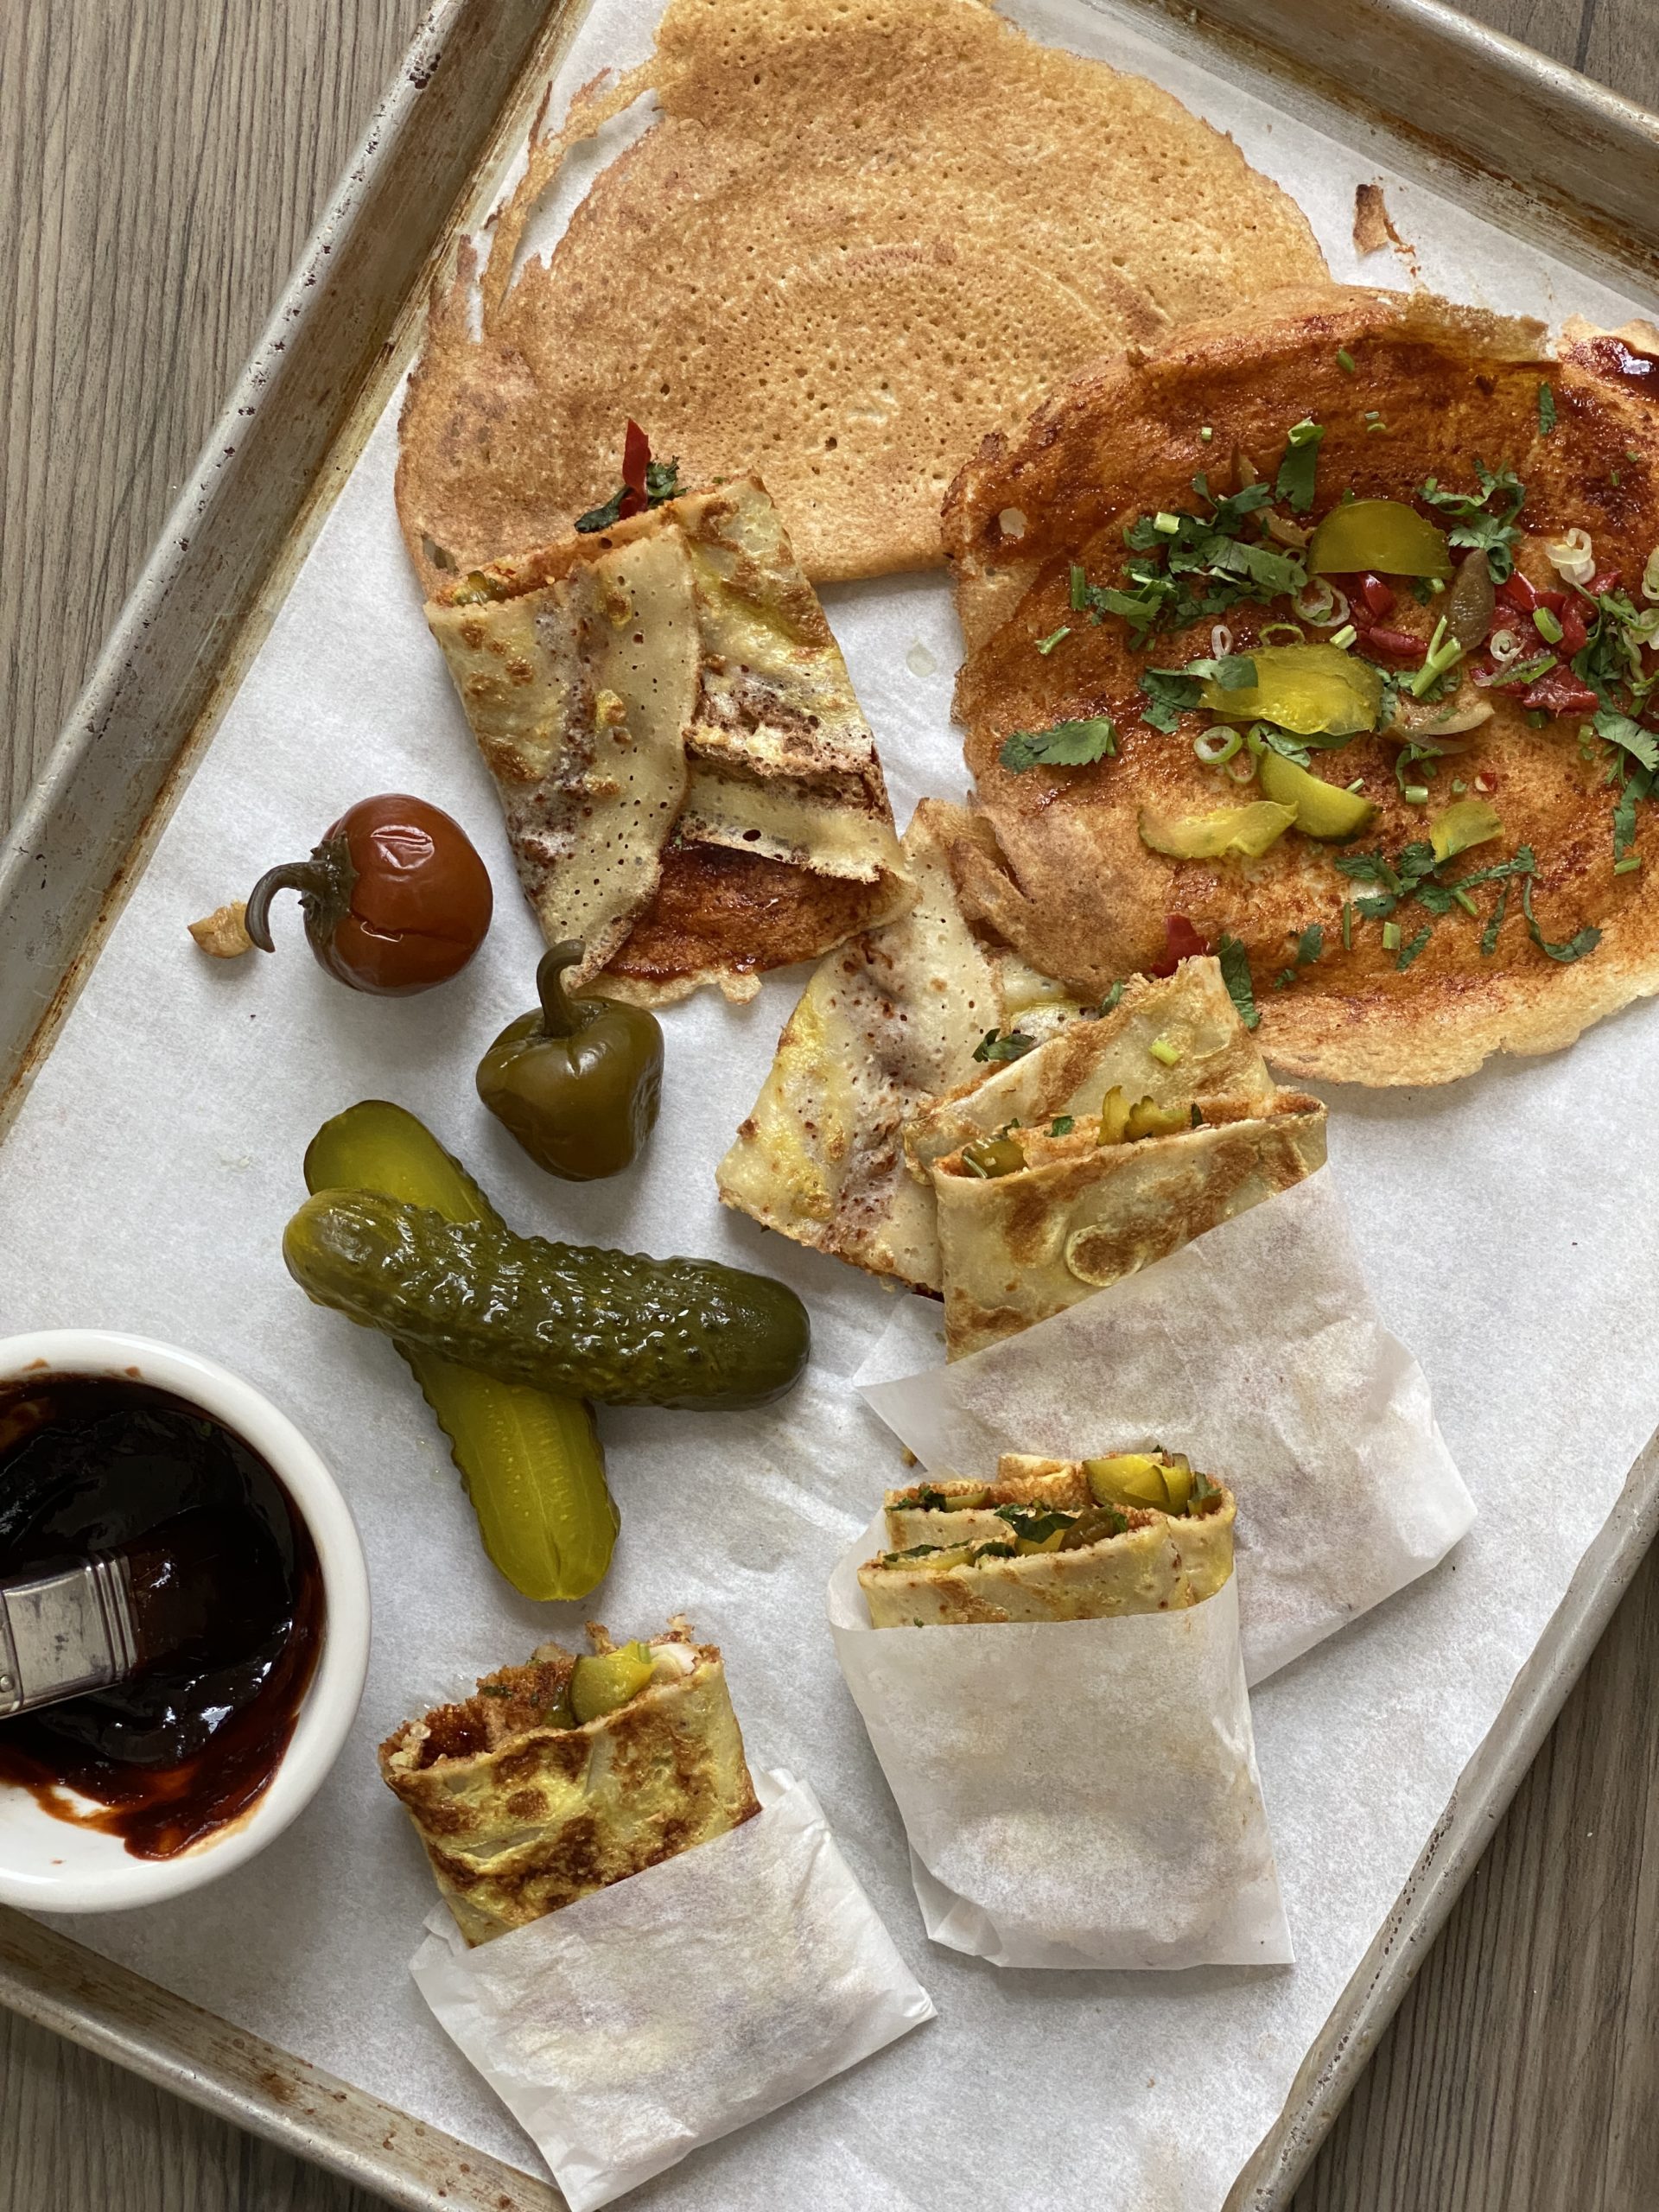
Jianbing with Spicy Hoisin and Pickles, by Reggie Soang (click on the image for YouTube video)

Jianbing is from China, and it has gained a fair share of popularity in the West and made it into the mainstream. Jianbing is a crêpe made out of millet flour, mung bean flour, and all-purpose flour. Quite frankly, the batter recipe is regional. I am using all-purpose flour and millet flour in this recipe; these two types of flour are more common and can be a substitute in a 1-to-1 ratio. Eggs, cilantro, scallions, crispy wonton, and hoisin sauce are essential fillings. For this version, I skipped the crispy wontons and added pickles. The crunch and flavors of the pickles make this dish just as joyful and pleasant to eat.

Ingredients:
For the Batter:
1/3 cup (60g) all-purpose flour
1/3 cup (60g) millet flour
1/2 teaspoon (3g) corn starch
1/2 teaspoon (1g) salt
3/4 cup (180g) water

For the Fillings (makes 1 pancake):
1 teaspoon spicy hoisin sauce (recipe below)
1 tablespoon chopped scallions
1 tablespoon chopped cilantro
1 tablespoon chopped NY-style deli pickles
1 teaspoon chopped pickled chilies
1/2 beaten egg

For the Spicy Hoisin Sauce:
2 tablespoons hoisin sauce
1/2 tablespoon gochujang (spicy Korean chili paste)
1 tablespoon water

  1. To make the batter, mix everything together and let it rest for 30 minutes at least.
  2. Prep the fillings accordingly; all the ingredients could be chopped roughly.
  3. Make the sauce by mixing all the ingredients together; the sauce should be thick and spreadable.
  4. Heat up a non-stick skillet on medium heat, and test out the skillet by adding few drops of water. Water should sizzle and evaporate quickly.
  5. Ladle about 1/3 cup of batter into the skillet and spread it out with the back of the ladle until nice and thin.
  6. Cook the batter until the sides start to peel off from the skillet. Spread the beaten egg on top and let it cook. Flip the pancake over when the egg is set.
  7. Brush the top of the pancake generously with the sauce and sprinkle on the fillings.
  8. To finish the pancake, fold one side to the middle and the other side over, like folding a letter. Serve as it is or cut it in half. Add more chili sauce if you dare! Bon appétit!
Categories
Recipes

Pancakes – Chickpea Dosa with Potato Masala and Chutney

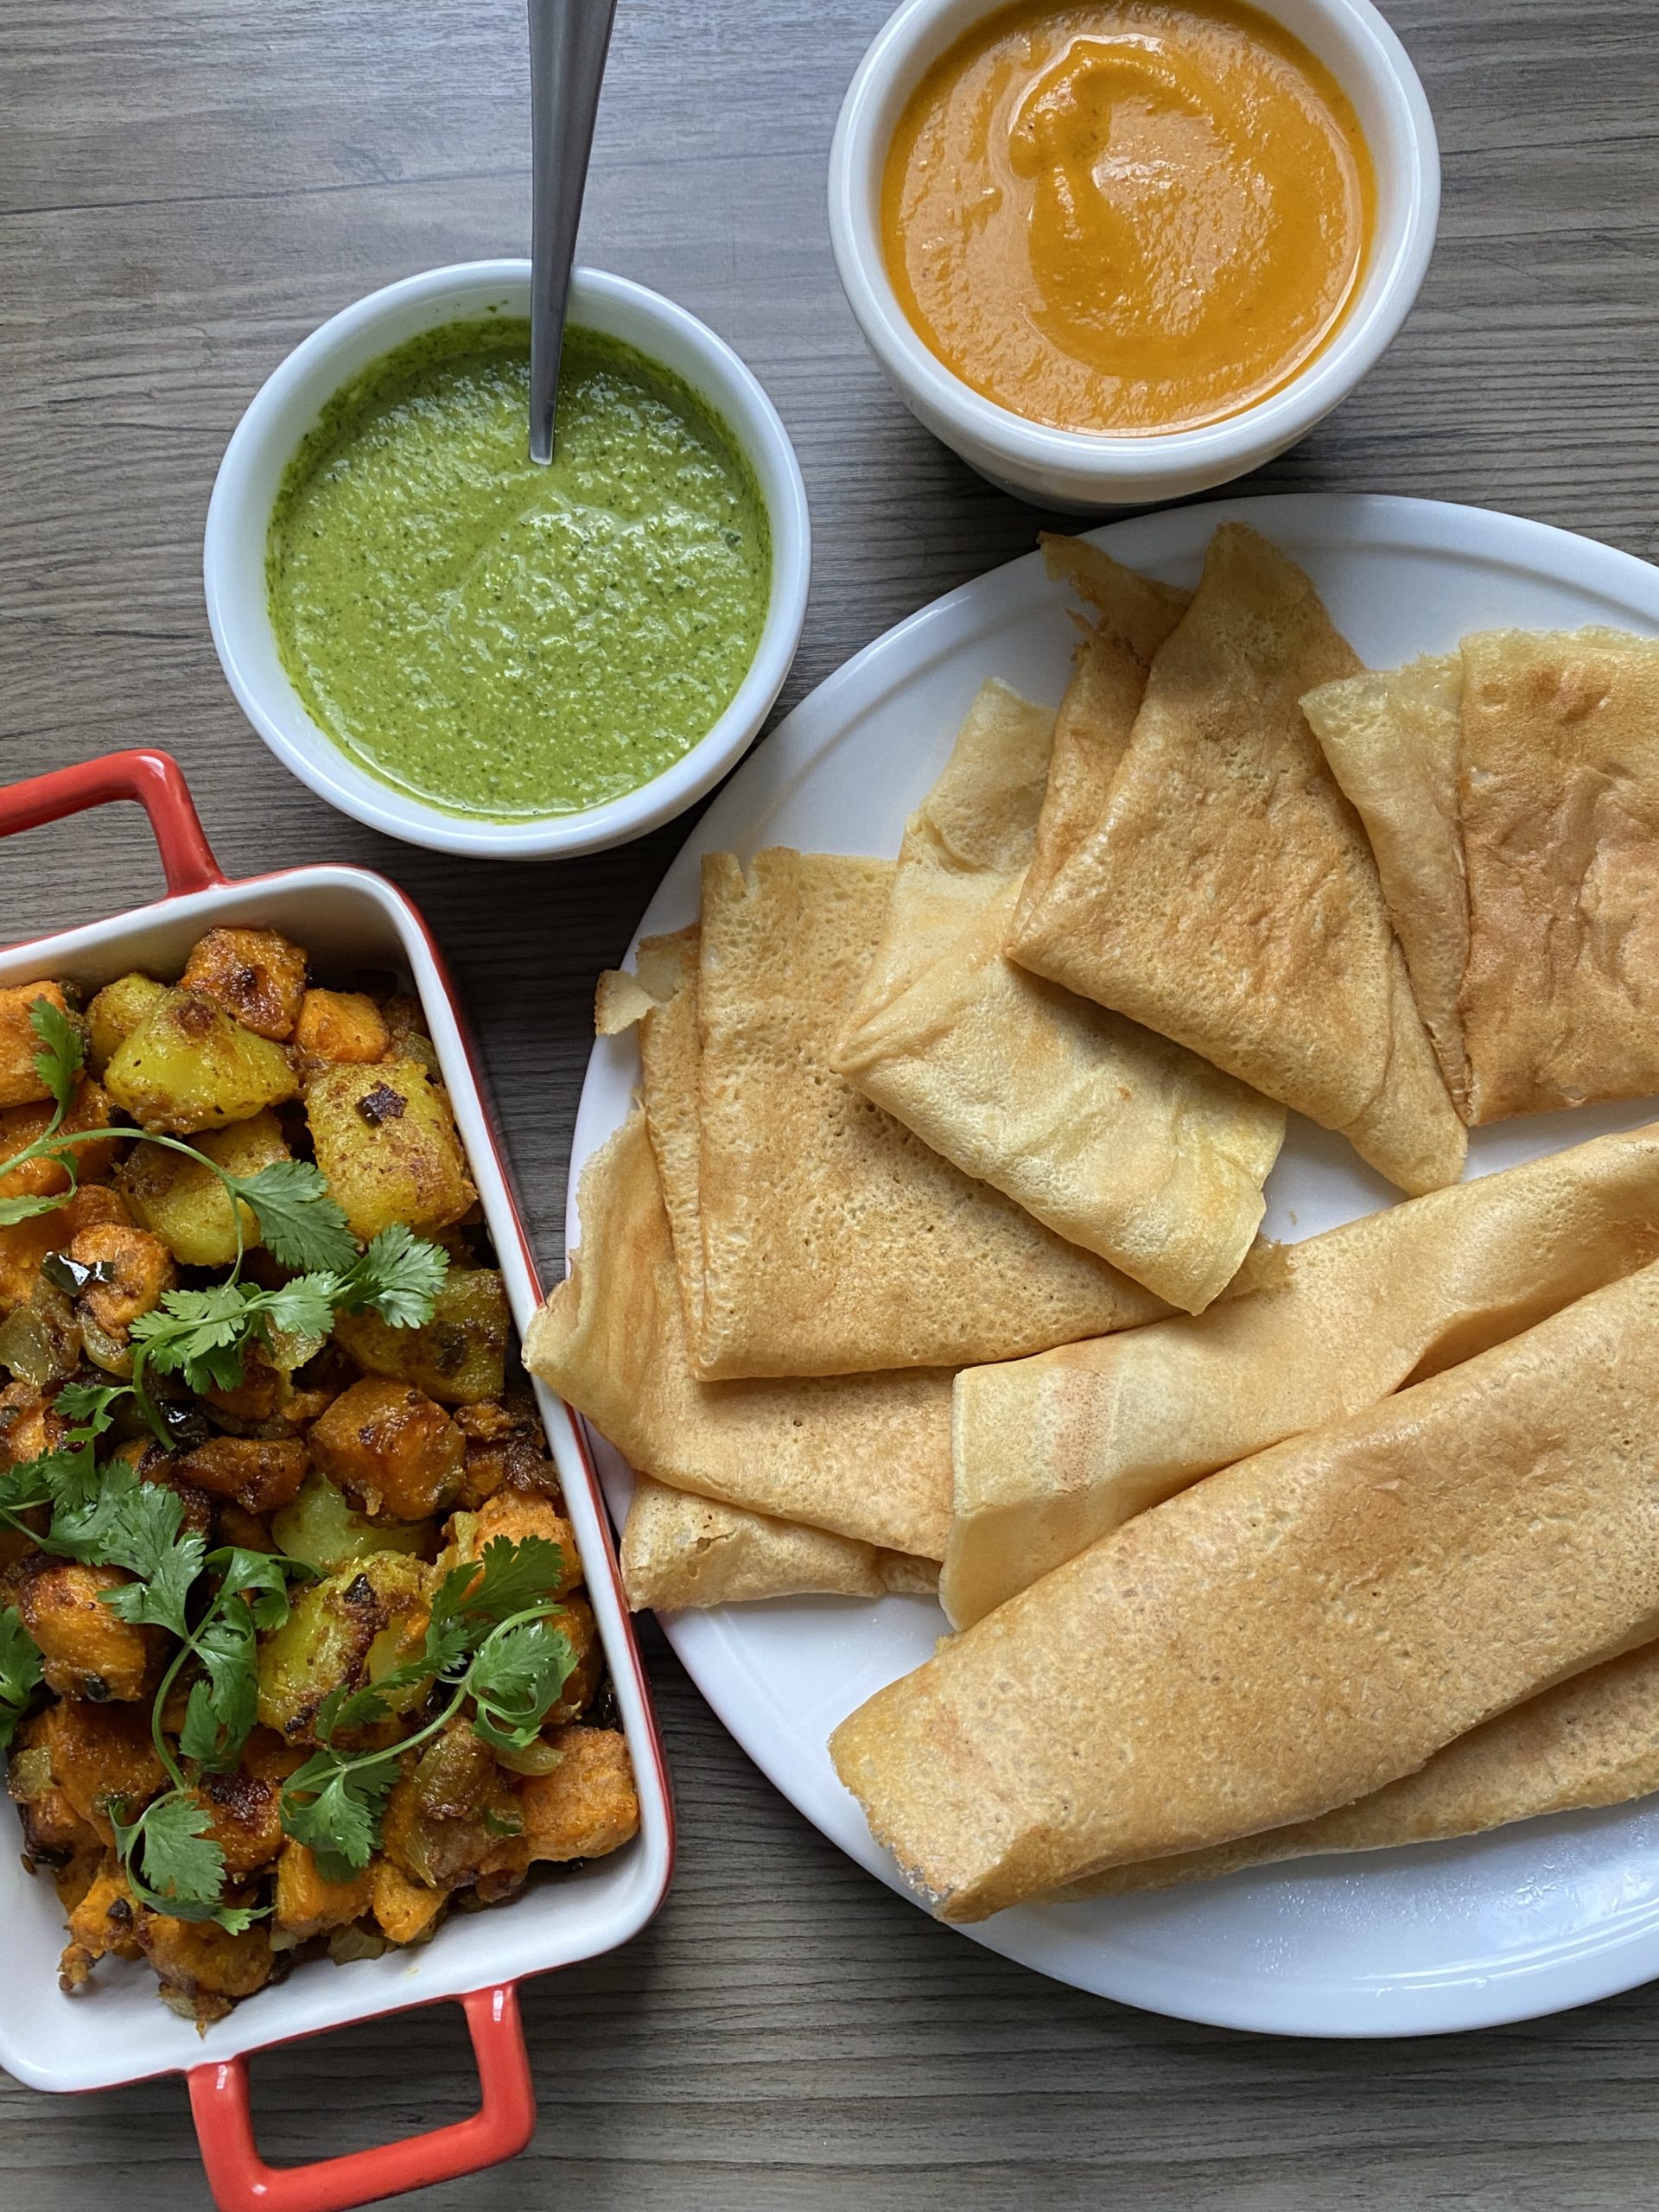
Chickpea Dosa with Potato Masala, by Reggie Soang (click on the image for YouTube video)

Dosa is similar to a European crêpe, in which pancake batter is spread to almost paper-thin and cook on moderate heat until it firms up, and then it is either rolled or folded into a parcel that has fillings or used as a scoop to dip into condiments. Dosa is also cooked until the outside is crispy, which is pleasant in every bite. Dosa is usually made with rice flour and dal. I substitute chickpea flour for dal; chickpea flour brings a pronounced nutty flavor to the pancake and complements the potato masala perfectly. While it takes a bit of practice to learn the technique of making dosa, once the repertoire is mastered, it is useful in making other types of Asian pancakes.

For the latest New Lifestyle Home Cooking Series:

Chickpea Dosa with Potato Masala
Portions: 2 portions

Prep Time: 30 minutes (not including inactive time)
Total Time: 1 hour

Ingredients:
For Chickpea batter:

1 + 1/3 cup (150g) chickpea flour
1 cup (230g) water
1 teaspoon salt

For Rice batter:
1 cup long grain rice (I used Carolina, but basmati is the best)
Water, to wash and soak the rice 
3/4 cup water, for blending the soaked rice

For Chickpea Dosa Batter:
1 cup chickpea batter, from the above recipe
4 tablespoons rice batter, from above recipe
Water, for adjusting consistency, about 1 to 3 tablespoons
pinch of salt

For Potato Masala:
1/4 cup cooking oil, divided in half
1 Idaho potato, cut into bite-size (1-inch chunks)
2 sweet potatoes, cut into bite-size (1-inch chunks)
1 onion, cut into bite-size (1-inch chunks)
1 green bell pepper, cut into bite-size (1-inch chunks)
2 tablespoons chopped ginger (1-inch nub)
2 teaspoons ground cumin
2 teaspoons Madras curry powder
1/2 teaspoon dried chili flakes
1/4 teaspoon turmeric powder
Cilantro to garnish

Optional condiments:
Cilantro Chutney
Tomato Chutney

  1. Rinse rice until water runs semi-clear, and then soak the rice for 4 to 6 hours. Drain the rice and blend it with 3/4 cup of water until a loose pancake batter consistency. Add more water if necessary. Rest the batter for 3 to 4 hours before using. The rice flour needs time to fully hydrate the water. (Leaving the rice batter on the counter overnight gives the best results for flavor and cooking)
  2. Mix chickpea flour with water and salt, and let the chickpea flour hydrate for 1 to 2 hours. (Leaving the chickpea batter on the counter overnight gives the best results for flavor and cooking)
  3. Meanwhile, make potato masala by prepping the veggies. Cook potatoes and sweet potatoes in salted water until tender but not falling apart. Drain and set aside.
  4. In a separate skillet, sauté onions and green bell peppers first until caramelized, and then add garlic and ginger. Cook until fragrant and then add the spices and cook the spices until aromatic.
  5. Add both potatoes into the skillet and cook them on medium heat until the edges pick up some color. Toss both potatoes a couple of times and keep cooking them without too much stirring. Once most of the potatoes are nicely caramelized on the outside, set them aside, and then go back to making dosa. 
  6. Mix the ready chickpea batter and rice batter together accordingly. The consistency should be similar to a tempura batter – thick, yet fluid and drippy. 
  7. Heat up a 9-inch non-stick skillet on medium heat. Test out the heat of the skillet by dripping a few drops of water and it should sizzle and evaporate quite quickly. 
  8. Ladle about 1/3 of cup of the batter into the skillet and using the back of a ladle to spread out the batter in a circular motion until the batter is almost paper-thin. Drizzle a few drops of oil around the edge to help the dosa get crispy (optional step). Slowly peel off the edge of the dosa and roll it into a big cigar or fold it in half. Serve dosa with potato masala and chutney. Bon appétit!
Categories
Recipes

Pancakes – Pajeon

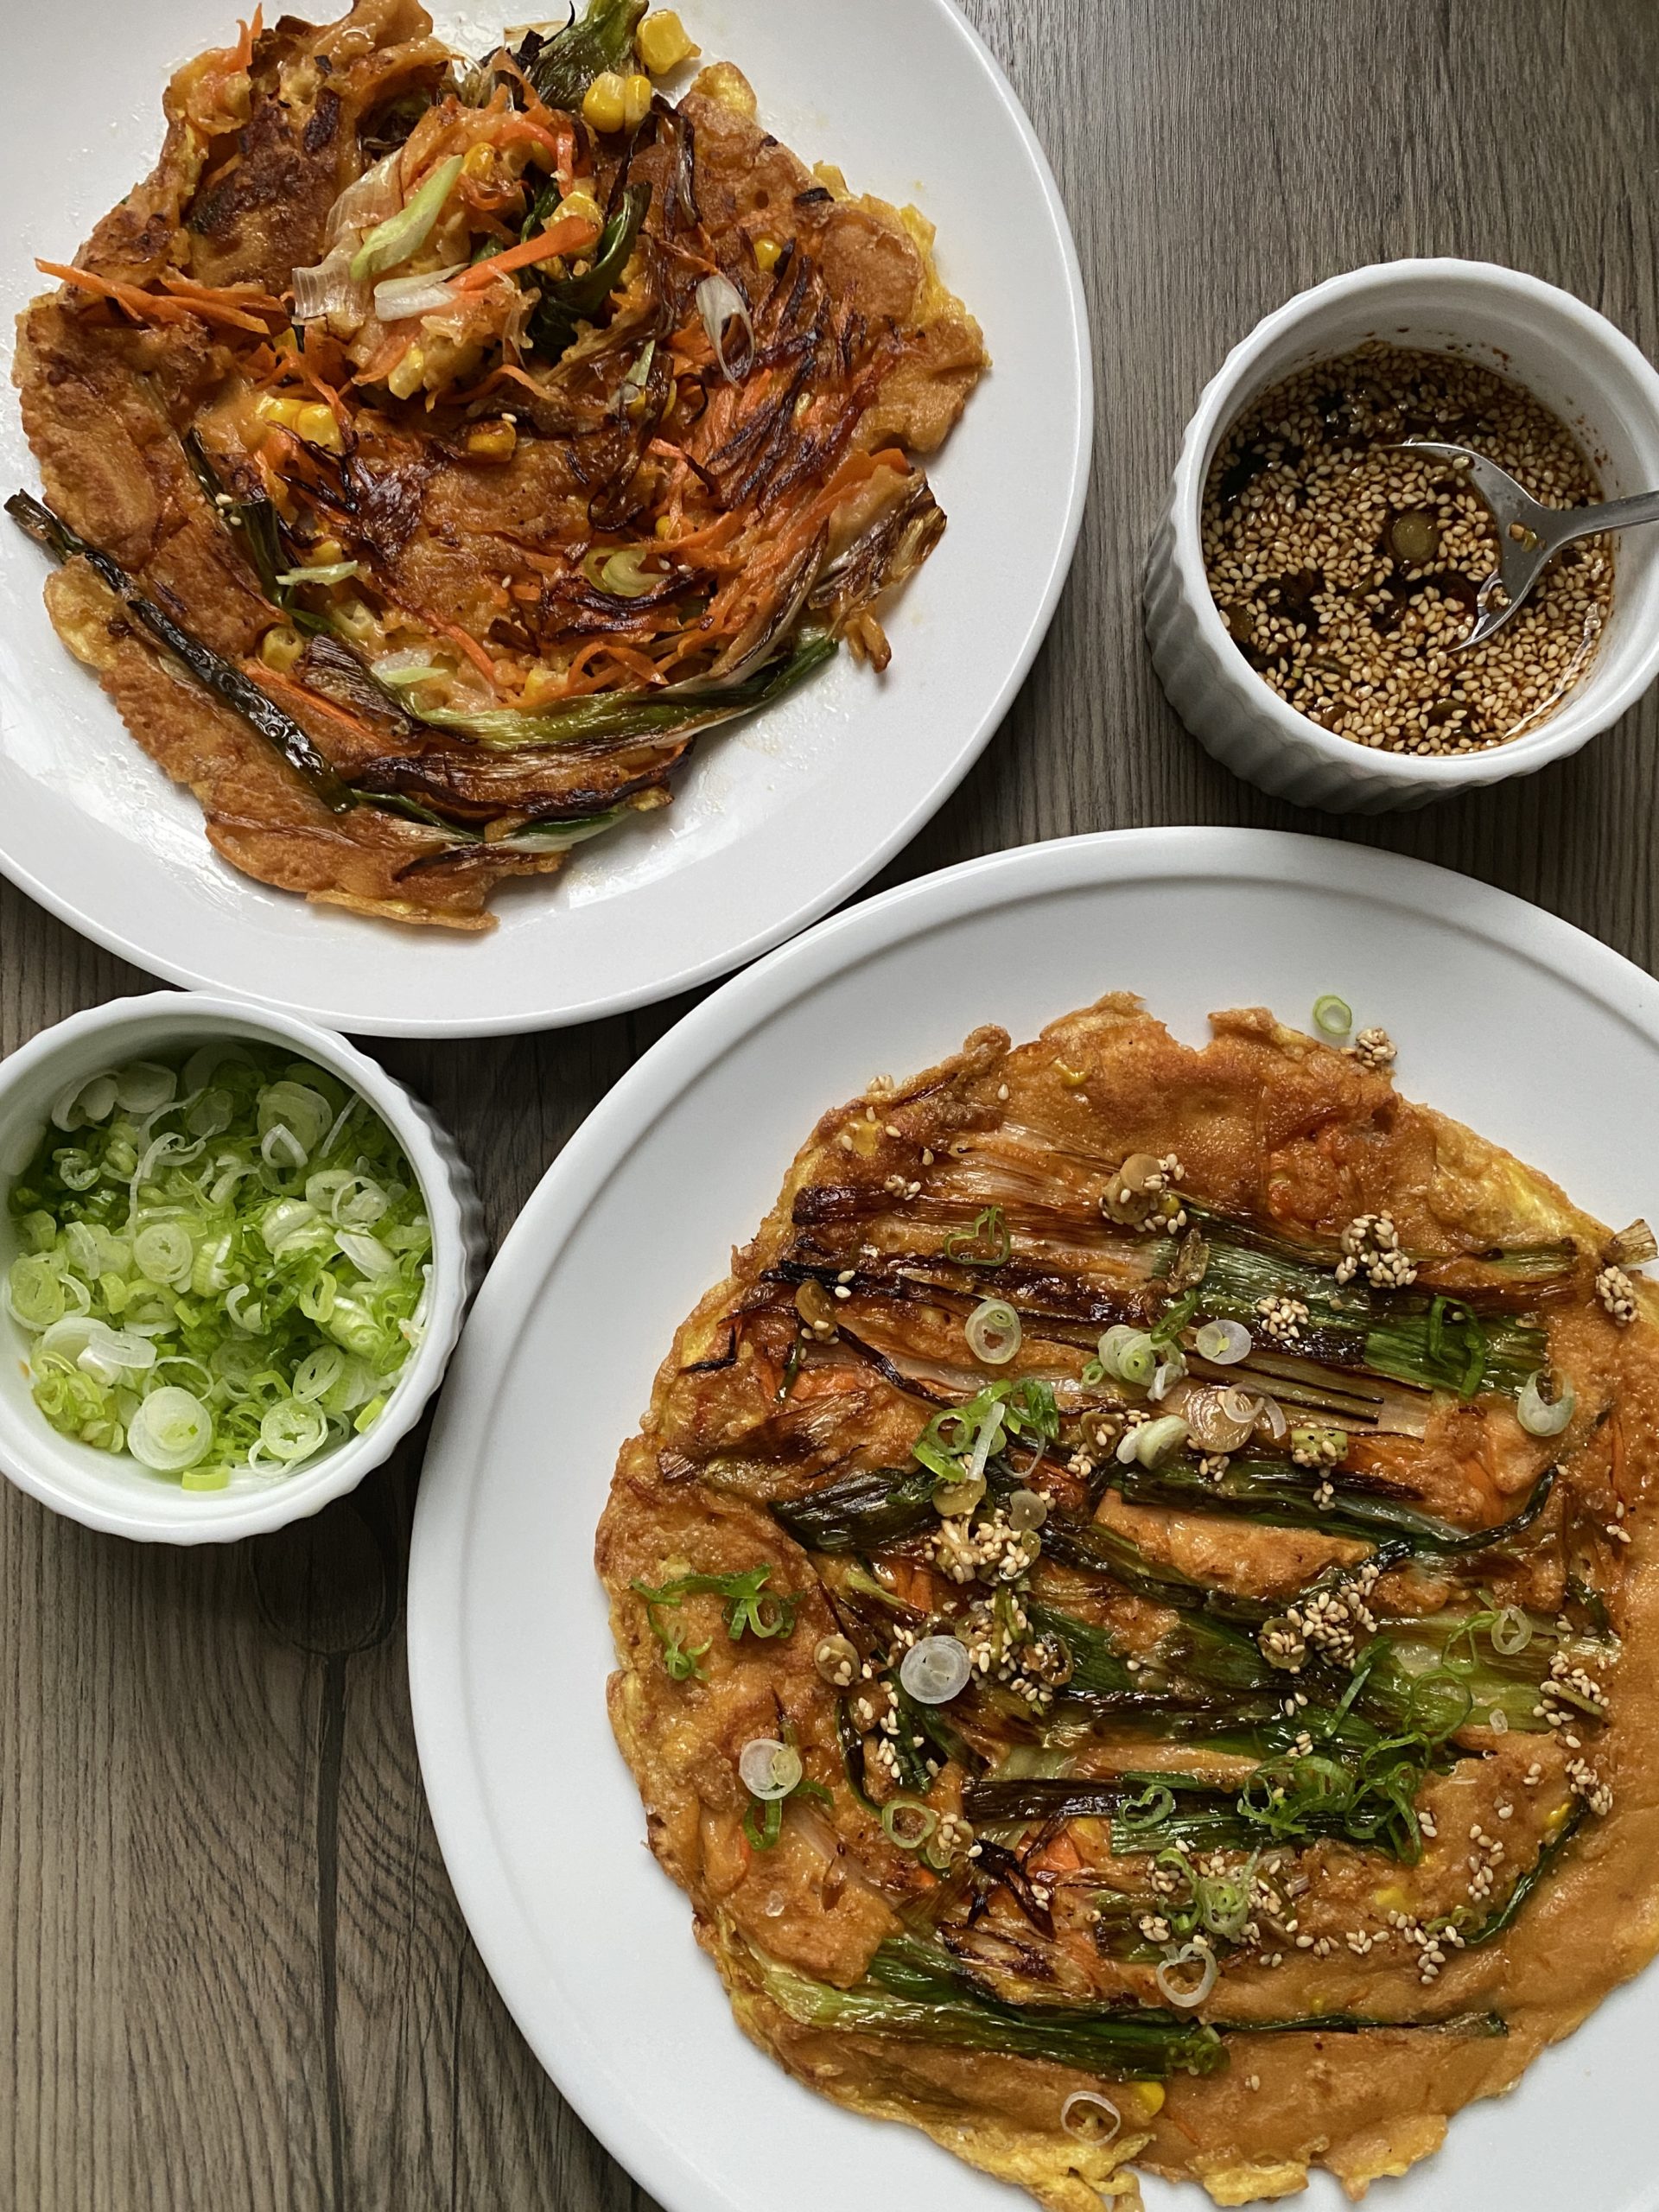
Pajeon, Korean Scallion Pancake, by Reggie Soang (click on the image for YouTube video)

Pajeon is a Korean scallion pancake. I enjoy eating pajeon because of its similarity to the Chinese scallion pancake. Pajeon is crispy on the outside and chewy on the inside; the textural contrast is similar to the flaky and pillowy textures from Chinese scallion pancakes. Pajeon has more scallions, and they are cut bigger, which I prefer sometimes over Chinese scallions pancakes in which scallions are cut into thin coin shapes and used moderately. Pajeon can be enjoyed as a snack or a meal, and each piece must be dipped with a generous amount of the sauce.

For the latest New Lifestyle Cooking Series:

Pajeon – Korean Scallion Pancakes
Serves: make 3 9-inch pancakes

Prep Time: 30 Minutes
Total Time: 45 Minutes

Ingredients:
For the Pancake Batter:
2/3 cup + 1/2 cup (170g) AP Flour
3 + 1/2 tablespoon (32g) rice flour
1 tablespoon gochujang (Korean Chili Paste)
1 + 1/4 cup (290g) water
1 egg

For the Fillings:
3 tablespoons cooking oil
2 cups cut scallions, into 3 to 4 inches long
1 cup cut carrots, in thin strips
1/2 cup corn kernel, from a can
Egg wash, 1 egg mixed with 2 tablespoons of water
2 tablespoons thinly sliced scallions, for garnishes

For the Dipping Sauce:
1 tablespoon soy sauce
2 teaspoons rice wine vinegar 
1/4 teaspoon crushed black peppercorn
1/8 teaspoon dried chilies
1/2 teaspoon sugar
1/2 teaspoon sesame oil
1/2 teaspoon toasted sesame seeds
1 tablespoon chopped scallions, thinly sliced into coin shape
1 tablespoon water

  1. Make the pajeon batter by whisking everything together, and let it rest for at least 30 minutes so the flour could be fully hydrated
  2. Prep the veggies for the fillings accordingly, and make the egg wash by mixing 1 egg with 2 tablespoons of water.
  3. Make the dipping sauce by whisking everything together until sugar is dissolved.
  4. To make pajeon, heat up a 9-inch non-stick skillet on medium-high heat with oil. When the oil shimmers, add scallions (the ones cut into 3 to 4 inches long) and cook until the edges are getting some color and the scallions are wilted.
  5. Add carrots and corn on the top of the scallions and pour 4 ounces of pancake batter over the veggies to cover completely. 
  6. Once the batter is set around the edge, drizzle 2 tablespoons of egg wash around the pancake. Cook until the eggs are crispy on the edge. Flip the pancake over and cook until the other side of the pancake is browned and crispy. Flip the pancake over again to make sure the first side is browned and crispy as well.
  7. Slide the pancake onto a plate and divide the pancake up for 6 wedges. Repeat with the rest of the batter and ingredients. Serve pajeon, Korean pancakes, with the dipping sauce. Bon appétit!
Categories
Blog

Raising My Fist – Archive From my Weekly Newsletter (6/3/2020)

Vote Trump Out, by Reggie Soang

There is no better way to start this newsletter by being completely truthful about my current feelings towards the state of our nation.

I am saddened, angered, and outraged at what has happened in our nation.

First and foremost, I am saddened by the killing of African Americans due to police brutality. I am outraged by the constant injustice African Americans have to endure because of our broken legislative, executive, and judicial branches at all levels. I am saddened that our nation has been complacent* about racism until today. And today, I am writing to admit that I am one of the reasons to blame because I never took the time to understand and learn about racism.

Merely having black or Hispanic friends does not make me anti-racism. Racism is rooted in legislature and institution, which means, laws are made unfairly to grant advantage and superiority to a certain ethnic group. Without showing the deepest sorrow and compassion towards the disadvantage, and using my privilege to help them take another breath, I am not being anti-racism. I have been complacent*; I focus on being a fair boss and a good friend to everyone, but I fail to walk in black people’s shoes. I do not know what it feels like to be a black person. I do not know what it feels like to be racially profiled to the extent where physical harm is executed on me. And let’s not forget the Hispanic people who have been publicly taunted by our elected President.

I am angered and outraged by the spin that people have put on to change the narrative. Americans protest for injustice and brutality, not against the nation, the flag, and what the country once stood for. Stop worrying about the flag and protect its citizens. This is the exact reason why police brutality is condoned, the focus is shifted, and the wrong leaders are elected, and this is also the textbook play used by our armed force to maneuver the media and corrupt our minds. Ignorance is bliss, and we have chosen to be blissful over grieving for our loss; equality and humanity. Do not change and maneuver the narrative, because she isn’t and hasn’t.

I am taking actions, and I am very new at doing this. I am spending time to understand the structure of our government. The elected officials who matter the most in the immediate reforms in police department and criminal justice system work at the state and local levels. I have the privilege to stay home and do my research. I can pay for my internet and log onto social media. I have to start somewhere, and this is where I choose to walk the green mile with all the African Americans. And I hope you could do the same.

Last but not least, I am ending this letter with a few resources that I used today to start the healing process.

If you live in New York***, and are on board with me, please either call or e-mail the following senators or assembly members to urge them to repeal 50-a (A2513/S3695) fully, without any amendments or modifications.

Andrea Stewart-Cousins, New York State Senator, Majority Leader
Carl. E. Heastie, New York State Assembly Member, Speaker
John J. Flanagan, New York State Senator, Minority Leader
Joseph A. Griffo, New York State, Deputy Minority Leader

I chose to reach out to both majority and minority leaders because I firmly believe both sides need to hear what a person has to say about protecting humanity. It will be in his or her conscience to decide if he or she would like to protect basic human rights.

***If you don’t live in New York, please follow the same format, call your senators and assembly speaker in your states and urge them to reconvene and pass legislation that will end shielding police from getting disciplined and investigated for violating our constitutional rights.

If you are like me, who only has a basic understanding about civil rights movement (not talking about the literal movement back in the late 40’s to 60’s, but the overall continuous effort throughout the American history), Obama Foundation offers all the resources and information that you need to know about fighting for justice. Change is a journey and process, and if I can’t fall in love with the process, then results will always disappoint me.

If you have gotten this far, I thank you for your time and patience. I chose to change. I will not allow my children (I will be a father one day) to witness my complacency* and cowardliness. I stand for Black Lives Matter.

On the lighter note, on this date in 1992. When I need to take a deep breath, I look for sports highlights!

With much love,
Reggie

*Updates are made on 6/5/2020.
     – Complacent has replaced Complicit from the original content
     – Complacency has replaced Complicity from the original content     

Categories
Recipes

Pancakes – Okonomiyaki (Osaka Style Inspired)

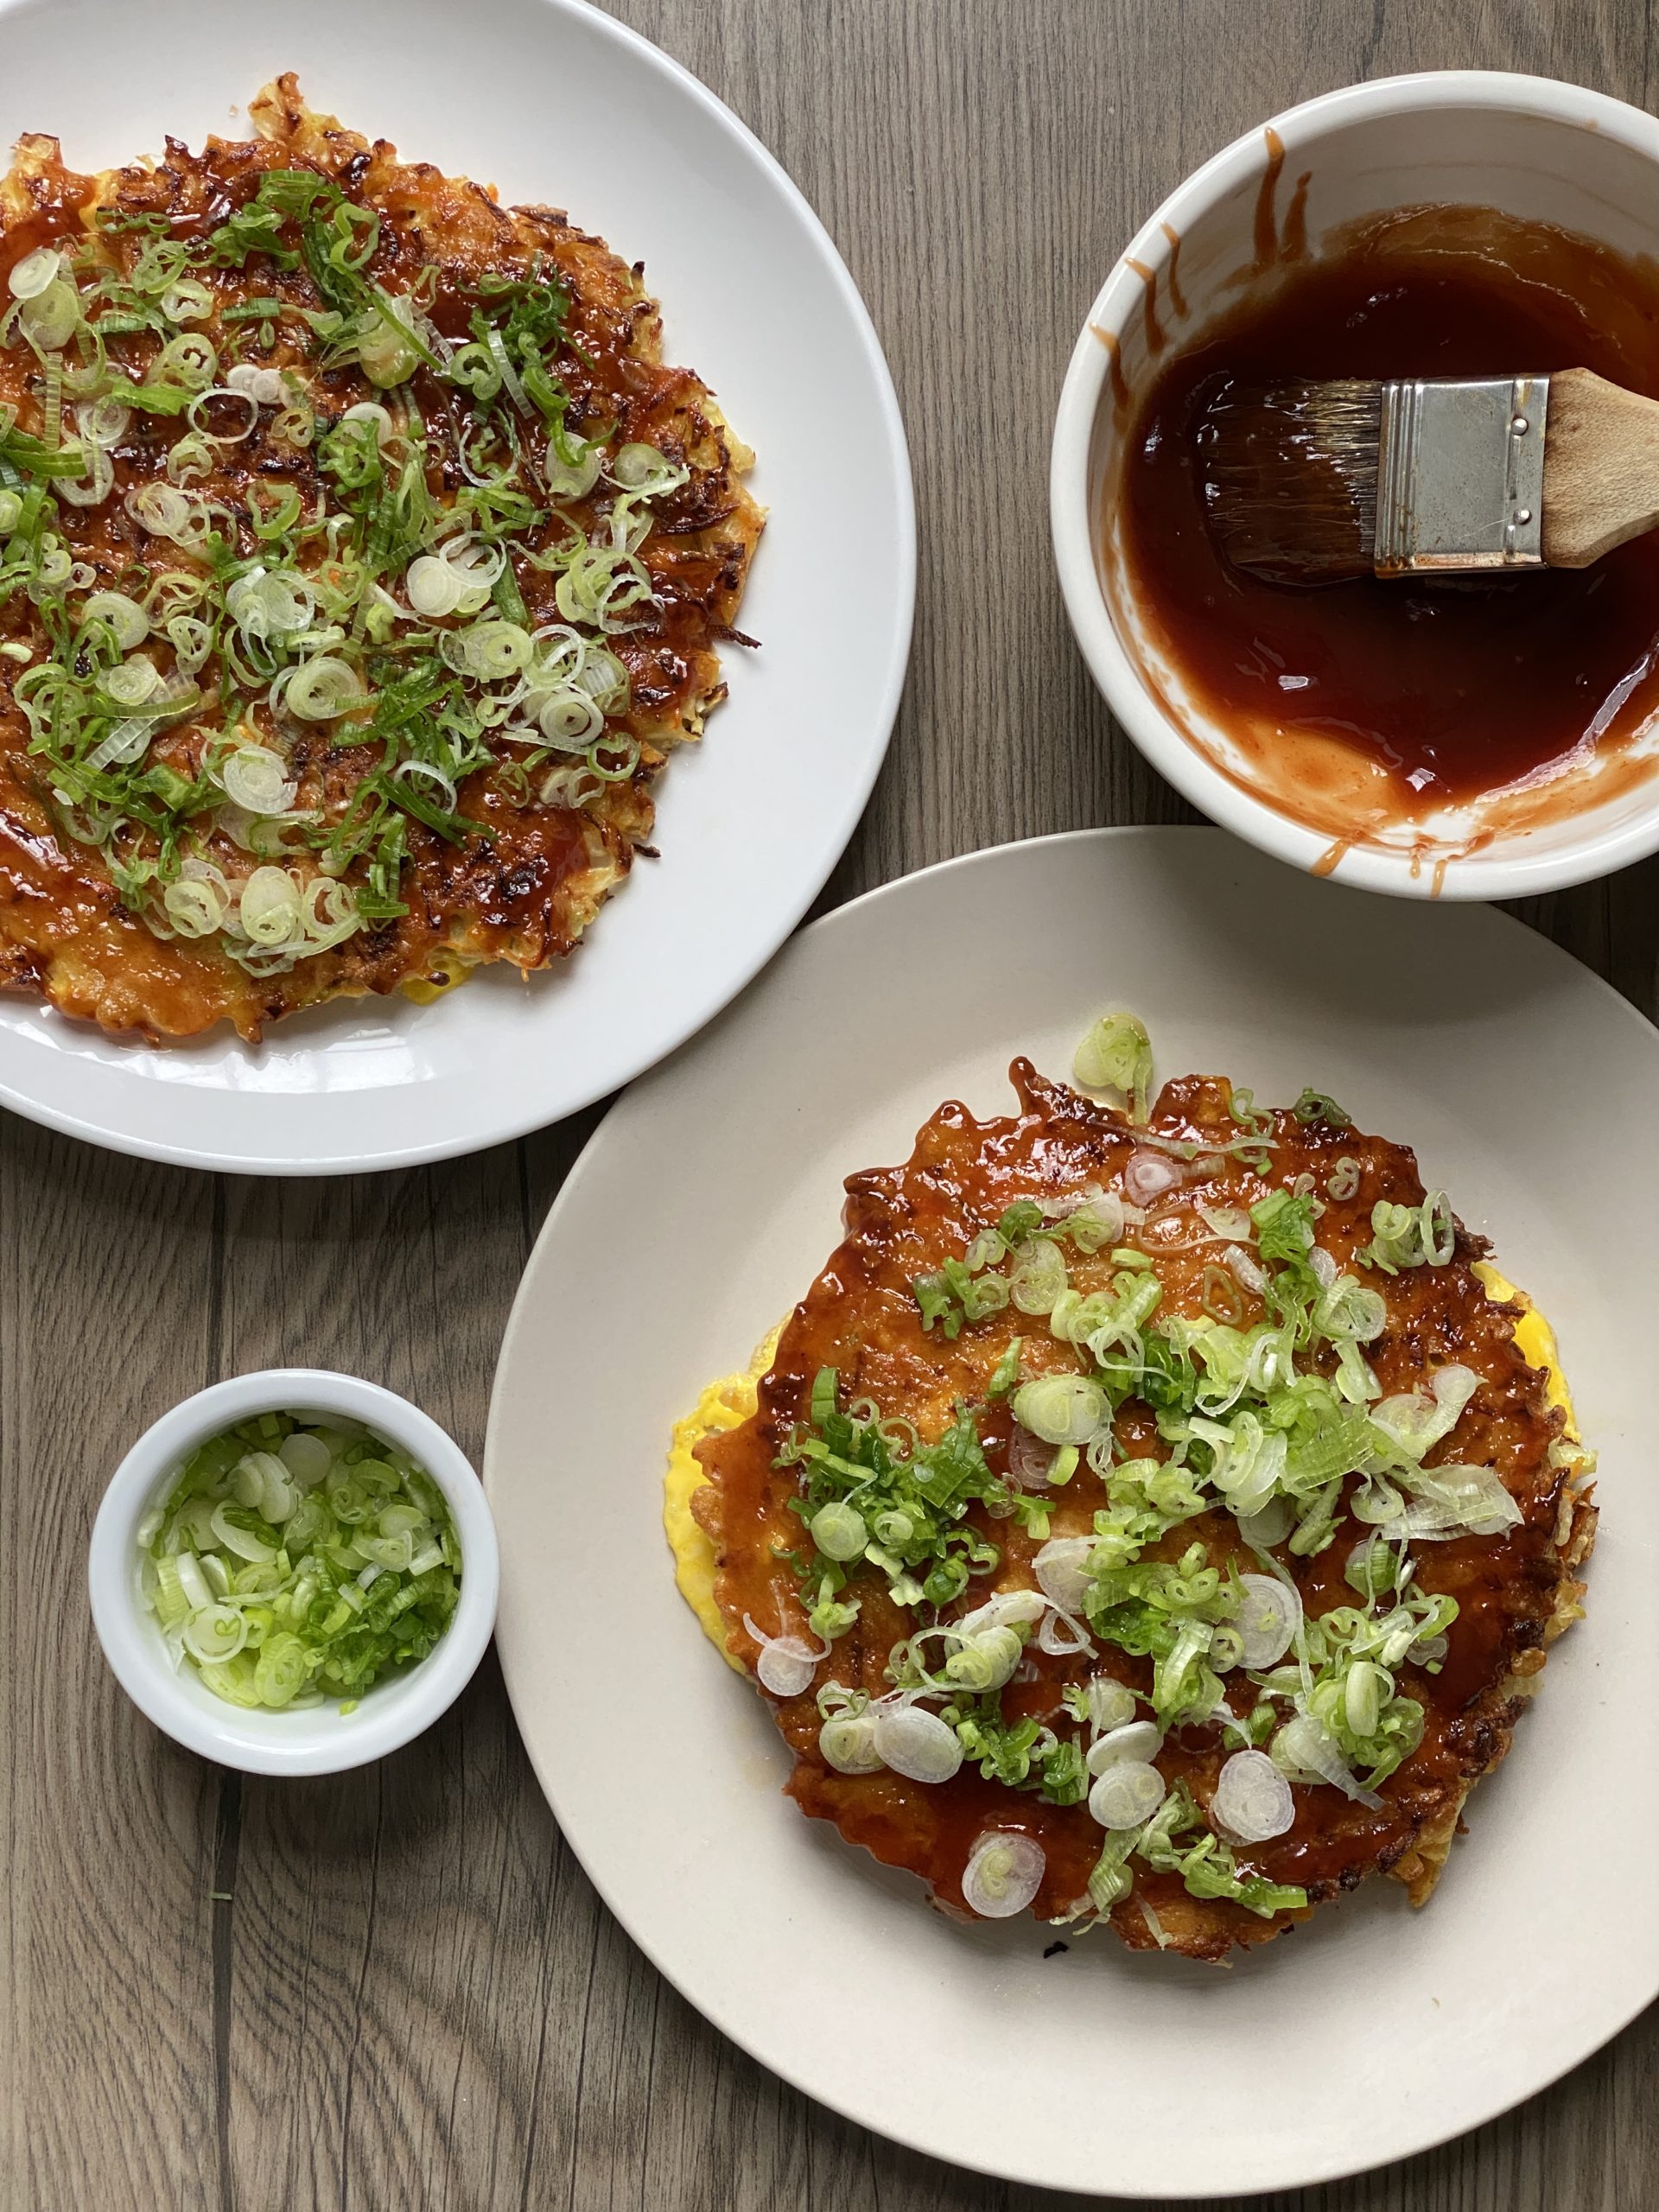
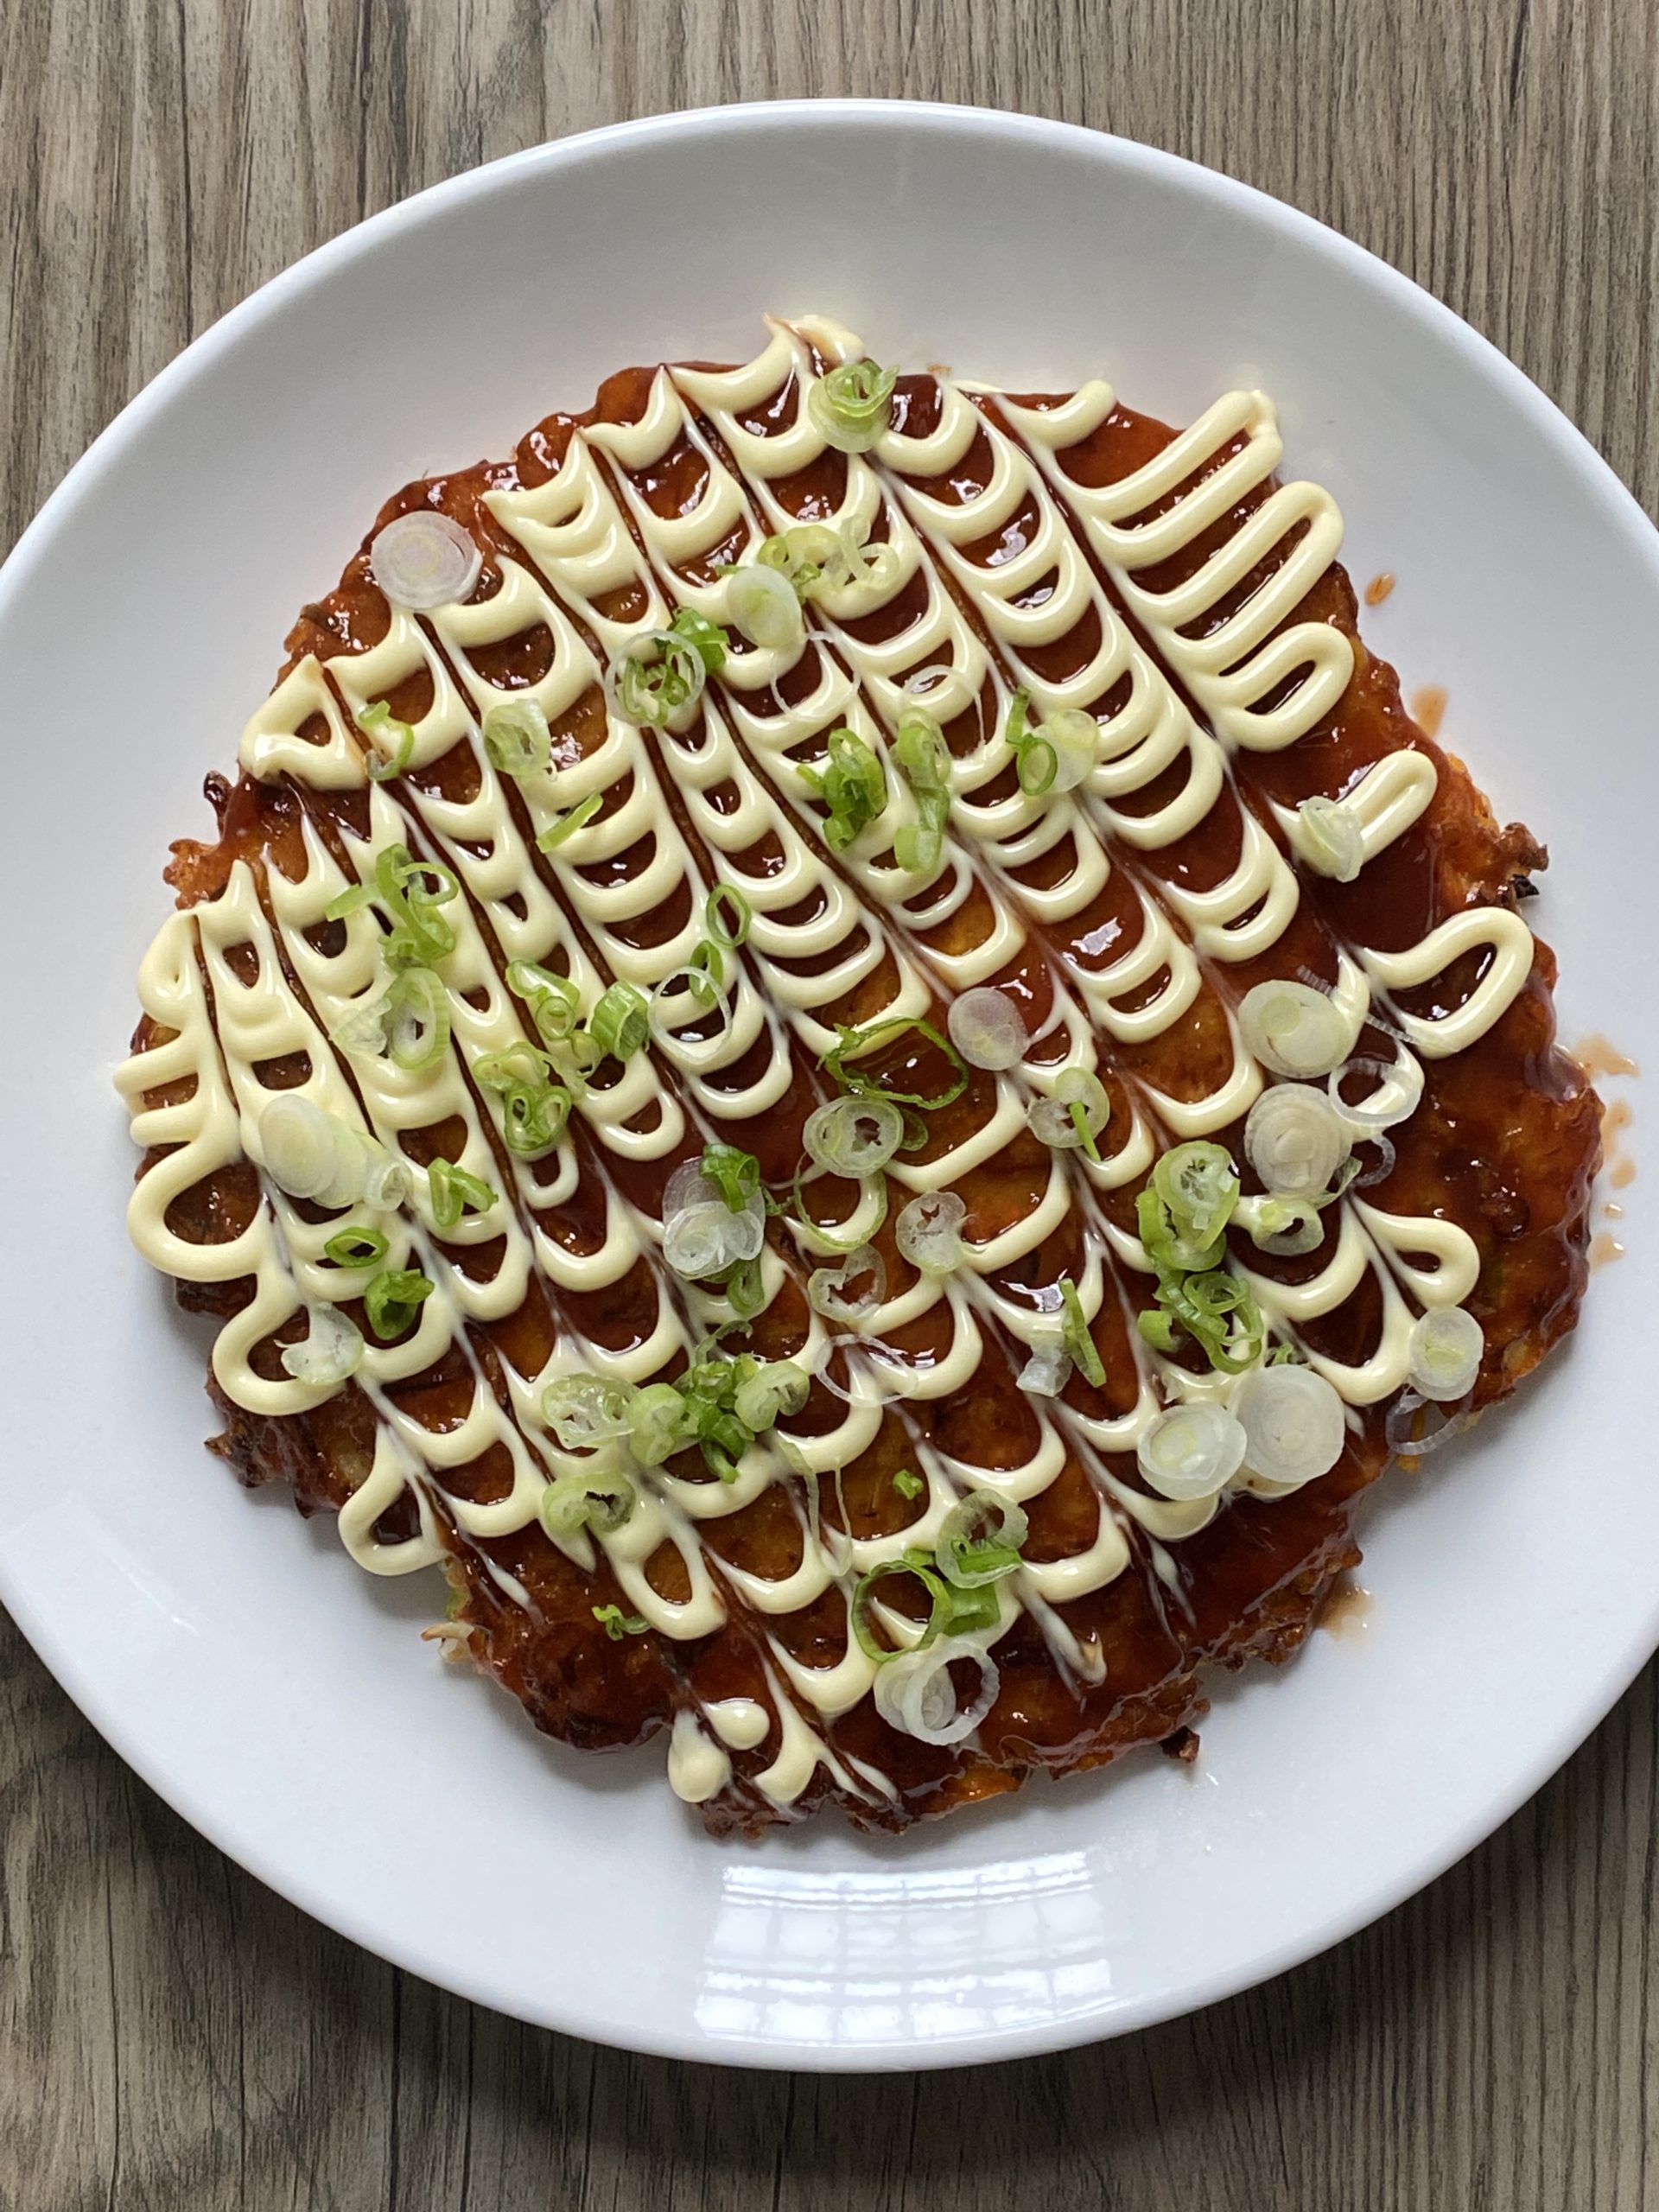
Osaka Inspired Okonomiyaki, by Reggie Soang (click on the image for YouTube video)

Okonomiyaki is a pancake, pizza, or rosti, whichever you prefer, or not, but it’s a batter fried in a pan. The word okonomi means “whatever you like”, and yaki means to grill. Therefore, okonomiyaki is to “grill whatever you like”. There are two styles of okonomiyaki, Osaka-style and Hiroshima-style. This recipe is an Osaka-inspired because I don’t have the bonito flakes and nori powder to make it a traditional recipe. However, with the right batter and sauce, my version is as close and delicious as it gets outside of Japan. Remember…okonomiyaki is grilling whatever you like; be creative and bold, and cook whatever you like!

For the latest New Lifestyle Home Cooking:

Pancakes – Okonomiyaki
Serve: make 3 pancakes

Prep Time: 15 minutes
Total Time: 40 minutes

Ingredients:
1/2 doze Eggs
Chopped scallions, for garnish
Shredded mozzarella cheese (optional)

For the Batter:
1 cup (125g) all-purpose flour
1/4 cup (45g) potato starch
1 + 1/2 teaspoon baking powder
2 eggs
1 cup (205g) stock (or dashi)

For the Filling:
1/4 head (3 + 1/2 cup) finely chopped cabbage
1 cup grated carrots
2 tablespoons chopped pickled ginger
1/3 cup canned corn kernels, or fresh
2 tablespoons chopped scallions

For the Sauce:
4 tablespoons ketchup
3 + 1/2 tablespoons Worcestershire sauce
2 tablespoons oyster sauce
1 + 1/2 tablespoon sugar
Kewpie Mayonnaise (Japanese Mayonnaise)**

**If kewpie mayonnaise is not available, here’s the homemade version: (just mix everything together)

1 cup Hellman’s mayonnaise
2 tablespoons + 1 teaspoon rice vinegar
1/2 teaspoon salt
1 teaspoon Dijon Mustard
1/4 teaspoon garlic powder
3/4 teaspoon MSG
1/4 teaspoon sugar

  1. To make the batter, mix flour, potato starch, and baking powder together first. Add eggs and stock and whisk to combine. Don’t whisk too much; avoid creating excess gluten in the batter. 
  2. To prep the filling, cut and mix the veggies together. Pour the batter from the previous step into the filling and use a spoon to stir and fold the batter into the veggies. 
  3. For the sauce, combine everything from the recipe above and mix together.
  4. To make Okonomiyaki, place a non-stick skillet on medium heat. Heat 2 tablespoons of oil until it shimmers. Scoop enough veggie batter to cover 3/4 of the skillet. Sprinkle some mozzarella cheese on and add more batter to cover the cheese. Cook the first side until golden brown and then flip okonomiyaki over to cook the second side.
  5. Once the second side is golden brown, slide the pancake out onto a plate. Set aside. While the skillet is still hot, crack one or two eggs into it and stir to cook. Add a pinch of salt and then slide the okonomiyaki onto the egg(s). Brush the top of okonomiyaki with sauce generously and then garnish with scallions and serve. Bon appétit!

*Optional step, zigzag the kewpie mayonnaise across the okonomiyaki, and then use a skewer to drag the lines perpendicularly to form the pattern you see below.

Adding Kewpie mayonnaise, an optional step, by Reggie Soang


Categories
Recipes

Homemade Taiwanese Food – Pork Ragu, Tomatoes and Eggs, Fried Rice

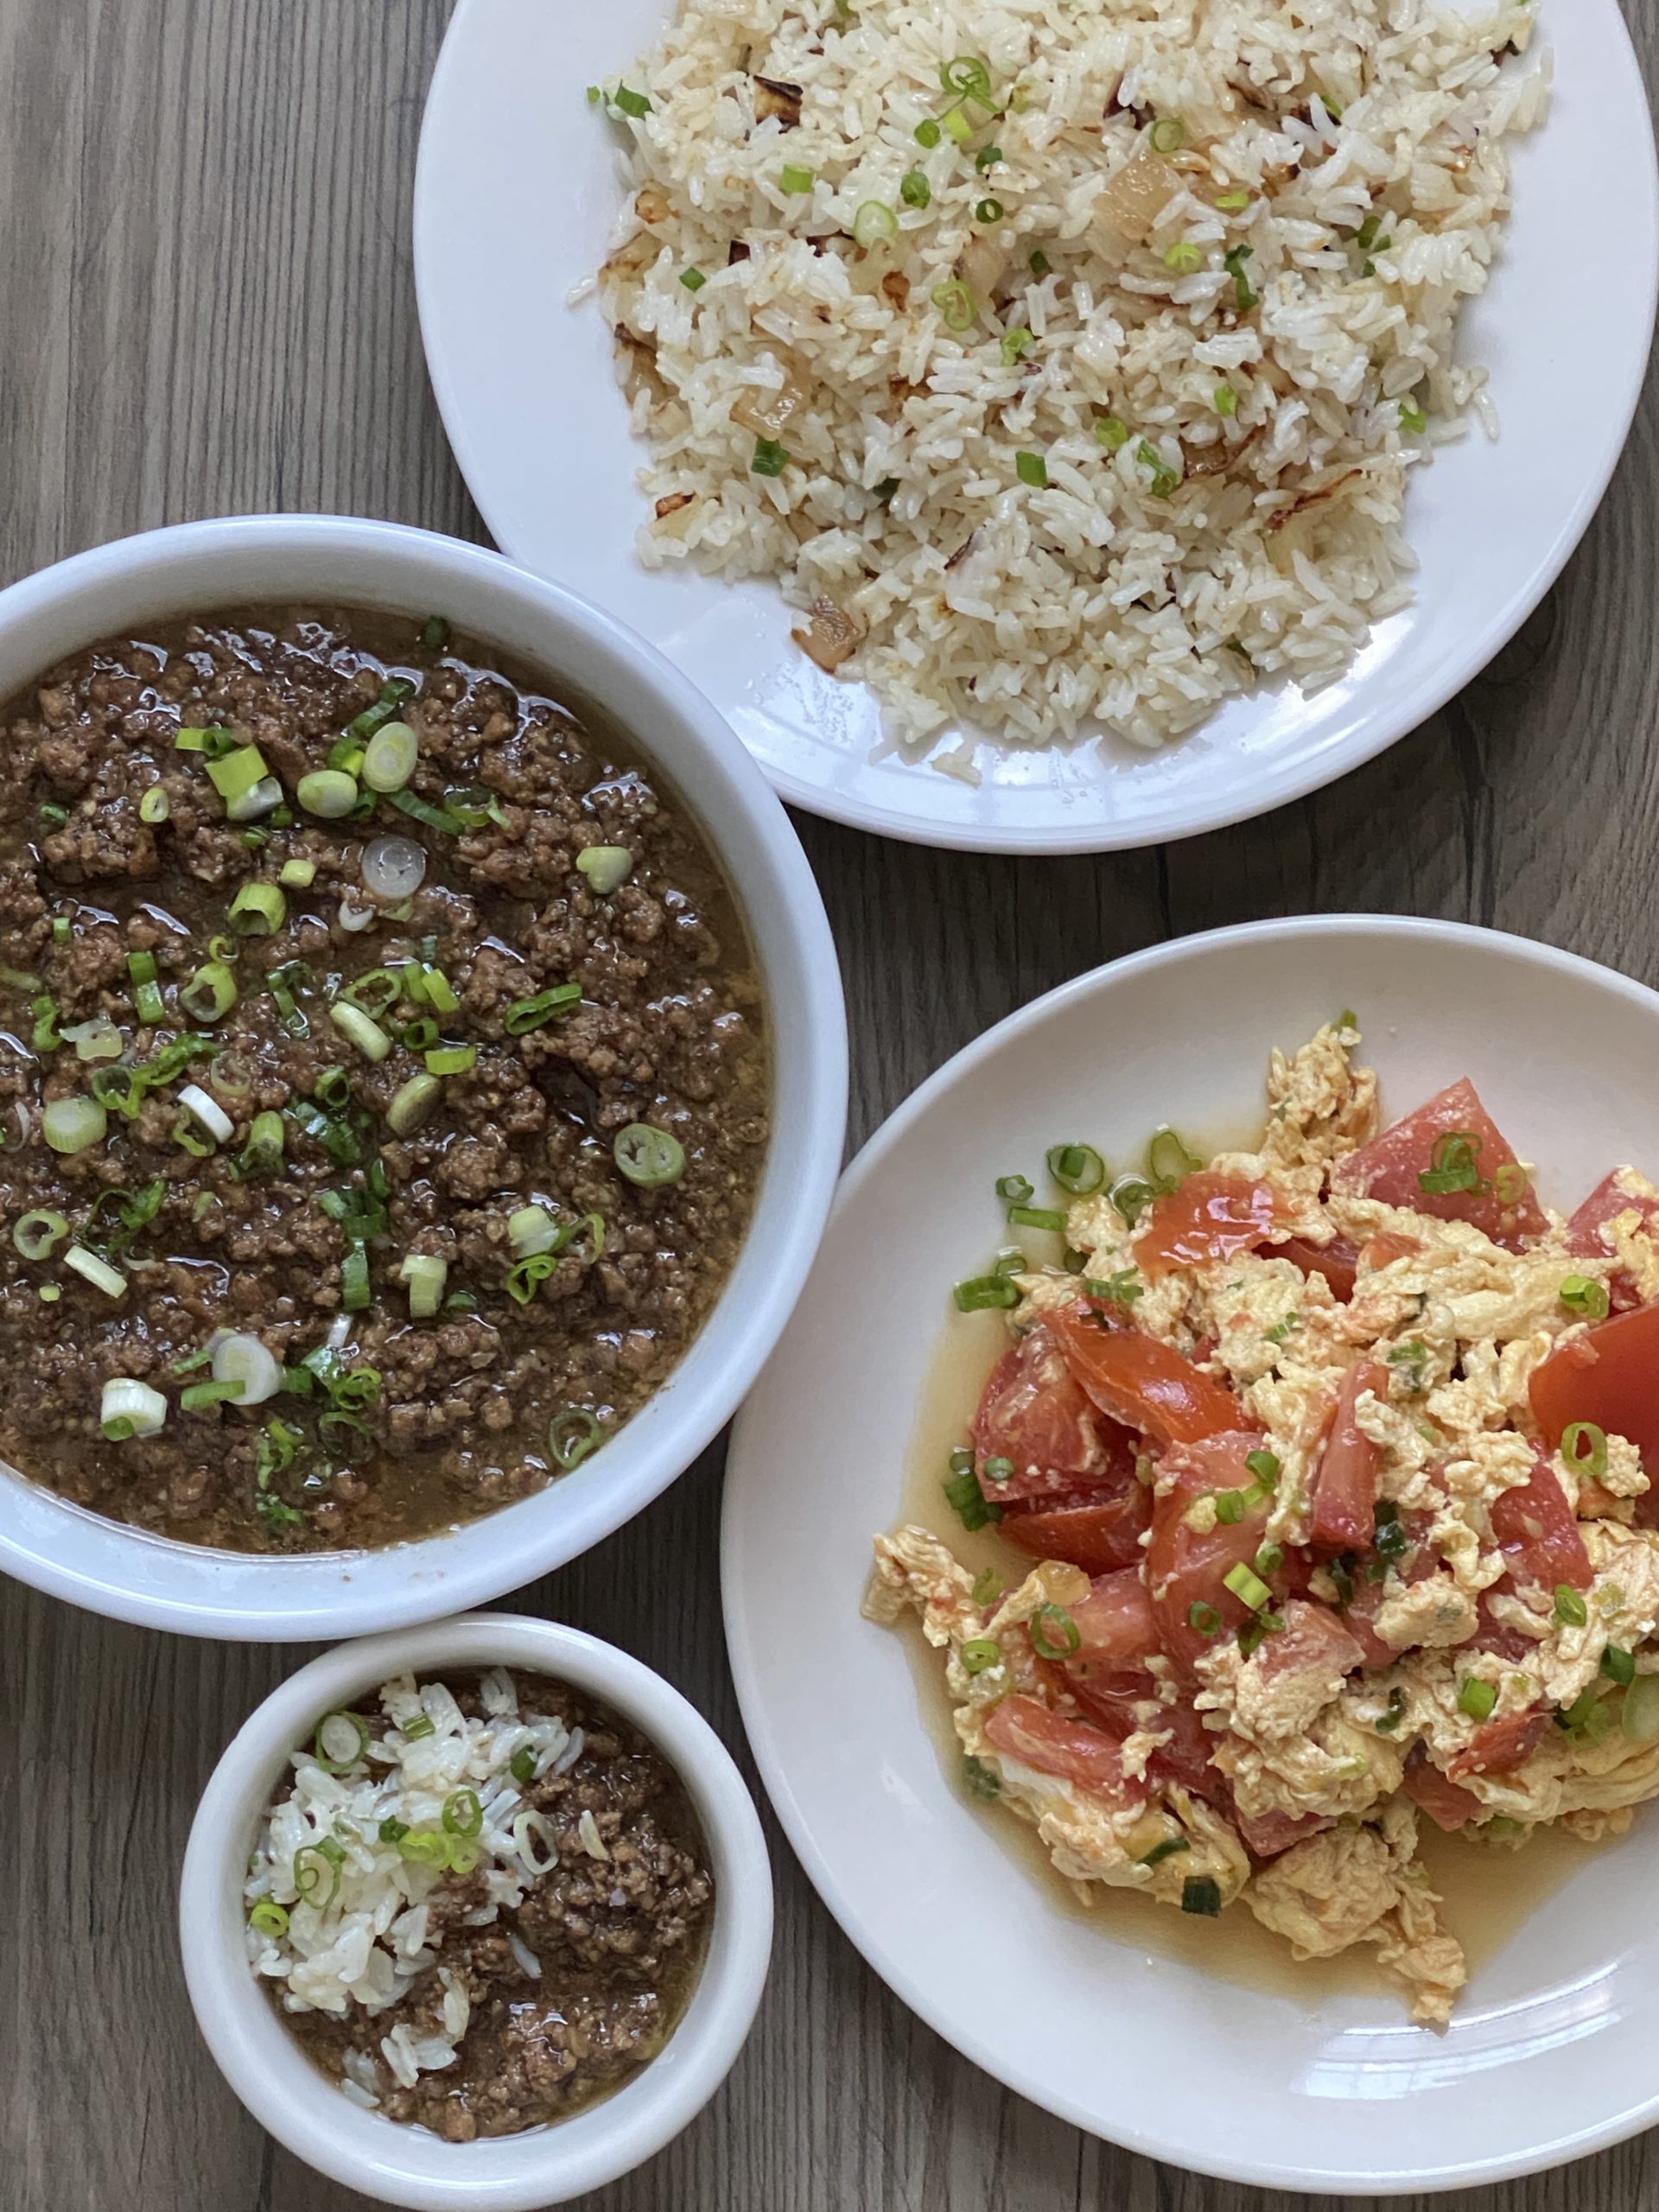
A Homemade Taiwanese Meal – Pork Ragu, Tomatoes and Eggs, and Fried Rice, by Reggie Soang

A homemade Taiwanese meal has rice, a soy sauce braised pork, and a vegetable dish. Taiwanese pork ragu is one of the most popular dishes, followed by the stir fry tomatoes and eggs. These two dishes are quintessential Taiwanese food and every family has its own version. Fried rice is often served because Taiwanese family cooks rice a few batches at a time; therefore, leftover rice is a “pantry stable”. Taiwanese meal is simple and straightforward. Taiwanese food is about using the freshest ingredients and a variety of spices. Taiwanese food is delicious and wholesome.

For the latest New Lifestyle Cooking Series:

Homemade Taiwanese Meal: Pork Ragu, Tomato and Eggs, Fried Rice
Serve: 4 to 6 people

Prep Time: 15 minutes
Total Time: 45 minutes

Ingredients:
For the Taiwanese Ragu:
3 tablespoons cooking oil
1 +1/2 pound ground pork
1 cup diced onions, large dice
3 cups diced eggplant, large dice
10 cloves/1 head fresh garlic
6 button mushrooms
2 tablespoons Chinese five-spice*
1/4 cup soy sauce
2 tablespoons mirin
2 teaspoons sugar
400g chicken stock or water
More water for adjusting consistency

*Chinese five-spice bland:
2 teaspoons star anise
1 teaspoon fennel seeds
1 teaspoon cloves
1 teaspoon Szechuan peppercorn
1 stick cinnamon

Grind everything into powder form

For the Tomato Egg Stir Fry:
2 tablespoons cooking oil
1 large beefsteak tomato, diced to bite size
4 eggs, beaten
1/2 teaspoon salt
1/4 teaspoon MSG
1/2 teaspoon sugar
2 tablespoons chopped Scallions

For the Fried Rice:
2 tablespoons cooking oil
1/2 cup chopped onions
1/4 cup chopped scallions
4 cups leftover/day-old long-grain white rice
1 teaspoon salt
1/2 teaspoon MSG

  1. Add chopped onions, eggplant, garlic, and mushroom to a food processor and blitz until fine, like the size of ground pork. Set aside.
  2. To make the pork ragu, set up a medium-sized pot on high heat, add the oil. Once the oil starts to shimmer, add ground pork and break up the chunks. Cook the pork until it is no longer pink.
  3. Add the veggie blend from step 1 and continuously cook the ingredients on high heat. Once the bottom of the pot picks up a little color and it is sizzling a little louder, add the spices and cook until fragrant.
  4. Add soy sauce, mirin, chicken stock or water, and sugar, and bring the pot to a simmer. Add more water to adjust the consistency. The ragu will thicken but should still be fluid and juicy. Simmer the sauce for 30 minutes. Add more water if the ragu gets too thick and dry during the simmering.
  5. Meanwhile, make tomato egg stir fry and fried rice.
  6. Set a non-stick skillet on high heat and add oil. Once the oil shimmers, sauté tomatoes, and season with salt, sugar, and MSG. When the tomatoes start to wilt on the edge, add scallions and keep cooking on high heat until scallions are fragrant. Pour in the eggs and stir vigorously and turn off the heat. The eggs will continue to cook with the residual heat. The eggs should be barely done and soft. Set aside and make fried rice and check on the ragu; the ragu should be aromatic, sweet, and barely too salty ( the fried rice is going to balance out the flavor)
  7. Wipe down the non-stick skillet, and put it back on high heat. Add the oil and when the oil shimmers, add onions and cook until the edges are picking up some color.
  8. Add the rice and let the rice sizzle in the hot skillet for 10 seconds before tossing and flipping. Season the rice with salt and MSG. The fried rice should be a little bland because the pork ragu will add a lot of flavor to it.
  9. Toss the fried rice a couple times and let it sizzle again for another 10 seconds. Do this procedure a few times until rice is hot and fluffy.
  10. At this point, the ragu should be finished; it should be creamy, saucy, and fragrant.
  11. To serve, put some rice in a bowl and ladle pork ragu to cover it. Serve tomato egg stir fry on the side with extra chopped scallions. Bon Appétit!
Categories
Recipes

Chinese Food – Kung Pao Chicken

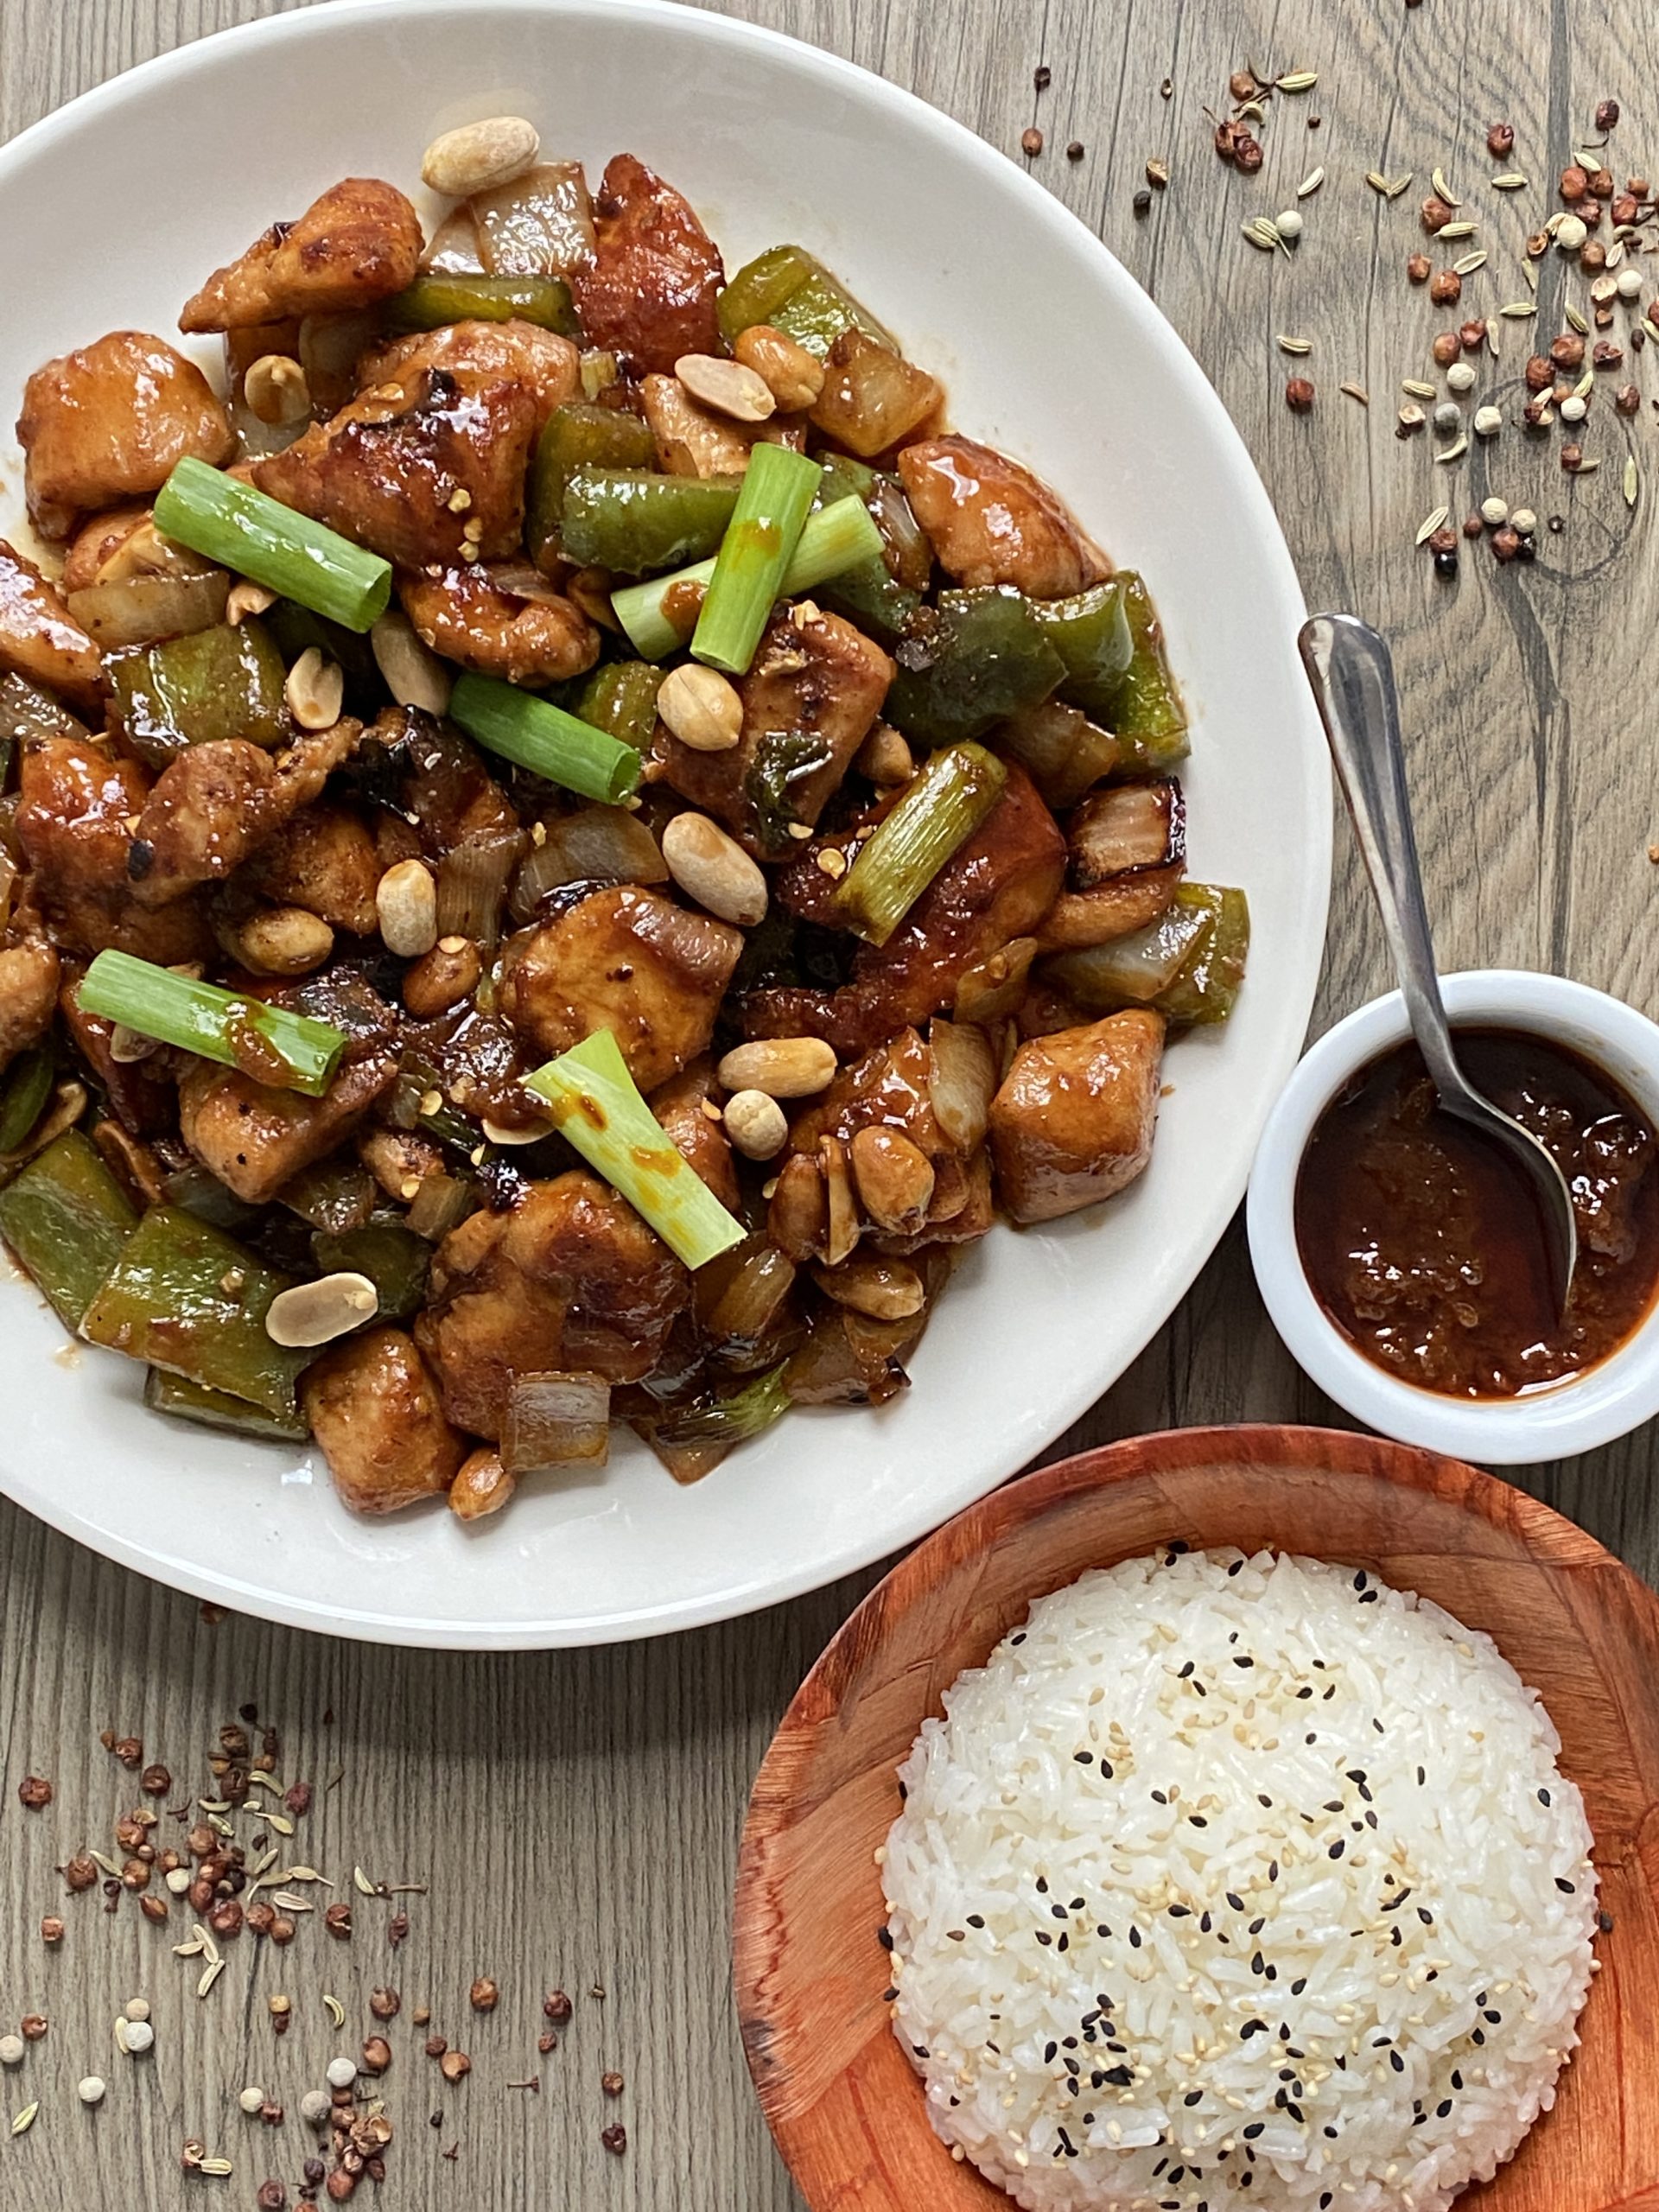
Kung Pao Chicken, by Reggie Soang (click on the image for YouTube video)

Kung Pao Chicken is a widely popular Chinese dish; the color is vibrant and the flavor is well balanced. A great Kung Pao chicken is salty, sweet, a little vinegary, and not too spicy; the dried and fiery looking chilies provide smokiness and a hint of heat that is pleasant and delightful. Last but not least, toasted cashews or peanuts are added for crunch and also give the dish a nice nutty complement. A bowl of steamed rice is the perfect sidekick to Kung Pao Chicken since it is flavorful and almost on the verge of being too salty…but there’s is no such a thing in Chinese cuisine!

For the latest New Lifestyle Cooking Series:

Kung Pao Chicken
Serves: 4 portions

Prep Time: 20 minutes
Total Time: 30 minutes

Ingredients:
For Marinating Chicken:
2 chicken breasts, cubed
1 tablespoon soy sauce
1 teaspoon sesame oil
1 teaspoon sugar
pinch of Chinese five-spice
1/2 tablespoons corn starch

For the Kung Pao Sauce:
2 teaspoons sugar
1 tablespoon rice wine vinegar
1 + 1/2 tablespoon soy sauce
1 teaspoon tomato paste
1/4 cup of chicken stock*
1 tablespoon hoisin sauce
1/2 teaspoon mirin
1/8 teaspoon MSG

*If there is no chicken stock, water could be a substitute. And then add a bit more of everything else to make up the lost flavor.

For the stir fry:
5 tablespoons cooking oil, divided
1 + 1/2 cup (1/2 large sized onion) diced onions, medium dice
1 cup + 1/4 cup (1 pepper) diced green bell pepper, medium dice
1 tablespoon chopped garlic, finely chopped
1/4 cup sliced scallions, cut into 2-inch length
1/4 cup toasted peanuts
1 teaspoon ground Szechuan peppercorn
1 teaspoon Chinese 5-spice
1 teaspoon dried chili flakes

To serve with:
White rice, steamed

  1. To marinate the chicken, add soy sauce, sesame oil, sugar, and Chinese five-spice to the chicken and mix to combine. And then add corn starch, mix to combine. The chicken will feel a little pasty.
  2. To make Kung Pao sauce, add everything together in a mixing bowl and mix to combine. Set aside.
  3. To make Kung Pao chicken, make sure to have everything prepped and ready to go in this order: onions and peppers, chicken, garlic and scallions, sauce, spices, and toasted peanuts.
  4. Using a skillet or a wok, heat it up on high heat. Add 3 tablespoons of oil and wait until it starts to smoke, add onions and green peppers to sauté. Without moving onions and peppers too much, cook until the edges of the veggies are caramelized. If the skillet is big enough, add the rest of the oil and then add chicken. If not, set aside the onions and peppers, wipe down the skillet, and then cook the chicken in it.
  5. When the chicken is nicely colored, add garlic and scallions. Sauté garlic and scallions until fragrant, and then add the veggies back into the skillet to reheat.
  6. Pour the sauce over and coat everything evenly. Turn the heat off and keep tossing the ingredients until they look glossy and saucy. Add peanuts and toss to combine.
  7. Place Kung Pao chicken on a plate and sprinkle raw scallions and toasted peanuts on top. Serve Kung Pao Chicken with steamed white rice. Bon appétit!
Categories
Recipes

Japanese Food – Japanese Curry with Fried Eggplant

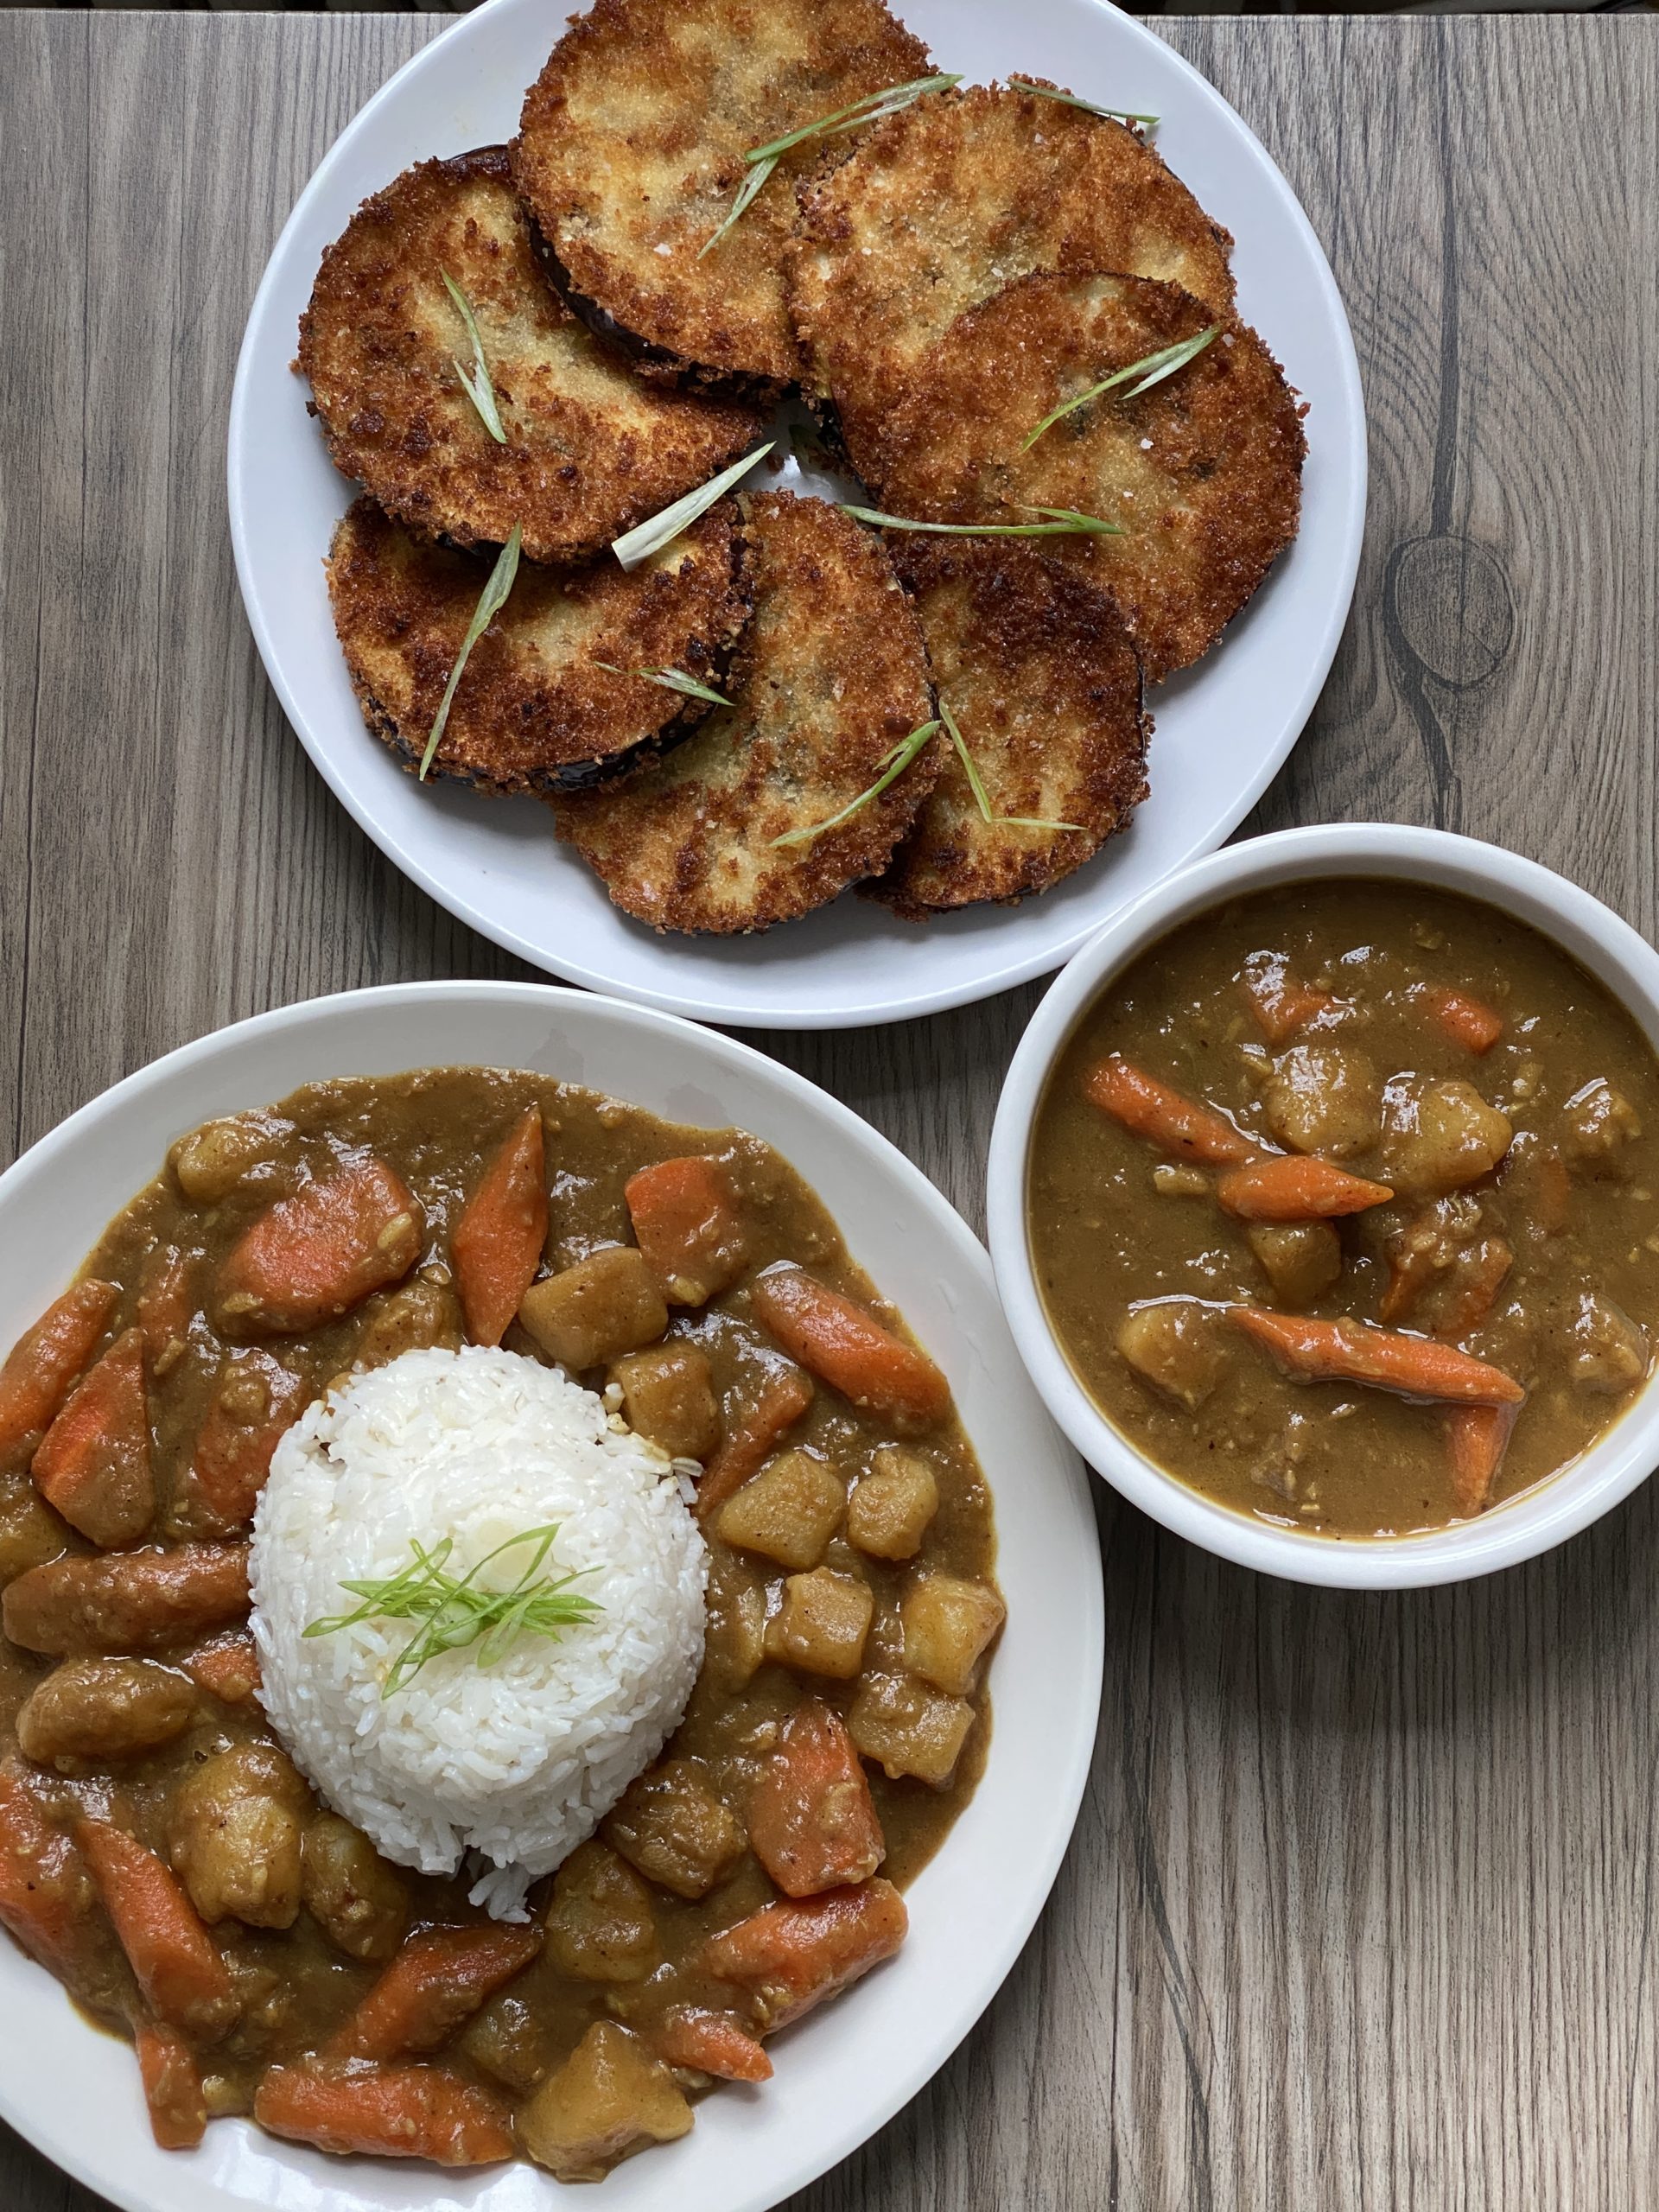
Japanese Curry with Fried Eggplant, by Reggie Soang

Japanese curry is a widely popular dish in Asian cuisine. The best way to eat a bowl of Japanese curry is to serve it with panko-breaded pork or chicken cutlet or eggplant. The crunch from the panko gives a nice contrast to the creamy and thick curry.

The curry base is made out of roux, a paste made by cooking flour and butter. Once the roux is made, it could be stored in an airtight container for up to 2 weeks. The curry base is versatile in making soup and stew.

Japanese curry is both salty and sweet. Conventionally, fruits such as apples or pears may be added for the sweetness while soy sauce is added for the savoriness. Japanese curry is could be spicy or mild, depending on personal preference, but a bit of kick does make this dish more appealing. 

For the latest New Lifestyle Home Cooking Series:

Japanese Curry with Fried Eggplant
Serves: 4 portions

Prep Time: 10 Minutes
Total Time: 50 Minutes

Ingredients:
For the Curry Base:
3 tablespoons butter
4 tablespoons all-purpose flour
1 tablespoon garam masala
2 tablespoon Madras curry powder
1/4 teaspoon Cayenne

For the Curry Stew:
2 tablespoons cooking oil
1 cup diced onions, medium diced
2 cups diced carrots, medium diced
2 cups diced potatoes, medium diced
2 tablespoons chopped garlic
2 teaspoons chopped ginger
1 bay leaf
3 cups chicken stock
1 tablespoon + 1 teaspoon curry paste, from the above recipe
1 teaspoon sugar
2 teaspoon soy sauce

For the Fried Eggplant:
8 pieces sliced eggplant, to 1/8-inch thick
Salt, for salting eggplant
Flour, for dredging 
1 egg, for egg wash
Japanese panko breadcrumb, 2 cups

To serve with:
White rice, steamed

  1. To make the curry base, on medium-low heat, cook the flour in melted butter until the flour turns light brown like peanut butter. Add the spices and cook them in the butter mixture until fragrant. Turn off the heat and set the curry base aside.
  2. Slice eggplant into rounds of 1/8-inch thick. Sprinkle salt on both sides of each slice and set them aside for 45 minutes to draw out moisture. Meanwhile, make the curry and cook some rice.
  3. To make the curry, prep the veggies accordingly. Heat up a medium-sized pot on medium heat. Add oil and once it starts to shimmer, add onions. Cook the onions until caramelized. Adjust the heat if necessary and cook the onions nice and slow.
  4. Add garlic and ginger and cook until they are fragrant, and then add carrots and potatoes.
  5. After adding carrots and potatoes, add chicken stock, and bay leaf. Bring the pot to a simmer and cook until carrots and potatoes are tender.
  6. While the curry is cooking, set up a breading station for the eggplant. Put each flour, a beaten egg, and Japanese panko breadcrumb in separate bowls.
  7. Pat the eggplant dry and dip each slice in the order: flour, egg wash, and panko. 
  8. Meanwhile, heat up a shallow pan of oil in a skillet. Heat the oil up to 350 F in temperature. To make sure the oil is hot enough, place a piece of bread in it and when it becomes golden brown, the oil is ready.
  9. Fry each eggplant slice until golden brown on the outside. Sprinkle with salt when they come out of the oil. 
  10. Once the carrots and potatoes are tender, mix the curry base with a ladle of the hot liquid from the pot in a separate down; dissolve the curry base into the liquid. Add the curry base liquid back in the pot and bring the curry to a simmer. The curry will start to thicken. Add soy sauce and sugar to season.
  11. To serve Japanese curry, have a bowl of rice ready and pour the curry over it generously. Finish the dish by placing a couple of slices of fried eggplant on top of the curry. Bon appétit!