Categories
Recipes

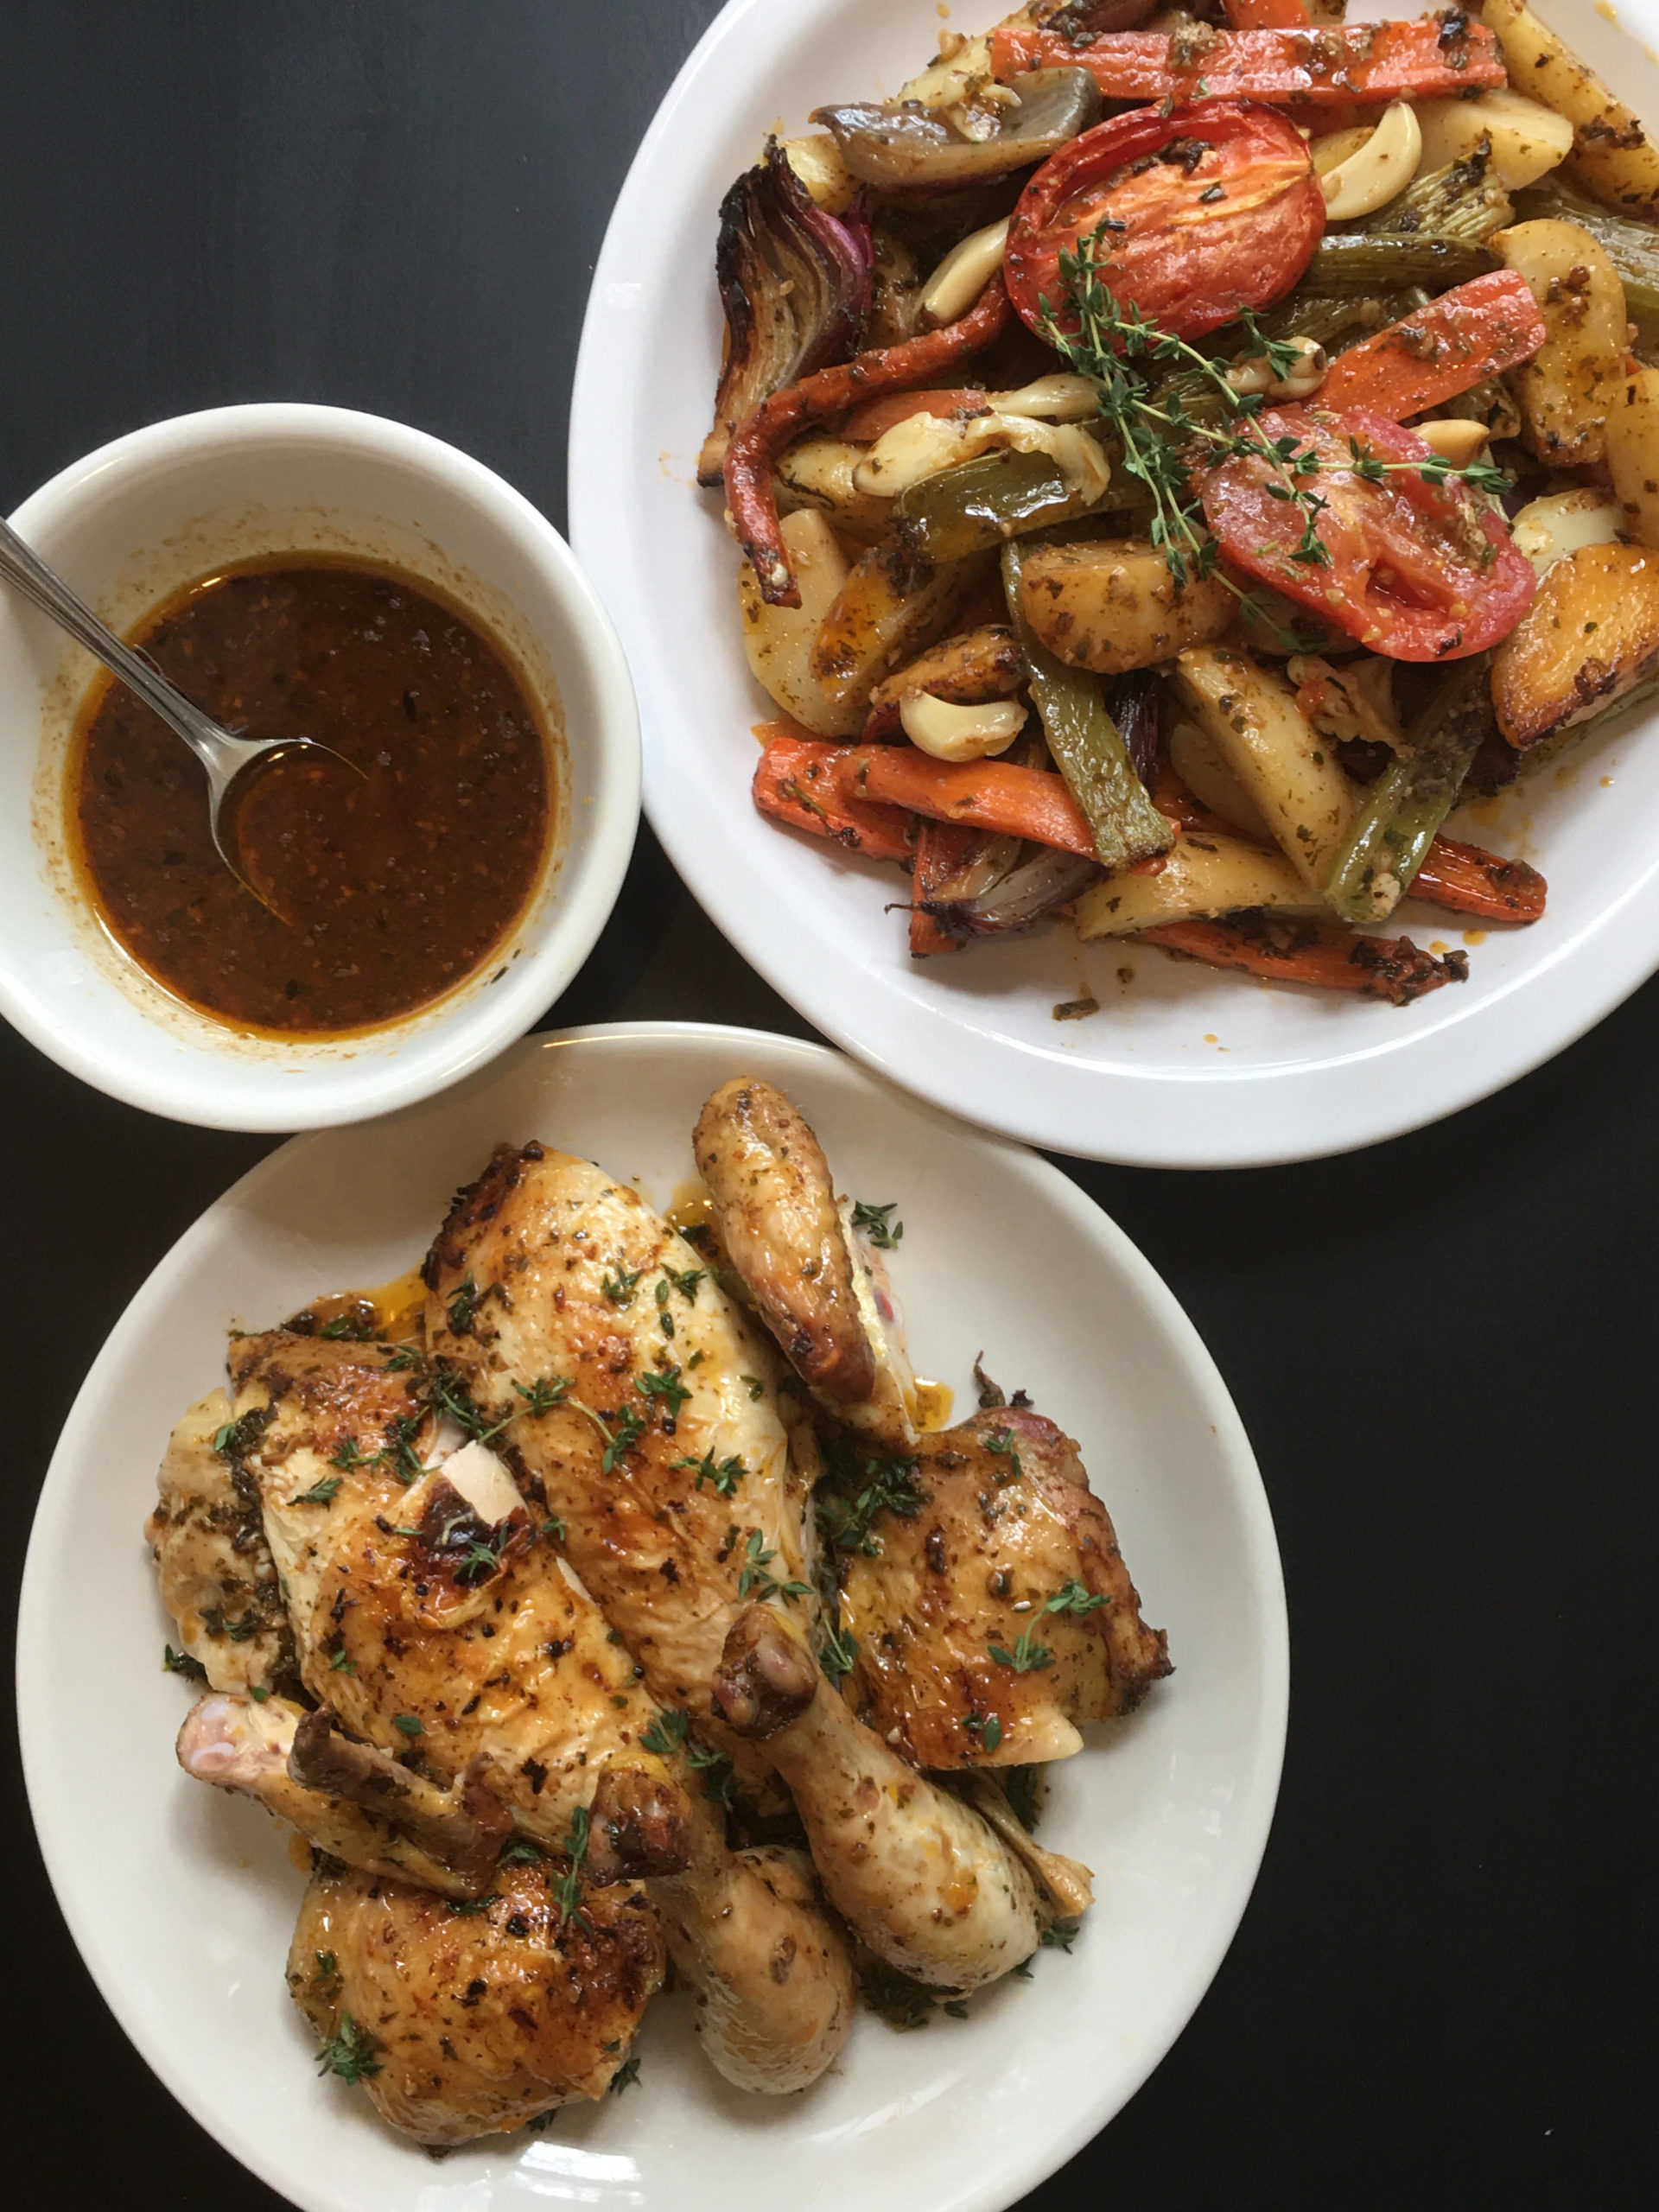
Mother’s Day Special – Roasted Chicken and Veggies

Roasted Chicken and Veggies, by Reggie Soang (click on image for YouTube video)

Roasted Chicken and veggies are some of the best dishes to cook for a special occasion. With a little bit of planning, the chicken will be roasted just in time for dinner with everything else falling into place. My way of roasting chicken is easy and manageable. I also blanch the veggies prior to roasting; therefore, all the veggies will be tender, juicy, and evenly cooked at the end. Ideally, you want to marinate the chicken overnight. However, if time is short, season the chicken a few hours before cooking and rub it generously with EVOO.

For Mother’s Day Special, 2020

Roasted Chicken and Veggies
Serves: 4 portions

Prep Time: 30 Minutes (including making chicken marinade)
Total Time: 1 Hour 30 Minutes (not including marinating time)

Ingredients:
For the Marinade
1 whole chicken, around 3.5#
1 head fresh garlic, peeled
1 bunch parsley
1 tablespoon chili powder
2 teaspoon salt
1/2 cup EVOO

For Roasted Chicken:
5 small Yukon potatoes
5 small carrots
2 small red onions
1 head garlic
3 stalks celery
1 Roma tomato, halved
Small bunch of thyme
Any leftover chicken marinade
1/2 cup chicken stock, for making the sauce, using water is fine

Marinating Chicken Overnight

  1. To make the marinade, blitz garlic, parsley, chili powder, salt, and EVOO in a food processor until pesto consistency, chunky and saucy. 
  2. Cut the backbone off the chicken by cutting through both sides of the vertebrae. Starting from the neck, use the tip of the knife to cut through the tiny bones next to the vertebrae, and then use the back of the knife to cut through the thicker part of the bones toward the end of the chicken. Open the chicken up like a book. 
  3. Rub the marinade all over the chicken and refrigerate overnight

The Next Day

  1. Take the chicken out at least 1 hour before roasting.
  2. Pre-heat oven to 450F
  3. Prep your veggies by peeling potatoes, carrots, onions, but leave them whole
  4. Break up a heard of garlic but don’t peel them
  5. Wash celery stalks and cut them into 3 inch long
  6. Put potatoes, carrots, celery, and onions in a pot of cold water and bring the water up to a boil. Immediately strain the veggies. Once the veggies are cool enough to handle, cut carrots  in half lengthwise. Quarter potatoes and onions. 
  7. Toss the pre-heated veggies with leftover rub or with EVOO, salt, and black pepper.
  8. Add the veggies, plus tomatoes and thyme to a roasting tray. Put the chicken right on top of the veggies and put the roasting tray on the middle rack of the oven and roast for 45 minutes. 
  9. Check the chicken after 20 minutes to make sure the skins are not getting browned too quickly. If you have a thermometer, the breast should be at 150~153F and the thighs should be at 170~173F after 45 minutes. The temperature of the chicken will reach 165F, as recommended by the USDA. *Don’t cook your chicken to 165F, because the chicken will keep on cooking after you take it out of the oven and dry out.
  10. Rest the roasted chicken for at least 30 minutes before carving to retain most of the juice. 
  11. While the chicken is resting, make the sauce. Scrape all the juice and brown bits off the roasting tray into a pot, and then add some water or chicken stock to make the sauce. Bring the sauce up to a boil and adjust the seasoning. Reduce the sauce to the consistency that you prefer.
  12. Cut up the chicken into 12 pieces: cut off two wings, cut each breast into 3 pieces, and cut off the drumsticks from the thighs. 
  13. Serve the chicken on top of the roasted veggies, and then pour the sauce all over. Bon Appétit! 
Categories
Recipes

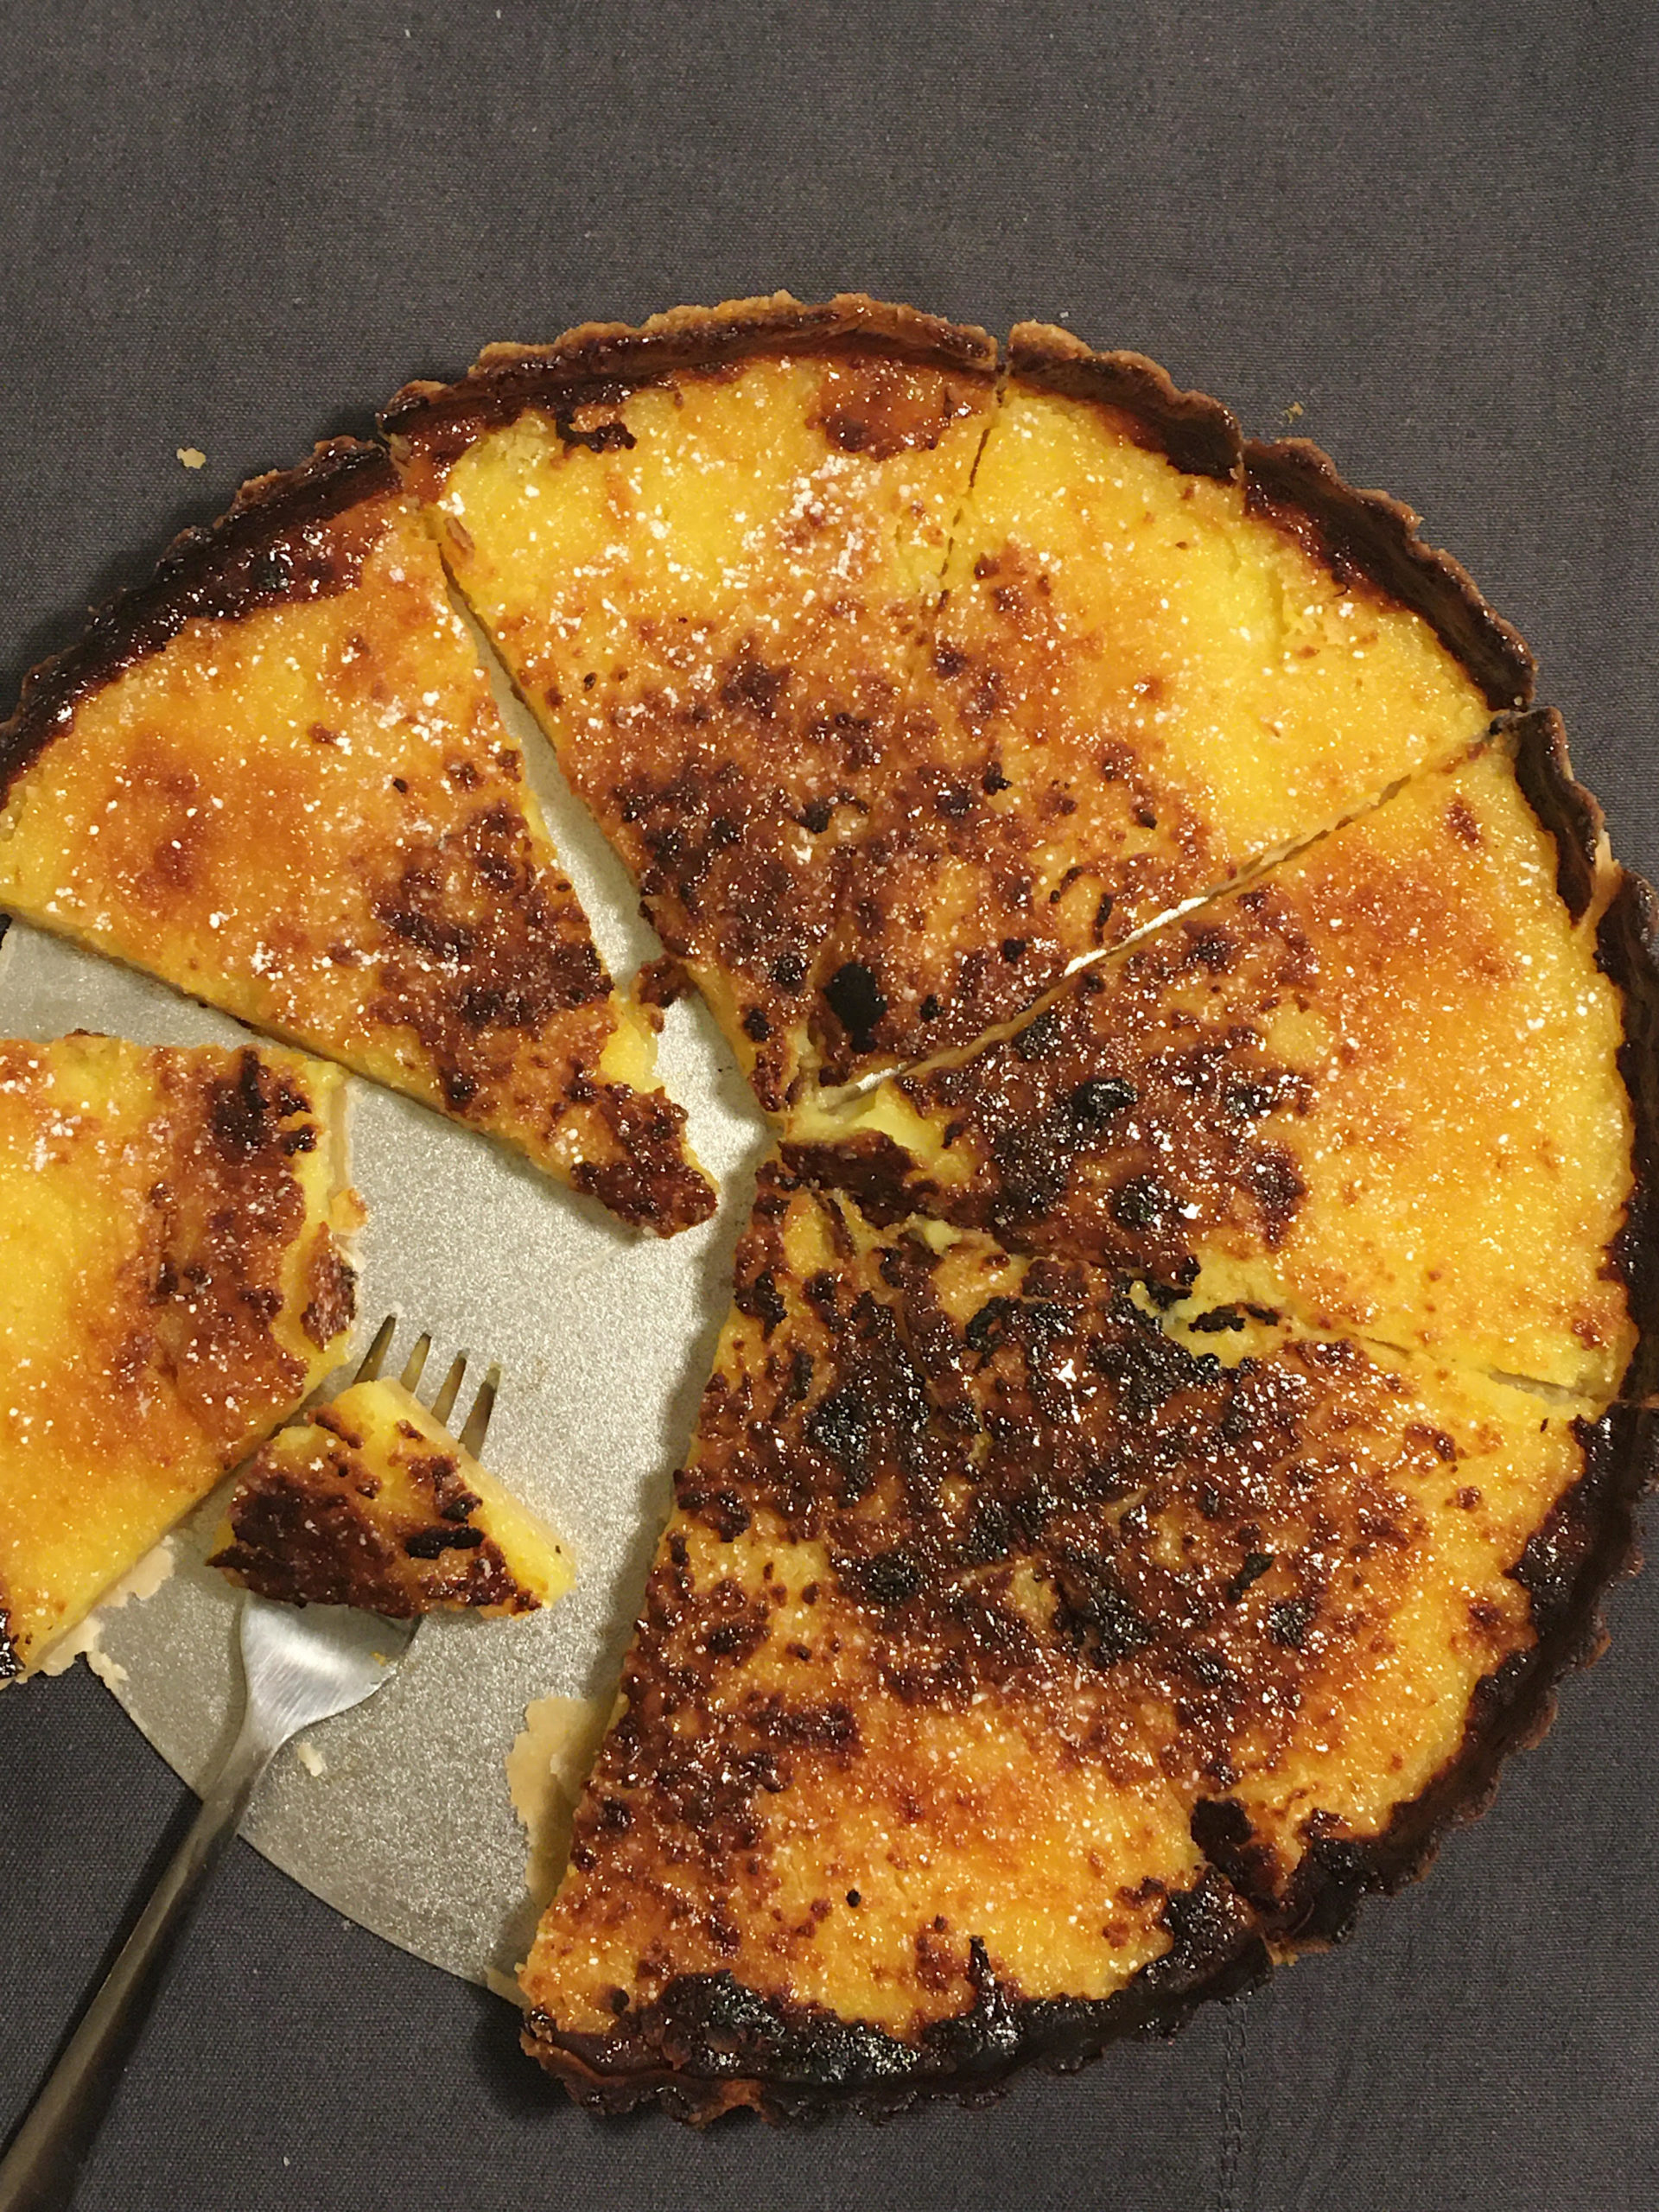
Mother Day’s Special – Lemon Tart

Lemon Tart, by Reggie Soang (click on image for YouTube video)

Growing up in Taiwan, lemonade was a popular thirst quench in my household, besides water. Lemonade made with fresh lemon juice and raw sugar cane sugar was simple and delightful.  My mom taught me how to make my first batch of lemonade, so I thought I would make a lemon tart, with a good amount of fresh lemon juice and its zest to mimic the taste of my childhood lemonade, to celebrate Mother’s Day. 

For Mother’s Day, 2020:

Lemon Tart
Serves: 4~6 portions

Prep Time: 10 Minutes
Total Time: 1 Hour 30 minutes (not including batter resting time)

Ingredients:
Store-bought tart shell
9 eggs
380g (2 cups less than 1 tablespoon)  sugar
5 lemon zest
170g lemon juice (about the juice of 5 lemons)
225g heavy cream
Confectioner’s sugar for dusting

  1. Pre-heat oven at 350F
  2. In mixing bowl, whisk eggs and sugar together until ribbon stage, which if you lift the batter, it will fall like ribbons back into the mixing bowl    
  3. Add lemon juice and zest, stir with a rubber spatula to combine
  4. Add heavy cream and stir gently to combine. Refrigerate the lemon batter for 1 hour.
  5. Meanwhile, roll out and fit the store-bought pie shell into your tart pan (mine is 9-inch). Push the pie shell tight and neatly against the sides. Let the excess pie shell drape over and leave it as it is. Dock the pie shell with a fork all over. And chill for 1 hour.
  6. When time is up, blind bake the pie shell first. Put a layer of tin foil or parchment paper inside the pie shell and put dry black bean or pie weights to keep the pie shell flat. Bake the pie shell for 10 minutes.
  7. After 10 minutes, gently use your thumb to push down on the excess pie shell on the sides. Put the pie shell back in the oven to bake for another 10 minutes.
  8. Lower the oven temperature to 250F when the pie shell is ready. Pour the lemon tart fillings until it fills up 3/4 of the way. Bake the tart in the oven for 45 minutes. Cool for 15 minutes.
  9. Dust the top of the lemon tart with a thin layer of confectioners’ sugar and put the tart underneath of the broiler to caramelize the sugar. Once sugar is caramelized, cool until sugar turns brittle before cutting it.
  10. Serve lemon tart at room temperature. Bon appétit! 
Categories
Recipes

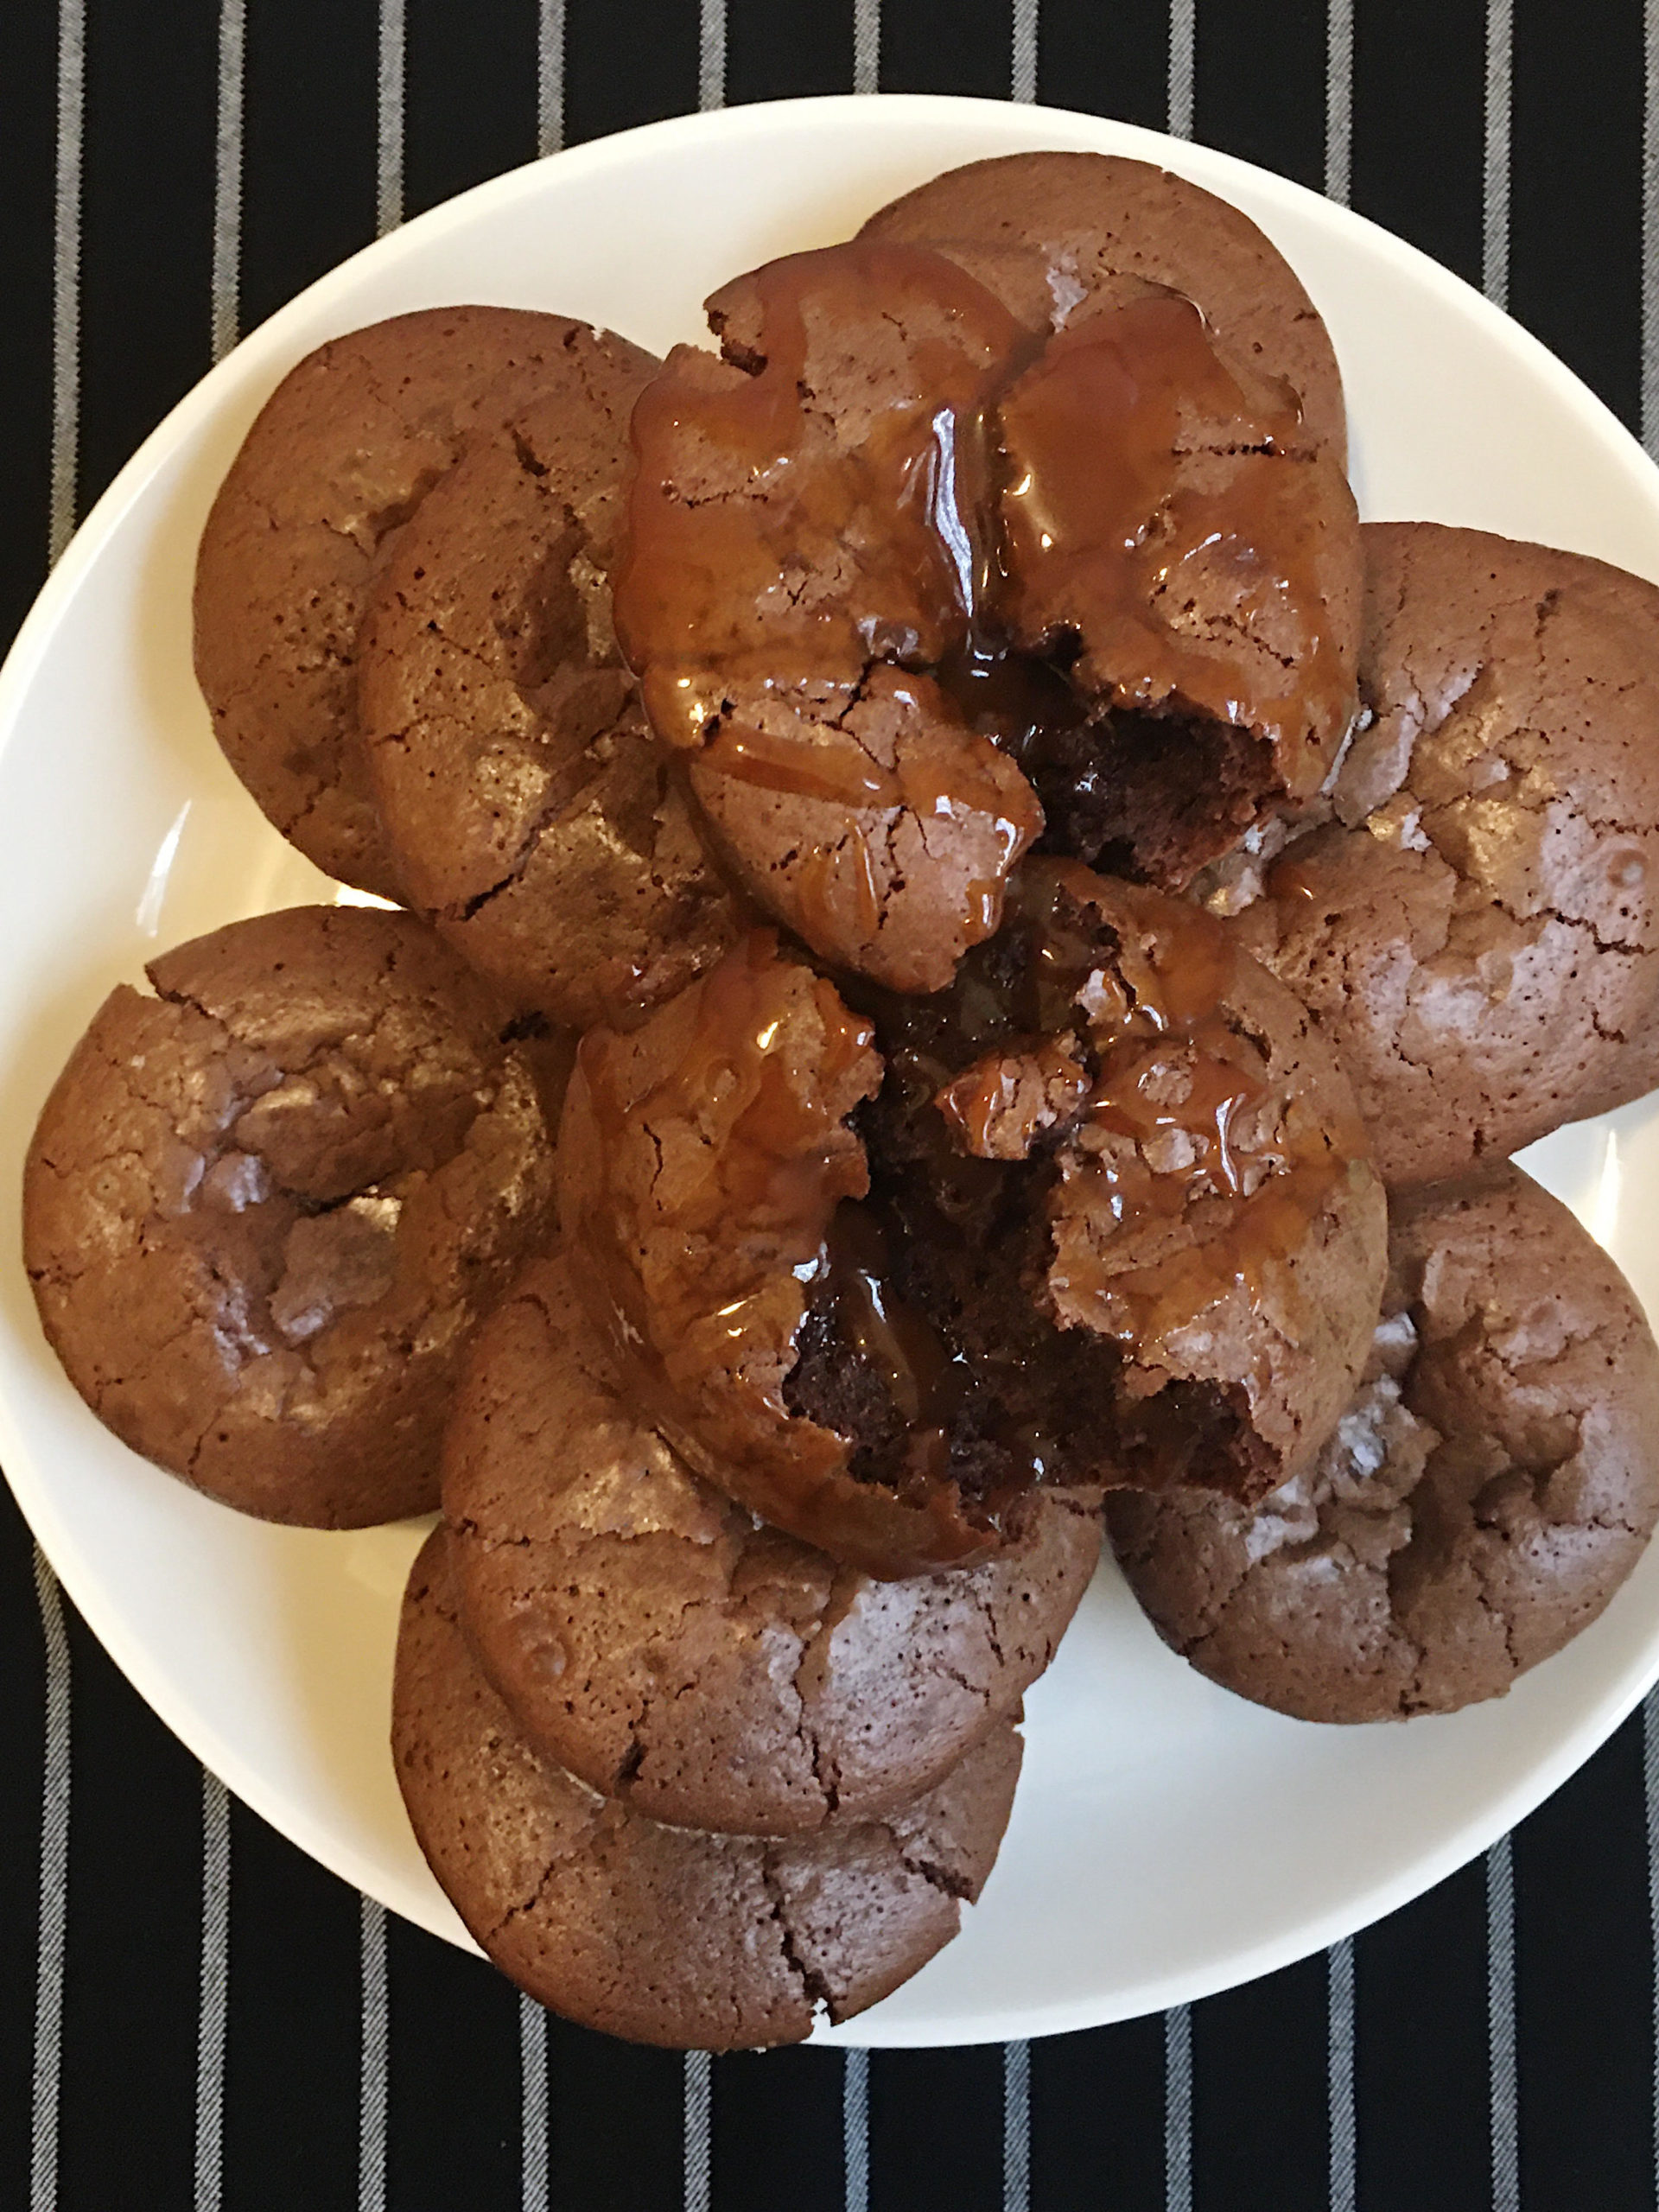
Mother’s Day Special – Chocolate Brownies

Chocolate Brownies, by Reggie Soang (click on image for YouTube video)

For mother’s day, I would like to share a few great recipes to create a Sunday roast. With a little bit of planning, cooking a mother’s day meal could be stress-free and enjoyable. Let’s start with desserts since they are the most time consuming, yet keeps well for a day or two either in the fridge or on your counter. 

For Mother’s Day, 2020:

Chocolate Brownies
Serves: 12 muffin-sized 

Prep Time: 15 Minutes
Total Time: 45 Minutes

Ingredients:
For Brownies:
360g (2 cups) semi-sweet chocolate chips
1/2 pound (2 sticks) butter
375g (2 cups) dark brown sugar
3 eggs
210g (1 + 1/4 cup + 2 tablespoons) AP Flour
2g (1/4 teaspoon) baking powder
5g (1 teaspoon) salt

For Caramel Sauce:
1/2 cup sugar
2 tablespoon water
1/4 cup heavy cream
1 tablespoon butter
1 teaspoon vanilla

  1. Preheat oven at 350F. Butter and flour muffin tins
  2. Melt chocolate with butter over a double boiler: set a mixing bowl with chocolate and butter on top of a pot filled with hot water 1/3 of the way. Maintain the heat of the water with a medium flame
  3. Mix dark brown sugar & vanilla into the chocolate mixture, and whisk to combine
  4. In a separate bowl, beat eggs
  5. Using a ladle, ladle heated chocolate into the eggs. Bring up the temperature of the eggs to slightly warm and then pour the eggs into the chocolate mixture and combine
  6. Sift together the dry ingredients: flour, baking powder, and salt
  7. Add the dry ingredients to chocolate mixture 2 cups at a time and folded in with a rubber spatula
  8. Fill the muffins tins 3/4 of the way with chocolate brownies’ batter
  9. Baked for 17 to 20 minutes in 350F oven.
  10. Rest the brownies for at least 20 minutes. Meanwhile, make caramel sauce. Heat sugar and water until sugar turns dark brown, and then pour in cream and vanilla extract and stir quickly to combine. Turn off the heat and stir in butter. 
  11. Drizzle warm caramel sauce over warm chocolate brownies and serve, bon appétit
Categories
Recipes

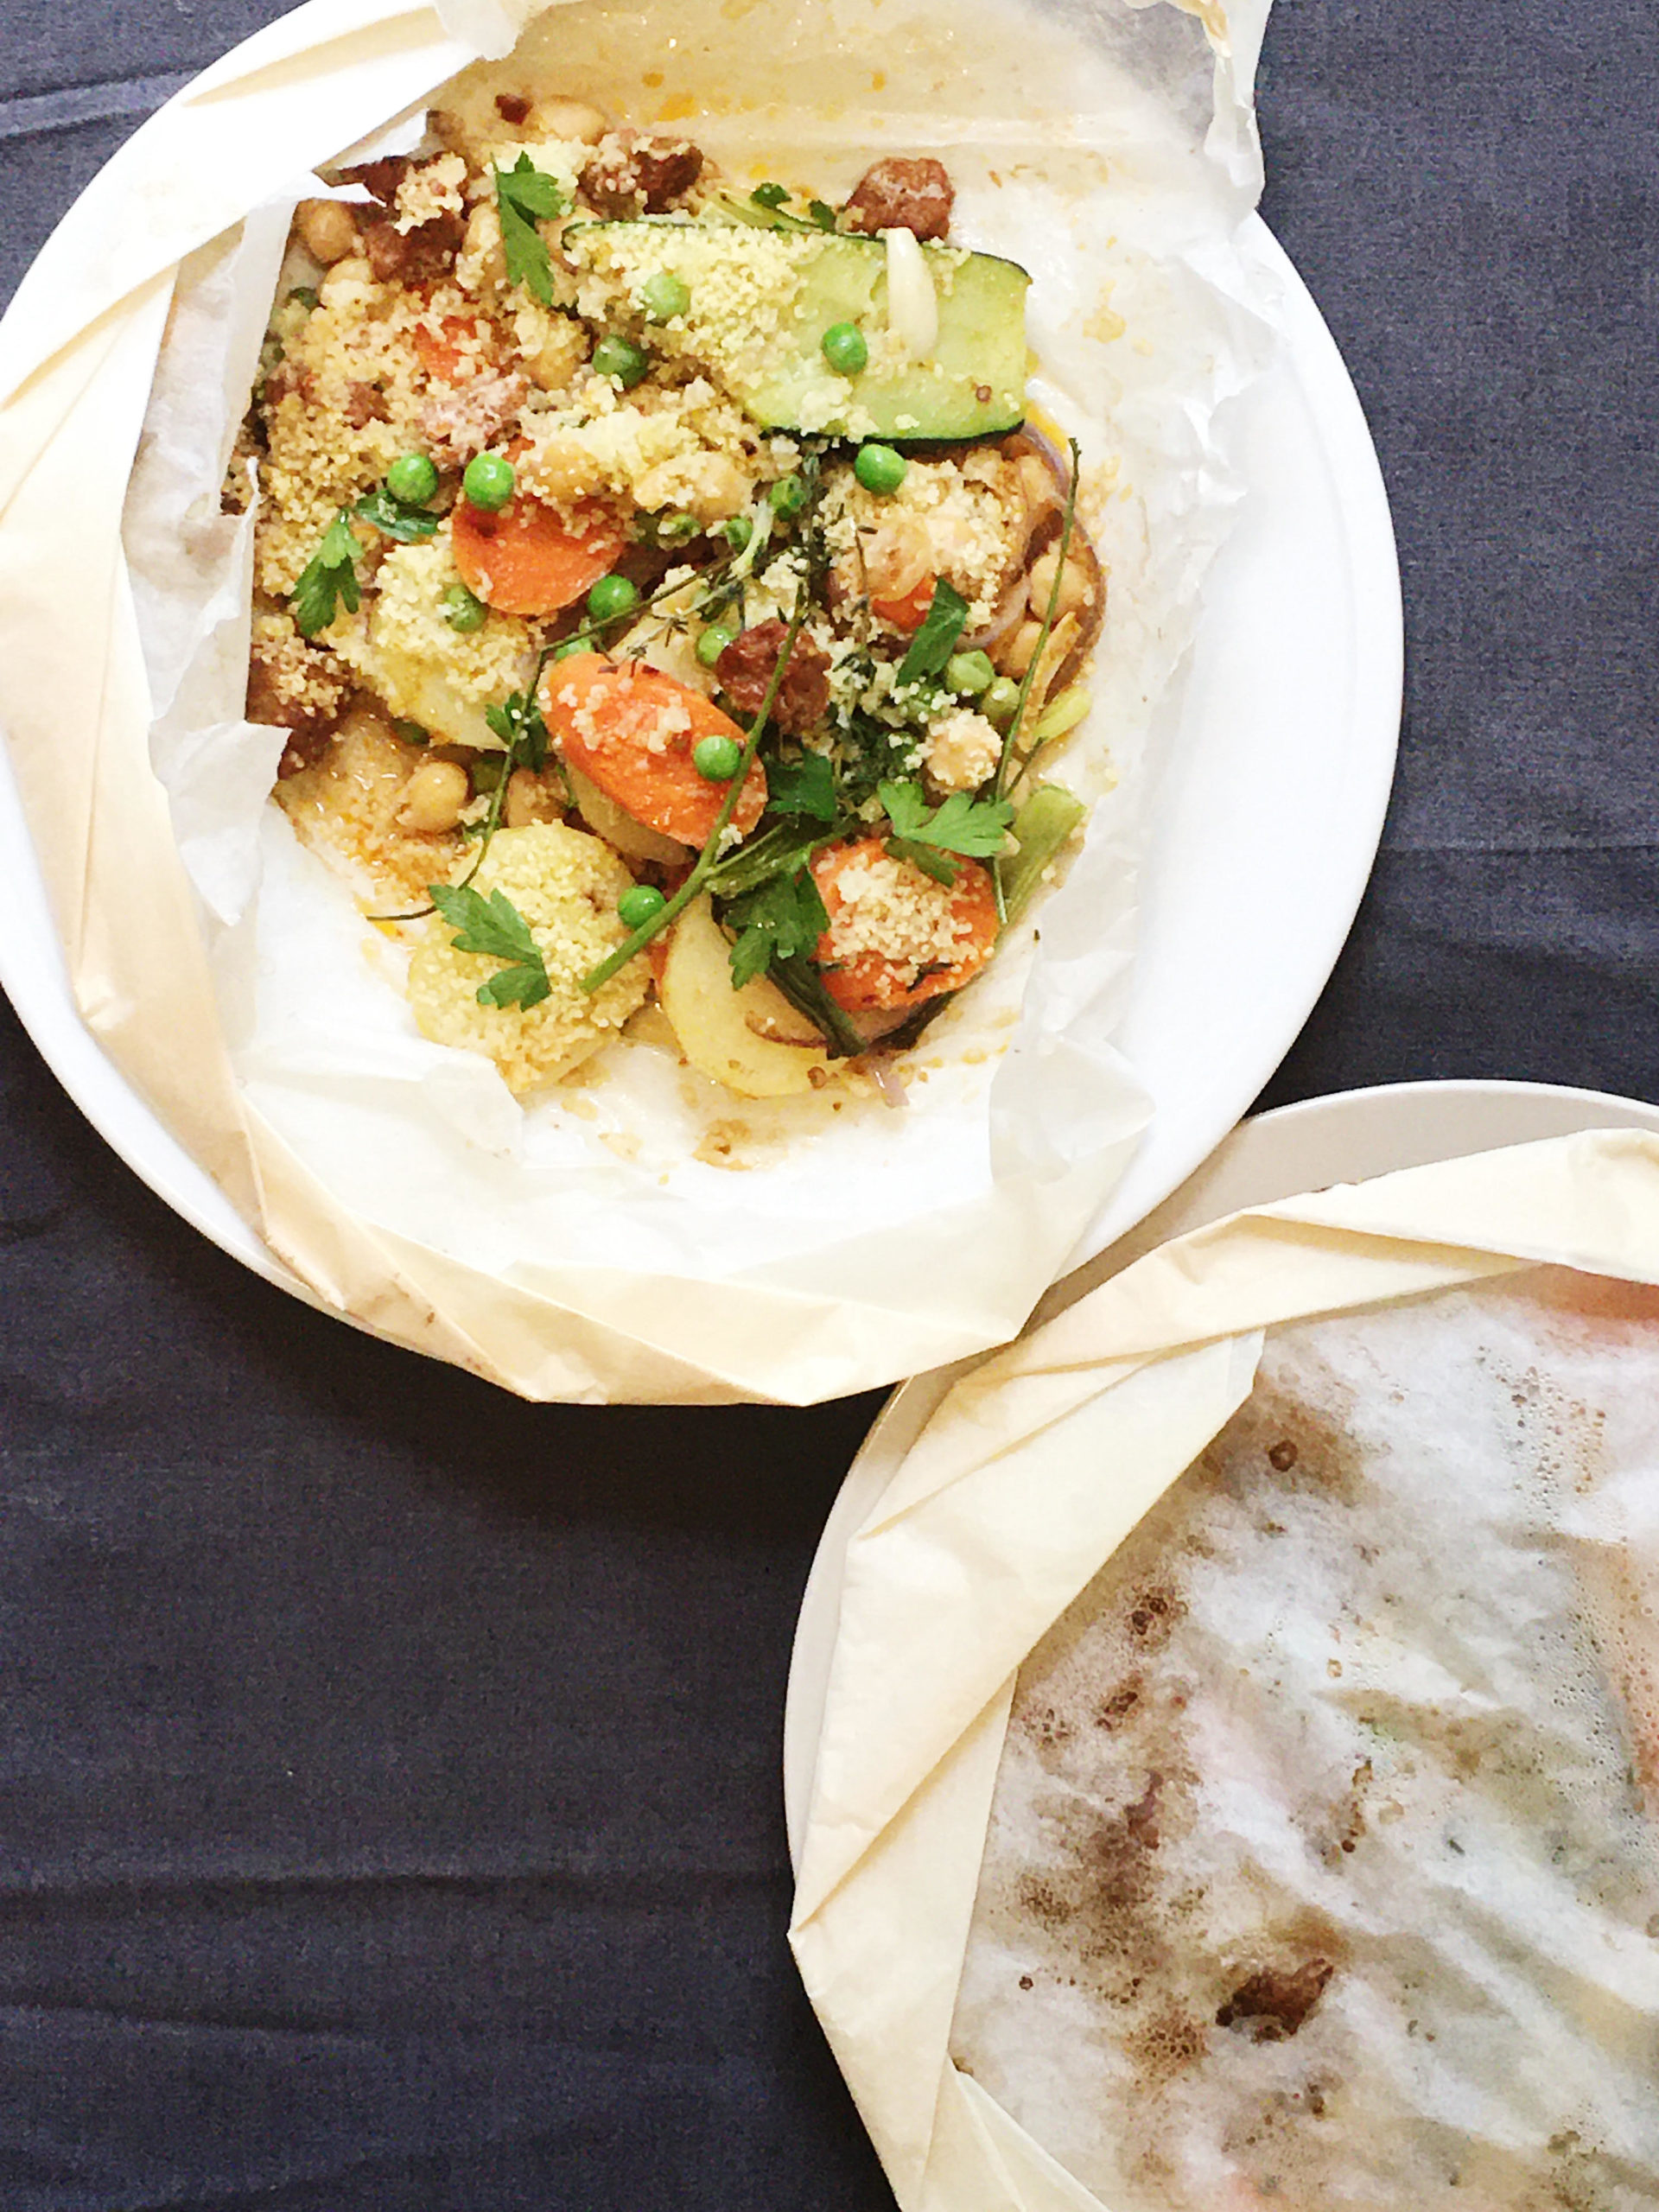
Mediterranean Inspired – Couscous en Papillote

Couscous en Papillote, by Reggie Soang (click image for YouTube video)

Cooking “en papillote” means cooking “in pouch” in French. All the ingredients are wrapped up with a piece of parchment paper or tin foil, and then baked in the oven. The ingredients will stay moist and the flavors inside the pouch will perfume the entire dish. I am adding couscous to this dish because the starch will soak up all the juices coming out of the veggies. Cooking en papillote is a useful technique for a busy home cook. In addition, the surprise element of opening the pouch brings joy and comfort to the table.

For the latest New Lifestyle Homecoming Series:

Couscous en Papillote
Serves: 4 portions

Prep Time: 10 minutes
Total Time: 30 minutes

Ingredients:
1/2 cup uncooked couscous
2 medium-sized Yukon potatoes, peeled and sliced to 1/2-inch thick
3 medium-sized carrots, peeled and sliced to 1/2-inch thick
3 medium-sized zucchini, halved lengthwise and then cut into 3-inch long
6 cloves fresh garlic, sliced
1 cup sliced red onions
2 teaspoons ground cumin
2 teaspoons ground coriander seeds
1 teaspoons paprika
1 tablespoon + 1 teaspoon of salt
4 pieces Italian hot sausages, get rid of the casings and break them into the size of Swedish meatballs
4 stalks scallions, cut into 3-inch long
1/2 cup frozen green peas
1 cup chickpeas, drained
Few sprigs of thyme
Few sprigs of parsley stems, after the leaves have been picked
Parsley leaves, for garnish

  1. Pre-heat oven to 425F
  2. Rince couscous with cold water and strain. Let couscous sit in the strainer for 15 minutes. Fluff the couscous with a fork.
  3. Cut the potatoes, carrots, zucchini, garlic, and red onions, and toss everything in a bowl with cumin, coriander seeds, paprika, and salt.
  4. Lay out a sheet of parchment paper or tin foil, the size will depend on the amount of ingredients you are cooking for each portion (this recipe is 4 portions). Scoop a generous amount of vegetables and place them off the center on the parchment paper. Add chickpeas, green peas, and Italian sausages. Add couscous on top, followed by placing few sprigs of thyme and parsley stems.
  5. Fold over the bigger half of the parchment paper and fold in edges along the ingredients to seal, like making an empanada. Right before sealing the parchment paper completely, pour in few tablespoons of water and seal it tight.
  6. Bake the pouch in the oven for 20 minutes. Use a small knife to cut the pouch open at the middle and let the steam come out. Once it’s cool to handle, tear open the top to reveal the entire dish. Drizzle with more EVOO and garnish with parsley. Serve hot and bon appétit!
Categories
Recipes

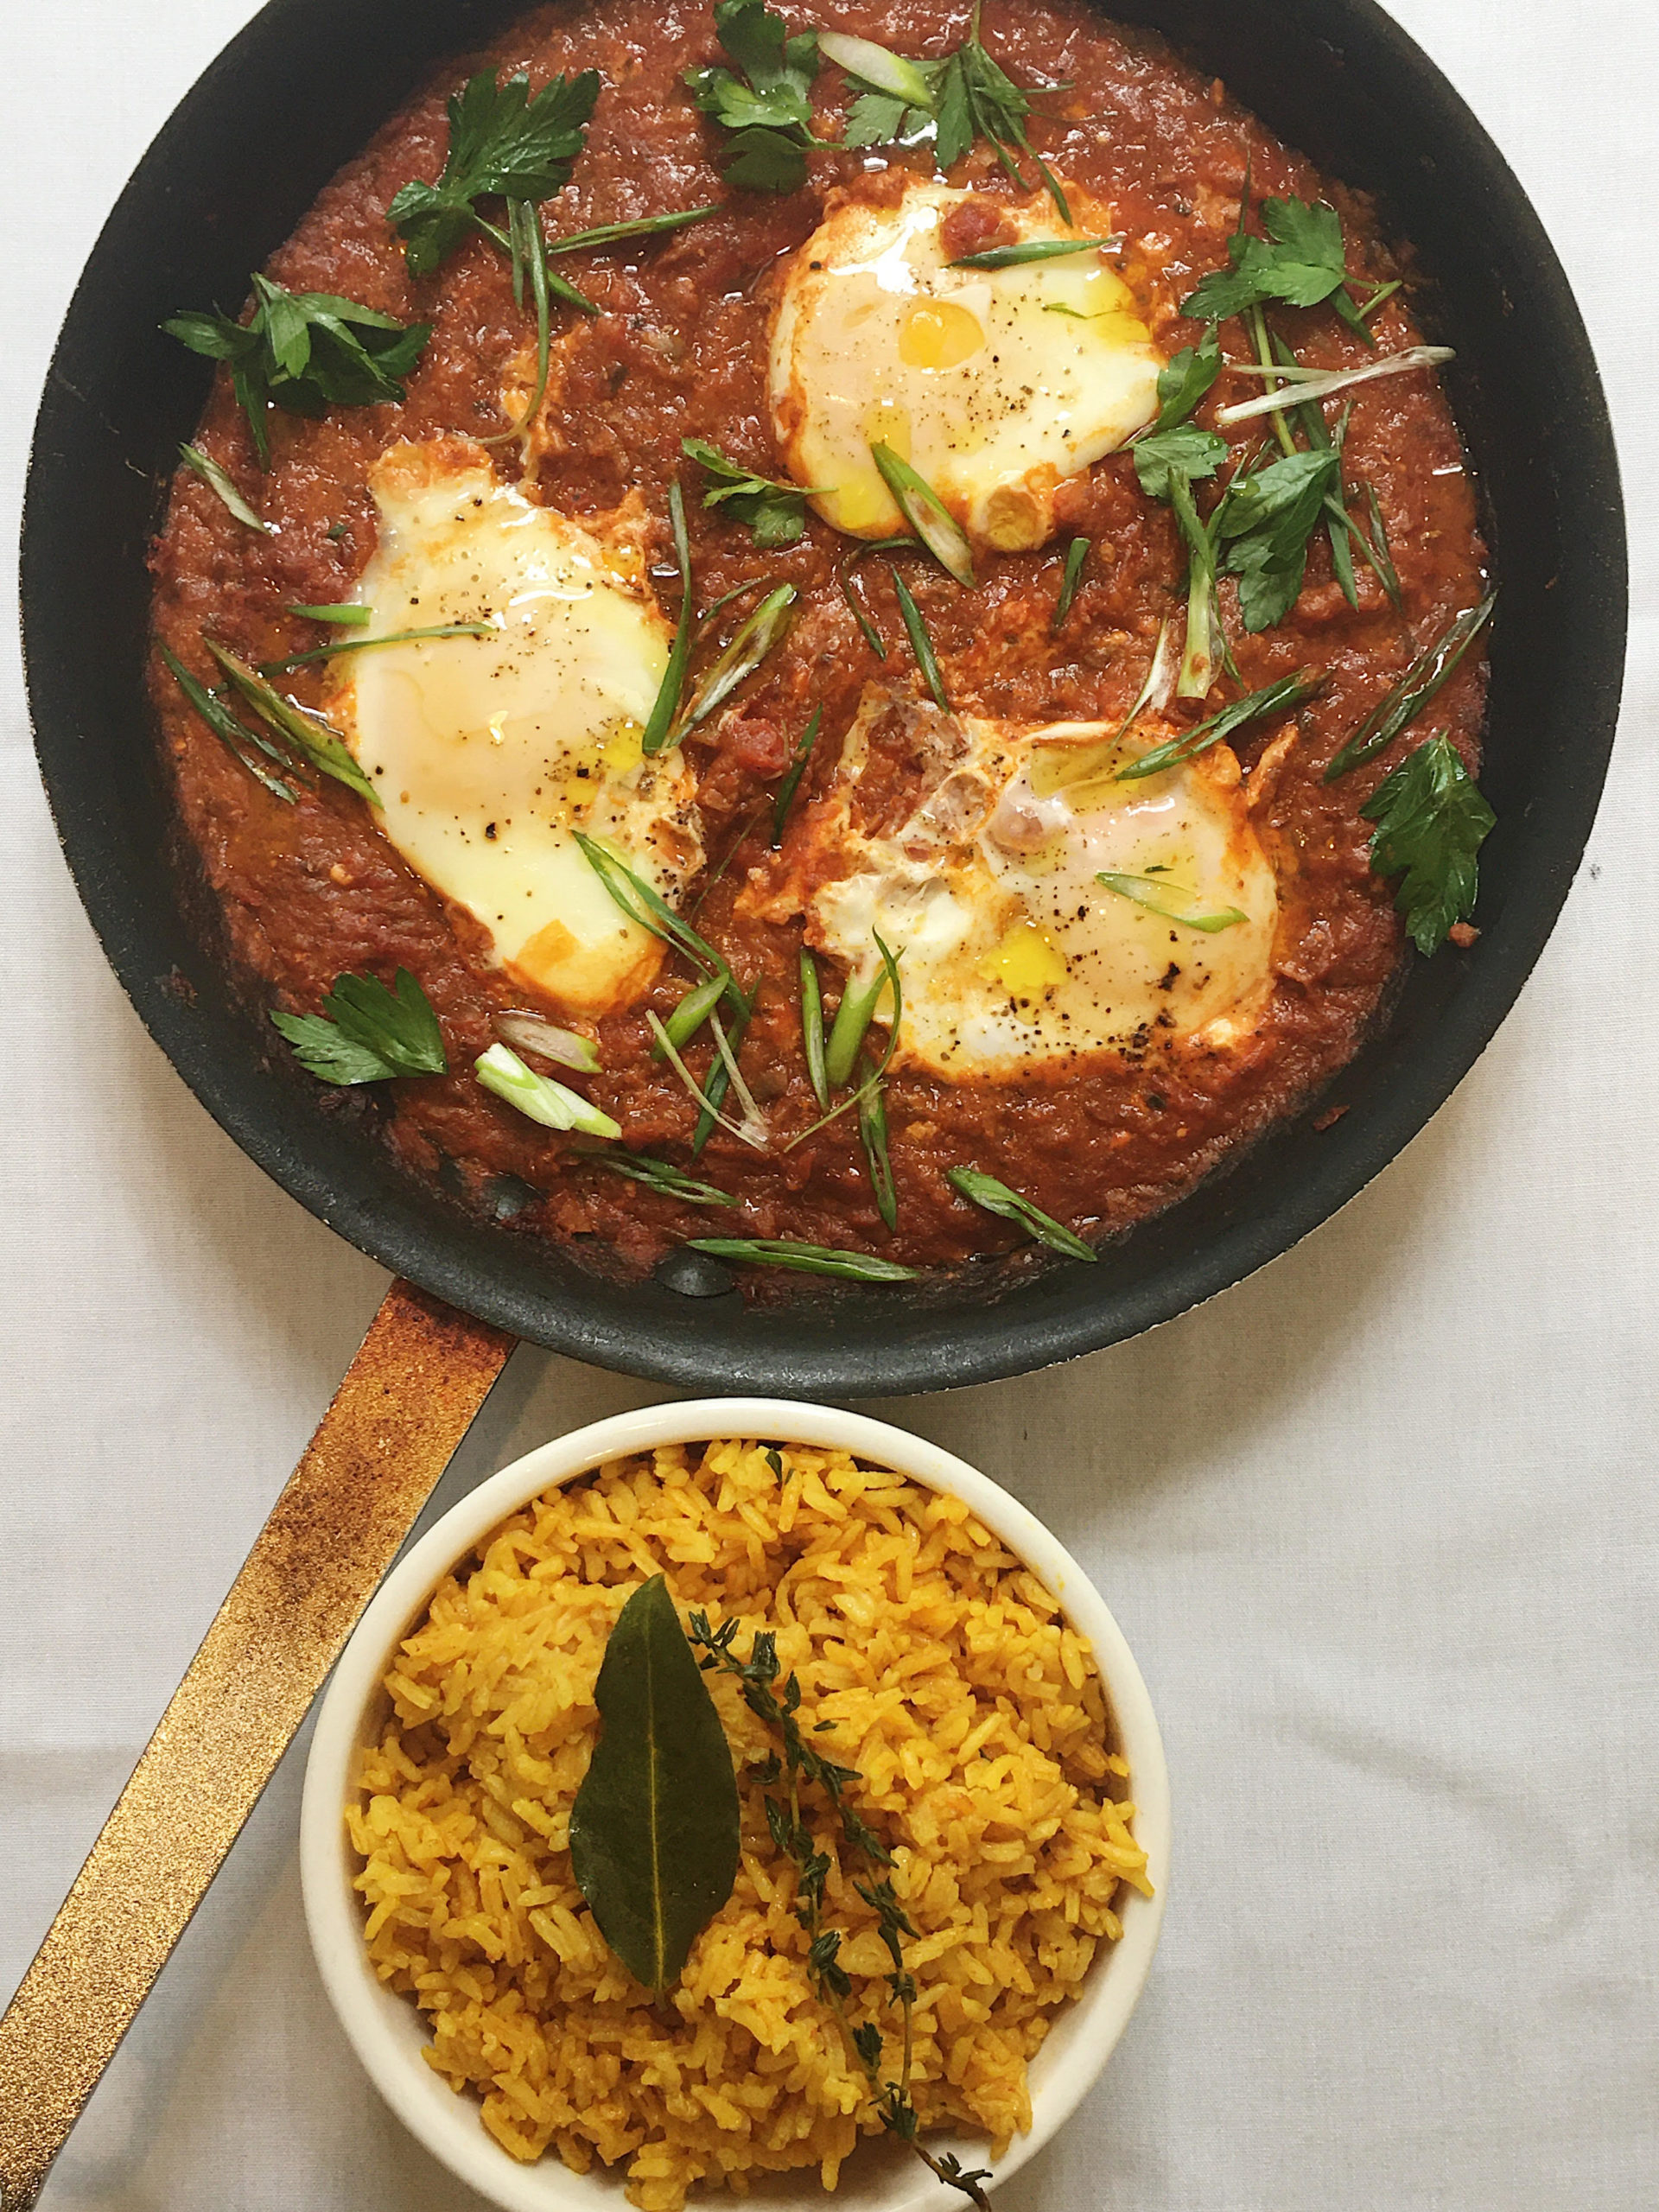
Mediterranean Inspired – Shakshuka with Turmeric Ginger Rice

Shakshuka Ginger Turmeric Rice, by Reggie Soang (click image for YouTube video)

Shakshuka comes from North Africa, where spices are abundant. Shakshuka is made of a rich and spiced tomato sauce with poached eggs on top. In this recipe, I chose to use cumin, coriander seeds, and paprika because they are common in households and simply the best for flavoring tomato sauce. Shakshuka also pairs well with rice; this rice recipe is brilliant because it has ginger and turmeric, which are popular in North African cuisine. Last but not least, shakshuka could be served as breakfast, lunch, or dinner!

For the latest New Lifestyle Home Cooking Series:

Shakshuka with Ginger Turmeric Rice
Serves: 4 portions

Prep Time: 30 Minutes
Total Time: 1 Hour

Ingredients:
For Aromatic Rice:
3 tablespoons EVOO
1 and 1/2 tablespoon finely chopped ginger
1 teaspoon turmeric
2 tablespoon tomato paste
1 and 1/2 cup long grain rice
2 and 2/3 cup water
1/2 teaspoon salt

For Shakshuka:
1/4 cup cooking oil
1 cup finely cut carrots
1 cup finely cut onions
1 cup finely cut celery
1 cup finely cut button mushroom
2 teaspoon salt
1 teaspoon cumin
2 teaspoon ground coriander seeds
2 teaspoon paprika
1 and 1/2 cup crushed tomato 
1 tablespoon Sriracha (optional)
1/2 cup water
4 Eggs
Ground black pepper, for seasoning the eggs
Salt, for seasoning the eggs 
2 tablespoons chopped scallions, for garnish
2 tablespoons parsley leave, for garnish

  1. To make aromatic rice, cook ginger with salt in olive oil on medium heat until fragrant. Stir in turmeric and toast until fragrant. Add tomato paste and stir to combine. Add rice and toast until fragrant. Add water, cover and bring to a boil, and then turn down to simmer. Once the water is completely absorbed, leave the cover on for another 10 minutes and then fluff with a fork.
  2. To make shakshuka, inside of a skillet, cook carrots, onions, celery, and mushroom with oil on medium high heat until softened, and season with salt. Add cumin, coriander seeds, and paprika and cook until fragrant. 
  3. Add crushed tomatoes, water, and Sriracha. Bring everything up to a simmer. Cook the tomato sauce until thickened, but still fluid. Adjust seasoning with salt.
  4. Keep the tomato sauce on medium-low heat and bubbling, using a spoon to make three dented spots on the surface and crack the eggs into them. Season each egg with a pinch of salt and ground black pepper. 
  5. Cover the skillet with a lid or a piece of tin foil and cook the eggs until the whites are set and the yolks are still runny. Cook the eggs longer if well-done eggs are desire. 
  6. Serve shakshuka with scallions and parsley with a side of ginger turmeric rice. Bon Appétit!
Categories
Recipes

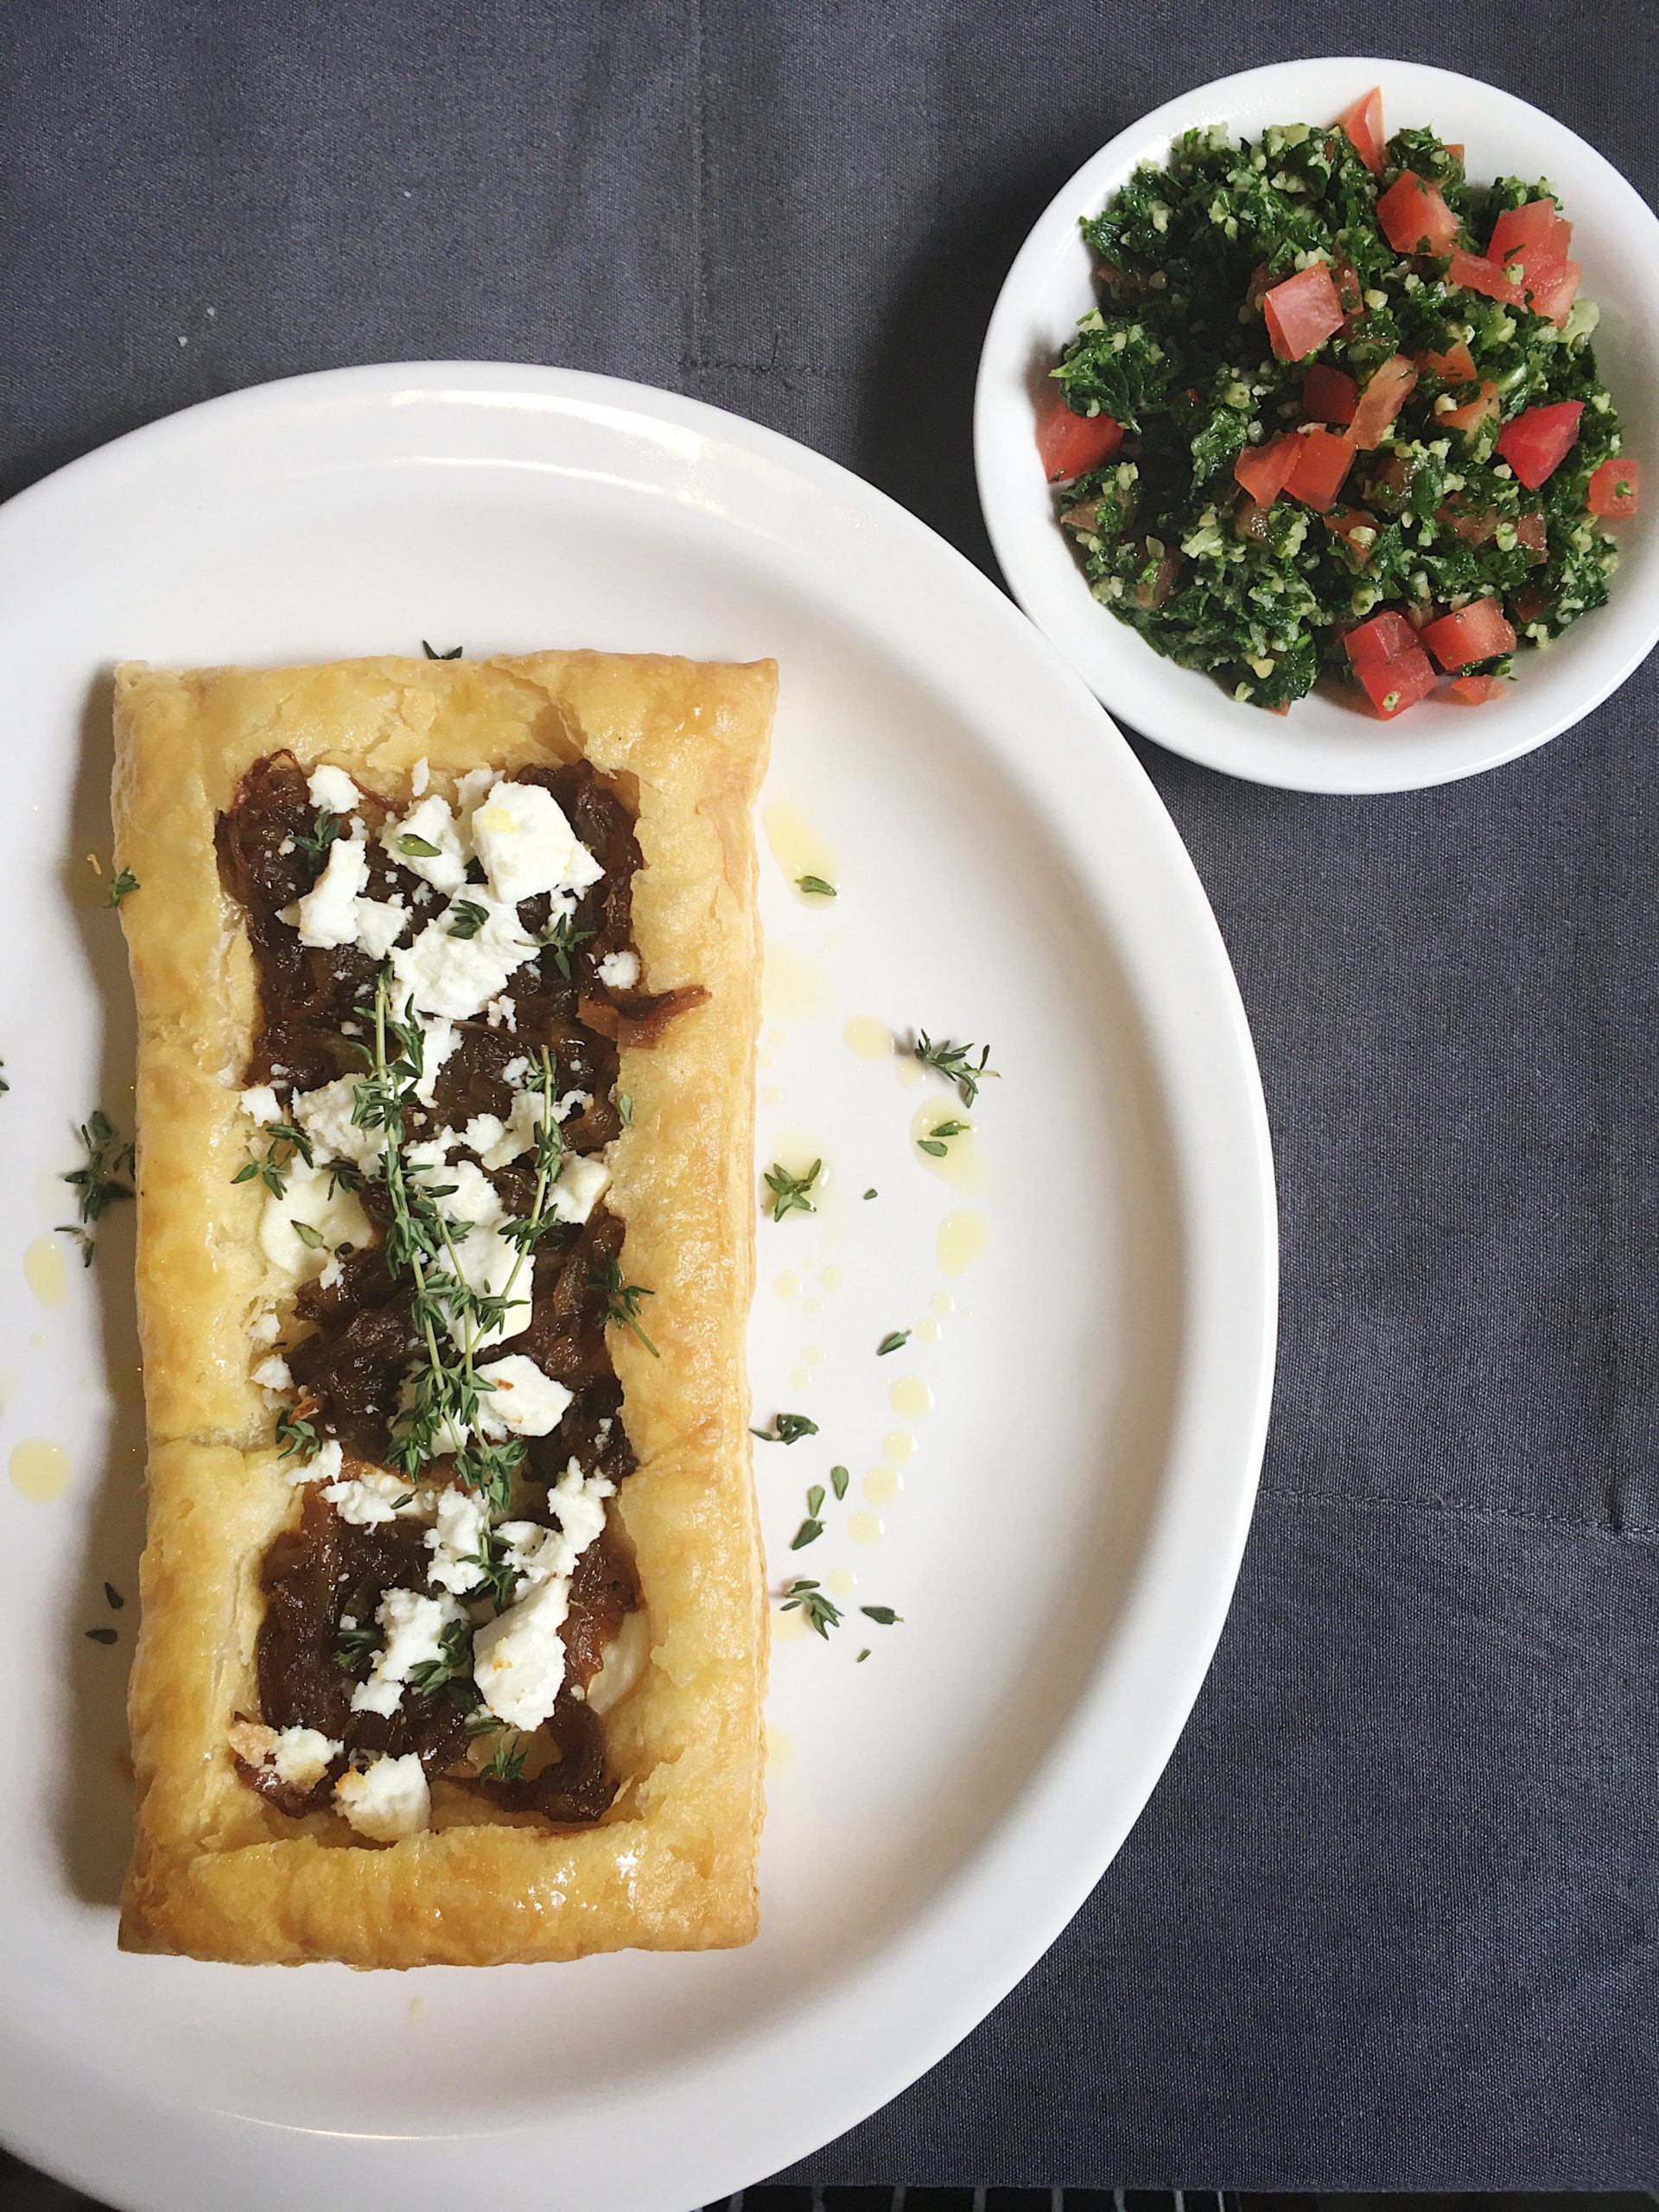
Mediterranean Inspired – Onions Tart with Feta Cheese and Tabbouleh

Onion Tart with Feta Cheese and Tabbouleh, by Reggie Soang (click image for YouTube video)

I love using puff pastry to create a quick meal. Simply add some caramelized onions and feta cheese to the pastry and bake it until nice golden brown and crispy, I promise that you will bring comfort and joy to the table. On the side, make a healthy and delicious salad, Tabbouleh. Tabbouleh tastes earthy with an abundance of chopped parsley and is balanced with fresh lemon juice and extra virgin olive oil. Together, this meal is delightful and leaves you feeling energized.

For the latest New Lifestyle Cooking Series:

Onion Tart with Feta Cheese, and Tabbouleh
Serves: 4 portions

Prep Time: 20 minutes
Total Time: 45 minutes

Ingredients: 
For Caramelized Onions:
1/4 cup canola oil, or any cooking oil
8 cups sliced onions
1 teaspoon salt
1 teaspoon black pepper
1/2 cup water

To Assemble the tart:
2 pieces of puff pastry, cut in halves
caramelized onions, from the above recipe
1/2 cup ricotta cheese
1 cup Feta Cheese
2 teaspoon fresh thyme leaves
1/4 cup EVOO, for brushing the sides

For Tabbouleh:
4 tablespoons soaked bulgur 
4 tablespoons chopped tomatoes
2 tablespoon finely chopped scallions
3 cup chopped Parsley
2 cloves fresh finely grated garlic
2 tablespoons lemon juice, adjust to taste
1/4 cup EVOO, adjust to taste
2 teaspoons salt, adjust to taste

  1. Pre-heat oven at 400F
  2. To caramelize onions, heat up a pot on medium high heat and add oil. Once the oil starts to shimmer, add onions and salt. Stir the onions around.
  3. Turn heat down to medium and stir the onions around occasionally. Once onions are getting browned and sticking to the bottom of the pot, pour couple tablespoons of water at a time and scrape up the brown bits. Onions are ready when they are soft and dark brown. Set aside
  4. Meanwhile, make tabbouleh. Boil 1 and 1/2 cup of water and pour it over 1/2 cup of bulgur and cover for 20 minutes. Fluff the bulgur and drain off excess liquid and let cool.
  5. Chop parsley until nice and fine. Mix in tomatoes, scallions, grated garlic, and bulgur. Season with salt, lemon juice, and EVOO. Set aside in the refrigerator.
  6. To prep the puff pastries, score around the pastries on the surfaces, leaving 1-inch space from the sides. Dock the pastries inside the borders and add few dollops of ricotta cheese. Brush the sides of the pastries with EVOO
  7. Bake in the oven for 18 minutes until light golden brown. Take the tarts out of the oven, spread caramelized onions across the top, and follow by sprinkling feta cheese. Brush the sides with EVOO again.
  8. Put the tarts back in the oven for 6 more minutes until the onions are warmed and the outside is more golden brown. To garnish, sprinkle thyme leaves on top of the tarts and drizzle olive oil around. Serve hot or at room temperature with tabbouleh. Bon Appétit!
Categories
Recipes

Mediterranean Inspired – Greek-Style Veggie Pie

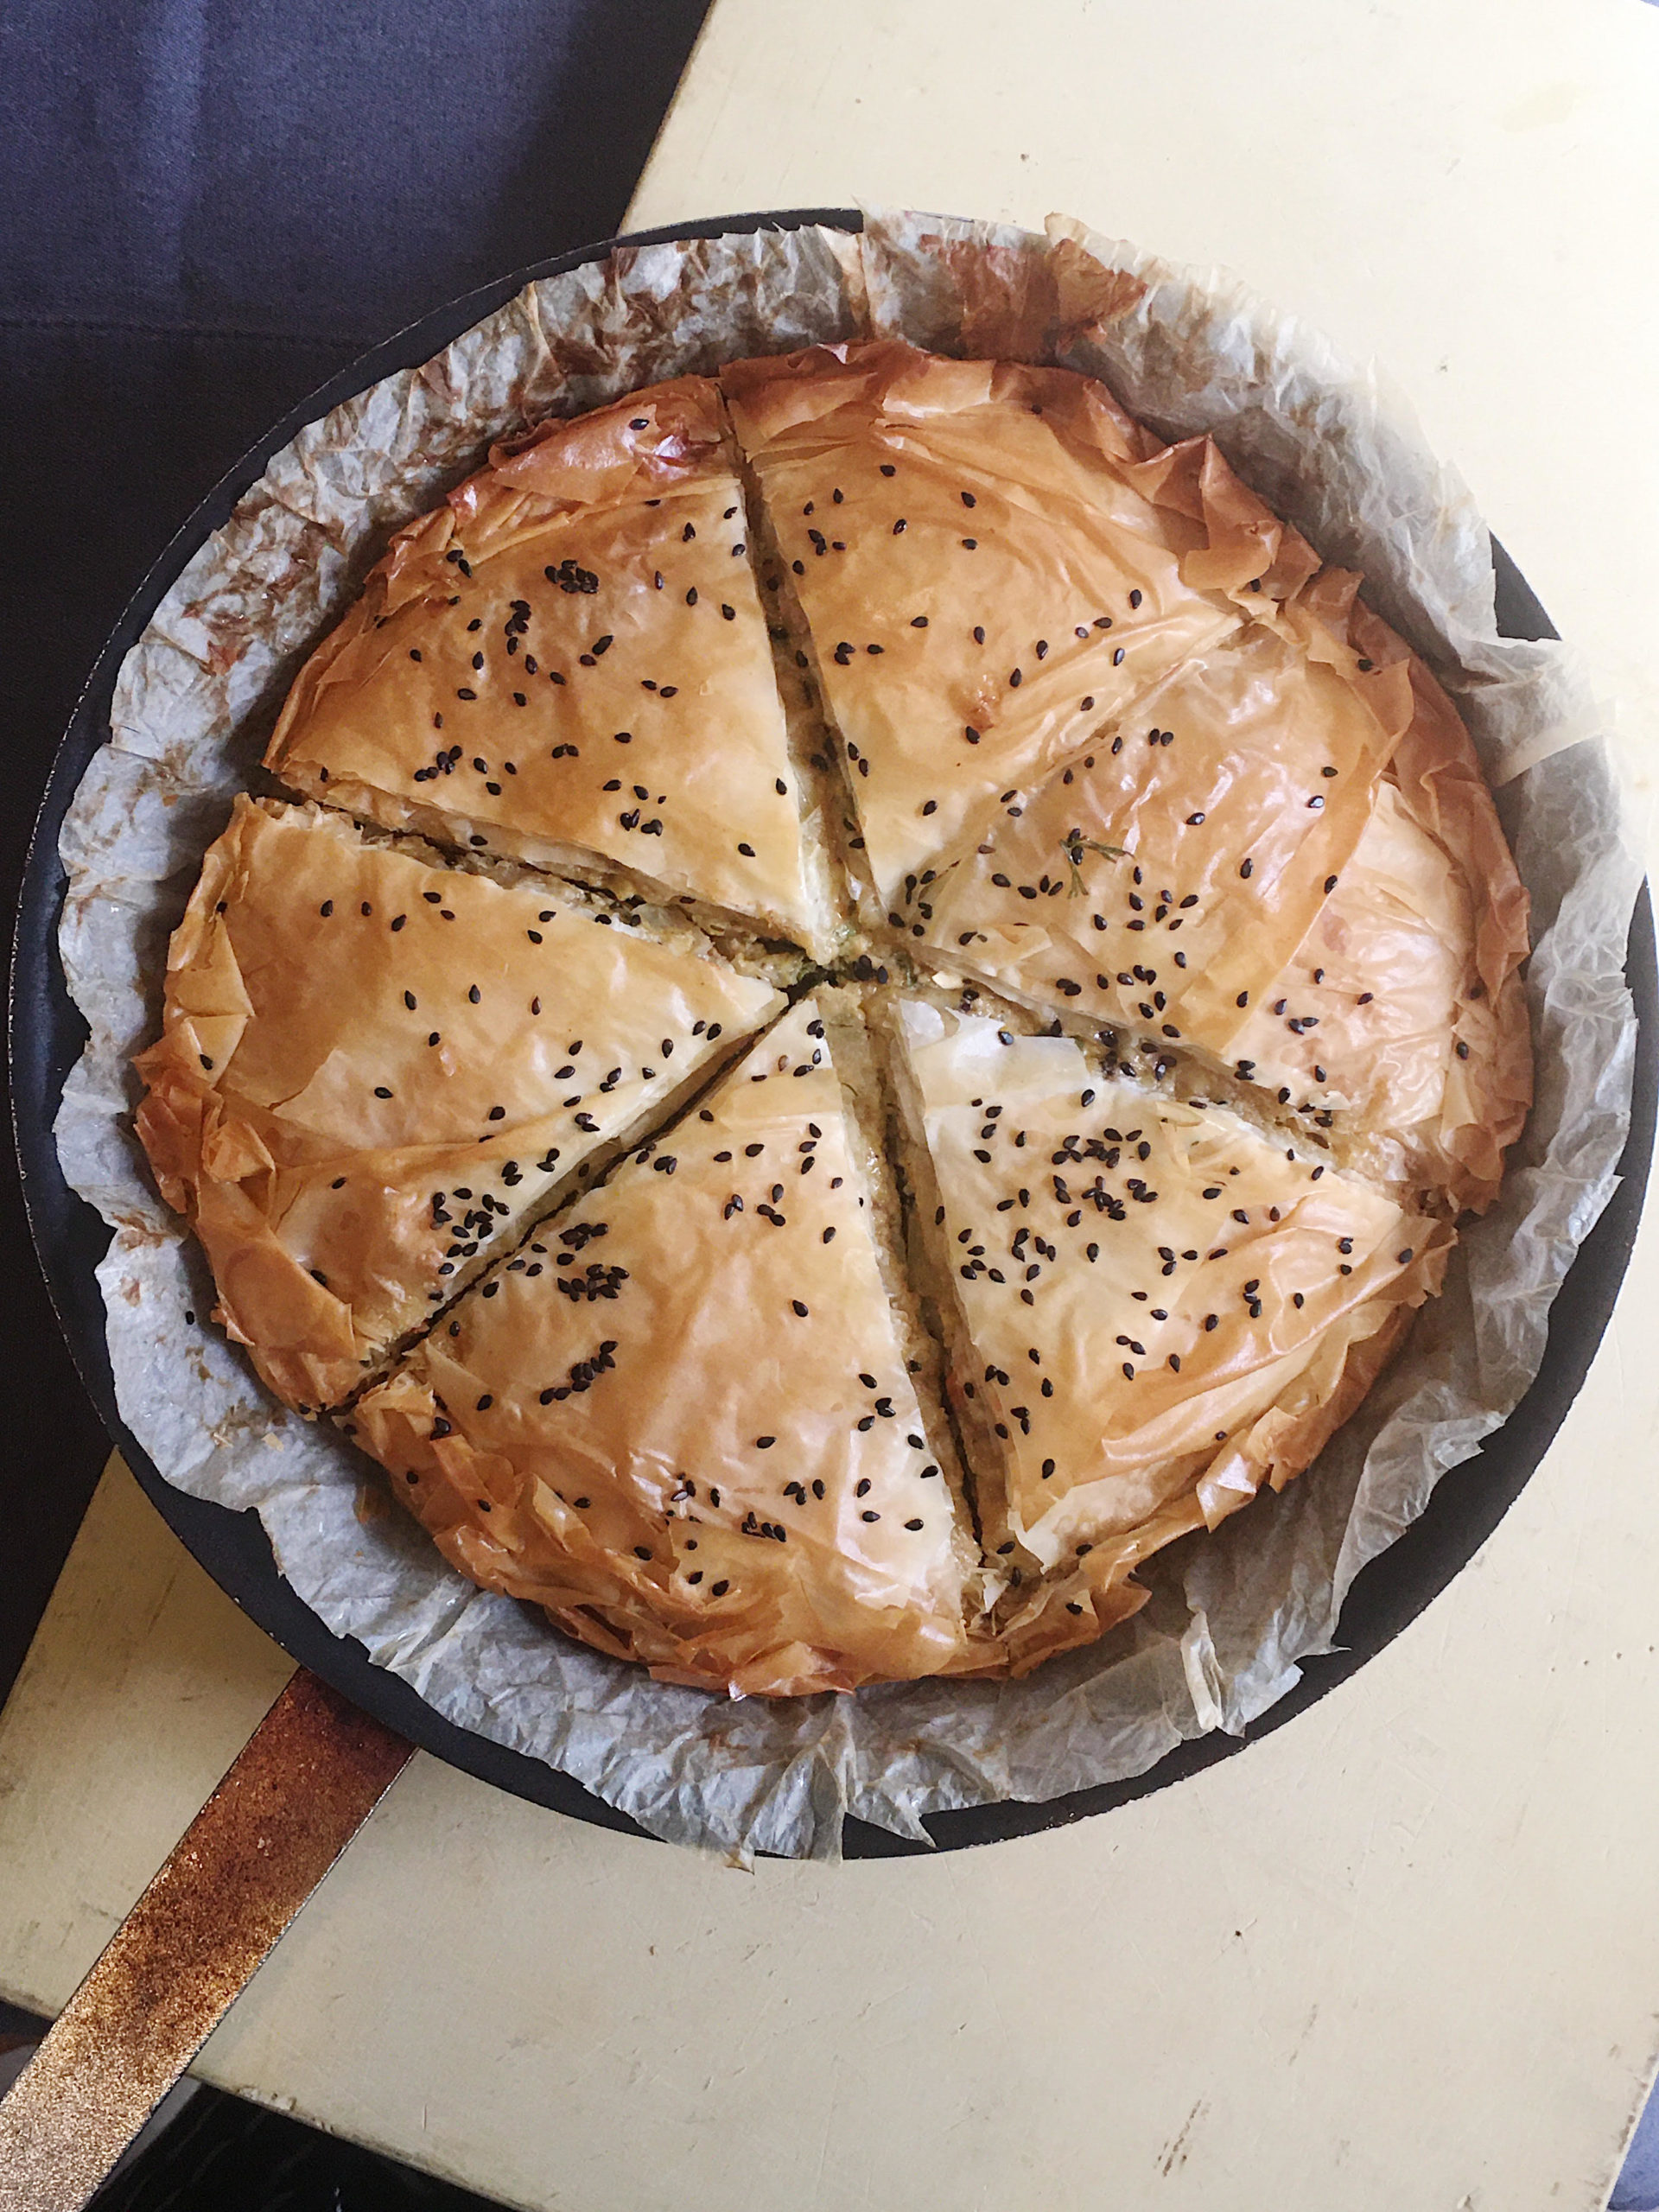
Greek-inspired Vegetable Pie (click photo for YouTube video)

This recipe is inspired by Greek Spanakopita, which spinach and feta cheese are baked inside of phyllo sheet. phyllo sheets are thin and become crispy when baked; each bite of the pie is crunchy and sumptuous. The choice of ingredients for this pie is abundant. Make sure to cook your veggies first for the fillings. While a Greek-style pie has feta cheese, substitute feta cheese with other cheeses such as cheddar, mozzarella, or queso fresco will bring just as much pleasure. The best part about making this dish is that it looks and tastes amazing while keeping the work to minimal.

For the latest New Lifestyle Home Cooking Series:

Greek-Style Garden Vegetable Pie
Serves: 4 portions

Prep Time: 30 Minutes
Total Time: 1 Hour

Ingredients:
1/4 cup canola oil (or any cooking oil)
2 cups medium diced onions
2 cups medium diced carrots
2 cups chopped button mushroom
2 cups medium diced zucchini
1 teaspoon ground black pepper
1 1/2 teaspoon salt
1/2 cup chopped dill
1/2 cup chopped mint
1 cup chopped scallions
1/2 cup shredded cheddar
1/2 cup shredded mozzarella
1 cup crumbled feta cheese
1 egg
10 pieces phyllo pastries, only open when ready to assemble the pie
EVOO for brushing the phyllo sheets
1 teaspoon black sesame seeds (optional)

  1. Defrost phyllo sheets at least 3 hours before using it. (the best way to plan for this recipe is to defrost phyllo sheets overnight in the fridge)
  2. Heat up a skillet on high heat, sauté mushroom first until nicely colored, and then add zucchini. It’s important to cook these two veggies first to get rid of the excess water content. 
  3. Add onions and carrots once mushroom and zucchini are nicely caramelized. Cook until all the veggies are softened. Tip all the ingredients into mixing bowl and mix in the chopped herbs and cheeses. Set it aside, and pre-heat oven at 400F
  4. Open phyllo sheets package and keep them under damp towels; phyllo sheets dried out quickly if not covered. 
  5. Wet a piece of parchment paper under cold running water and wring out as much water as possible. 
  6. Lay out the parchment paper flat on a counter and brush it with EVOO. Lay phyllo sheets over the parchment paper and lightly brush each piece of phyllo with EVOO. Lay out 6 pieces and overlap them. Transfer the phyllo sheets into a skillet. Fill the skillet with your fillings and wrap up the pie by folding over the sides of the phyllo sheets. Brush the top with more EVOO
  7. Cover the top with the rest of the phyllo sheets. After laying out each piece, crumble up the sides and brush with EVOO. Sprinkle on some black sesame seeds. Use a sharp knife to portion the pie into wedges like a pizza. 
  8. Trim off excess parchment paper and heat up the skillet on medium heat. Once the sides of the phyllo pastries are getting crispy and golden brown, slide the skillet into the oven and bake for 20 minutes.
  9. Once the top is golden brown and crispy, take the pie out of the oven and let it rest for 10 minutes. Cut the pie along the cuts made previously and serve it with more feta cheese on the side. Bon Appétit!
Categories
Recipes

Mediterranean Inspired – Ratatouille Tartlet

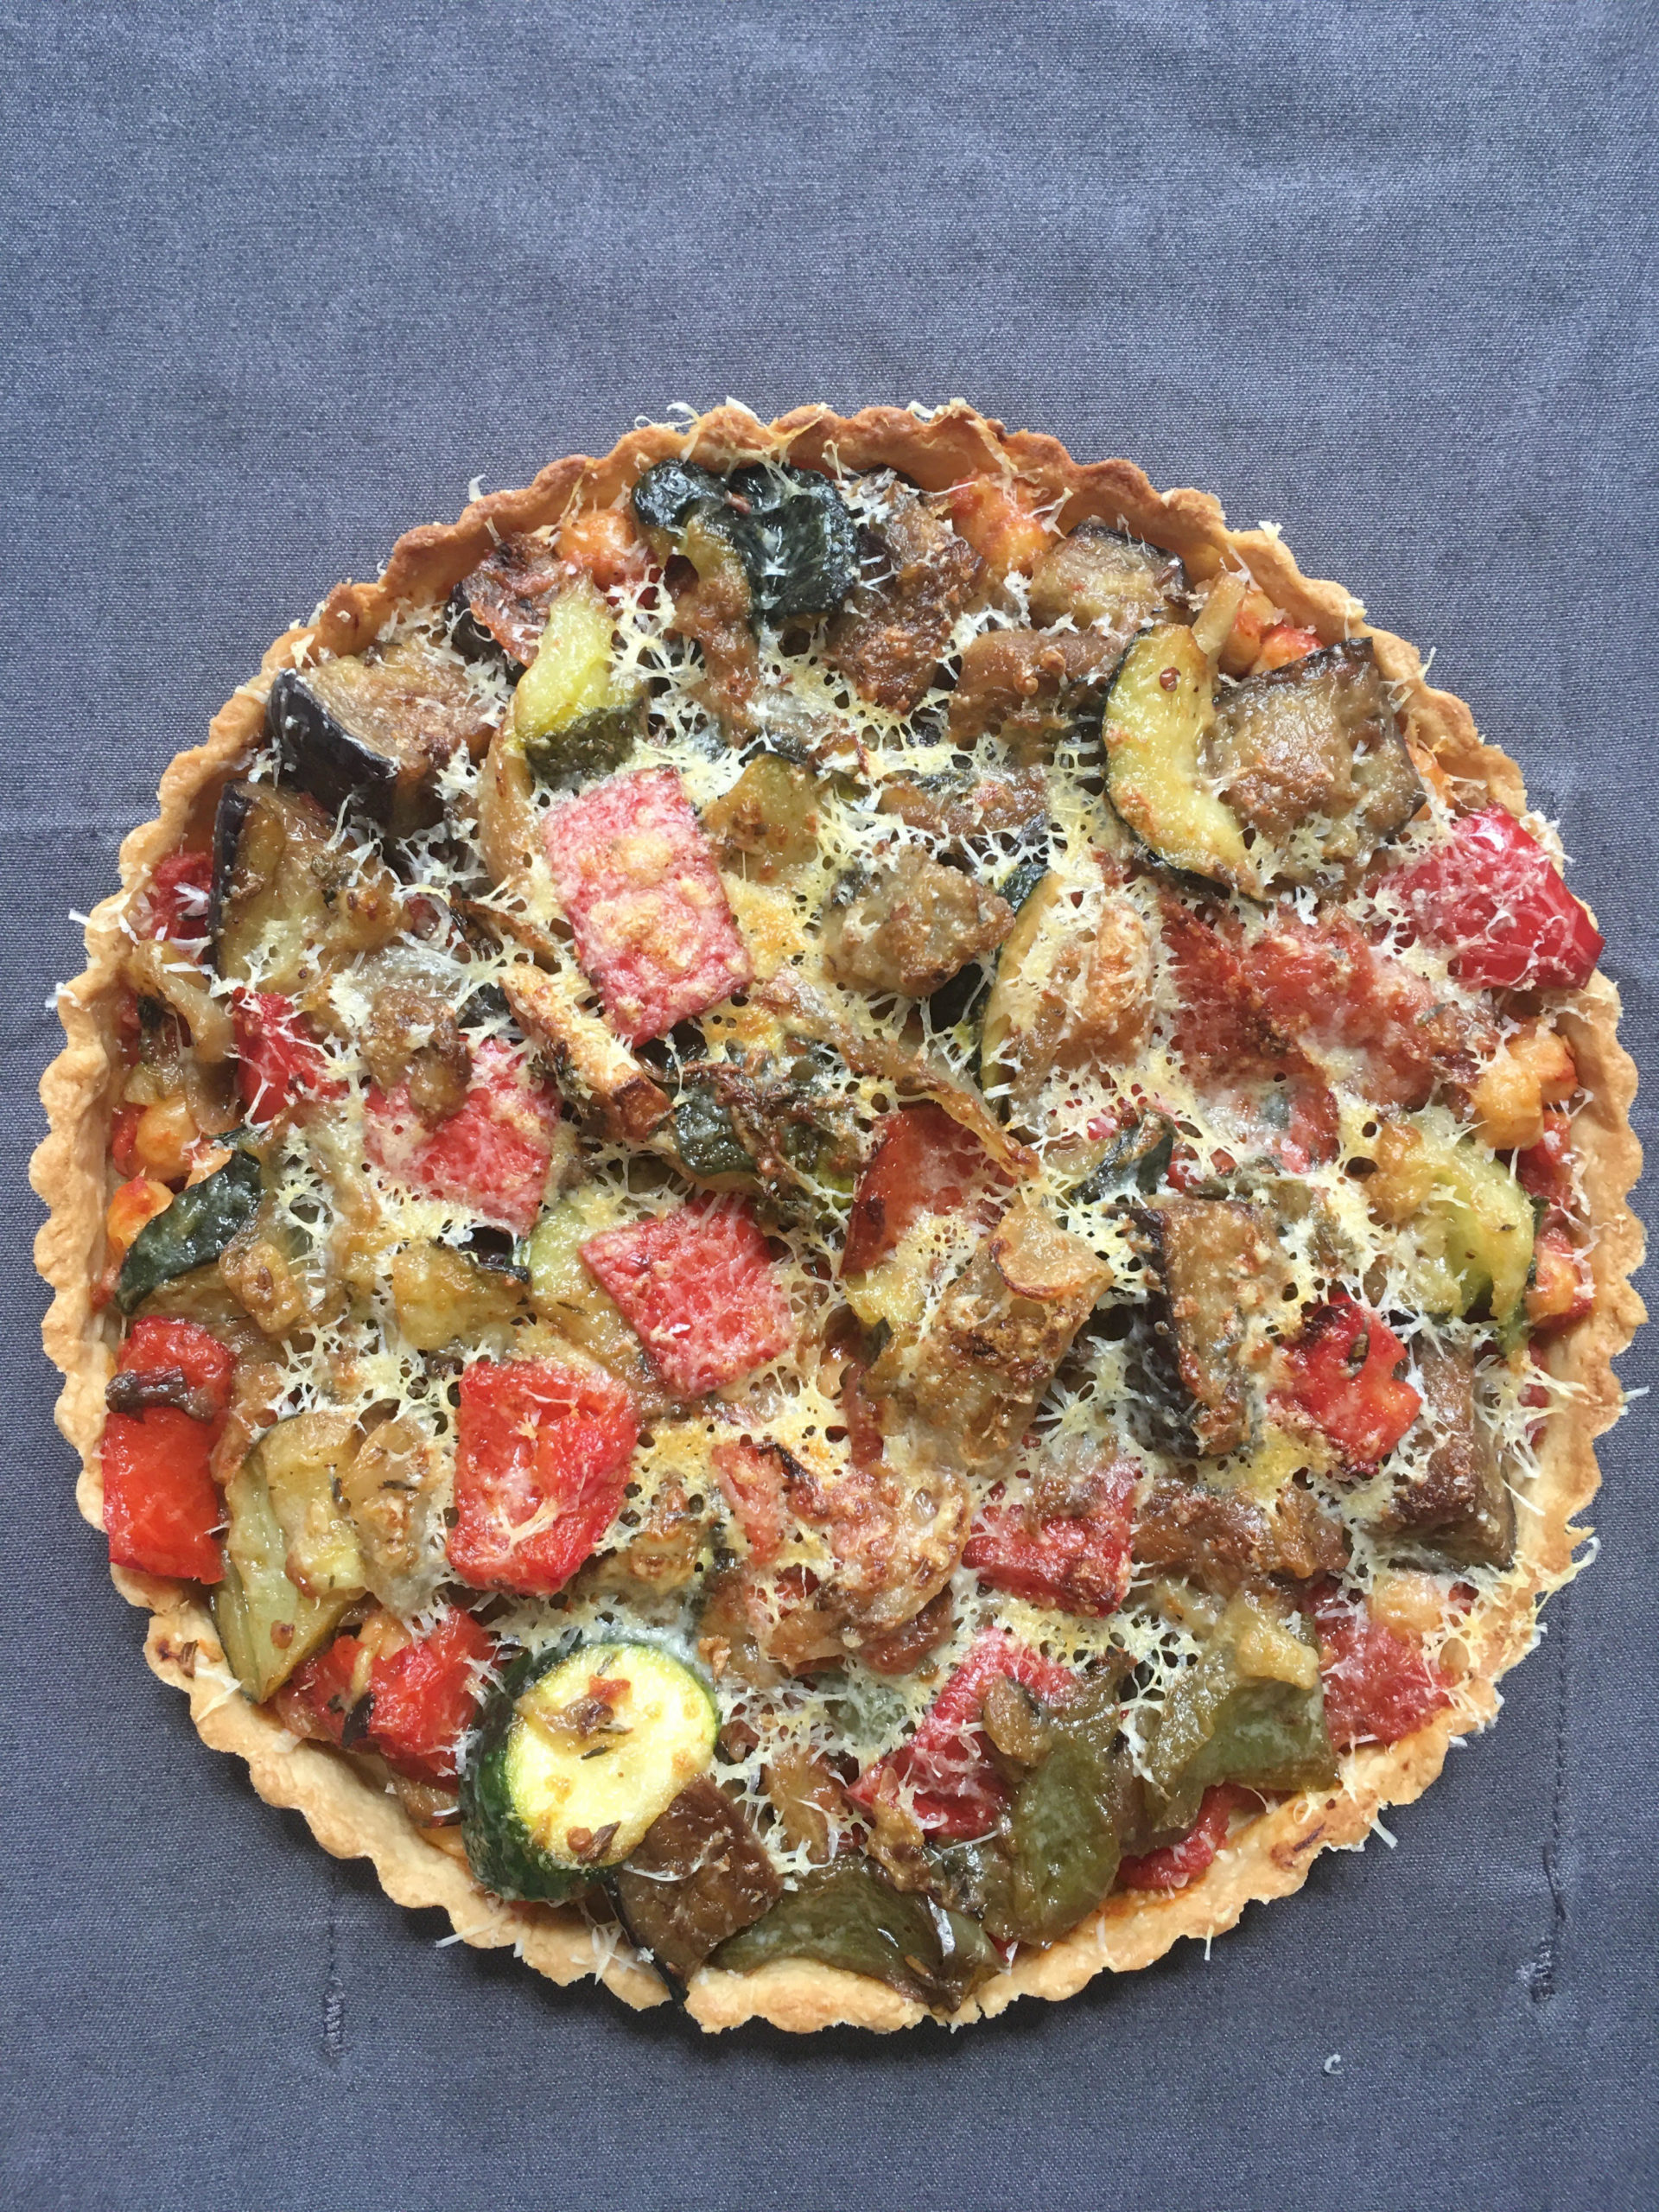
Ratatouille Tartlet, by Reggie Soang (click image for YouTube video)

I enjoy eating ratatouille because it’s hearty, yet guilt-free; it is made entirely with vegetables. There are a few ways to serve ratatouille. It’s delicious and vibrant by itself, and it’s also wonderful baked into a tart. Though making it into a tartlet is not conventional, I enjoy the textural contrast of the tart shell with the soft veggies.

For the latest New Lifestyle Home Cooking Series:

Ratatouille Tartlet
Serve: 4 Portions

Prep Time: 15 minutes
Total Time:1 hour 15 minutes

Ingredients:
3/4 cup plus 1/4 cup EVOO, keep them separated
2 cups sliced onions, thin wedges
5 cloves whole garlic
4 cups medium diced eggplant
3 pieces Tomatoes, cut into wedges
3 cups medium diced bell peppers (mixed of green and red peppers)
5 cups medium diced zucchini
1 tablespoon fennel seeds
1/2 teaspoon dried chilies
1 tablespoon fresh thyme leaves
1/2 cup cooked chickpeas
1 cup tomato sauce
1/2 cup grated Parmesan
1 tart shell for a 10-inch pie pan, blind baked according to the instructions on the package
1 pound (comes in 1 bag) dried beans for weighing down the tart shell in blind baking

  1. Divide up 3/4 cup of EVOO to cook onions and garlic, eggplant, tomatoes, bell peppers, and zucchini separately in a skillet. Make sure they get a nice caramelization on the outside. 
  2. After cooking the veggies, toast fennel seeds and dried chilies until fragrant with the rest of 1/4 cup EVOO. Turn off the heat and add thyme. Set this aromatic oil aside.
  3. Put veggies and aromatic oil back in the skillet. Bring up the veggies to a simmer and put a lid on. Leave a tiny gap for steam to escape. 
  4. Meanwhile, blind bake your tart shell. Pre-heat your oven as instructed by the tart shell package. Dock the tart shell at the bottom and on the side. Cover the tart shell with a piece of parchment paper or tin foil, and then add dried beans on top. Bake the tart shell according to the package instruction. When tart shell is ready, leave to cool. Turn oven to broiler setting
  5. Once the veggies are nice and soft, drain off the excess oil and reserve. 
  6. Heat up tomato sauce and scoop the sauce into the tart shell and spread it around like pizza. Scoop ratatouille onto tomato sauce and fill in the entire tart. Sprinkle chickpeas on top. 
  7. Sprinkle the grated Parmesan over the tartlet and melt the cheese under broiler until nice and crispy. 
  8. Let tart rest of 5 minutes before cutting it. Bon Appétit!
Categories
Recipes

Vegetarian Friendly – Eggplant Parmesan

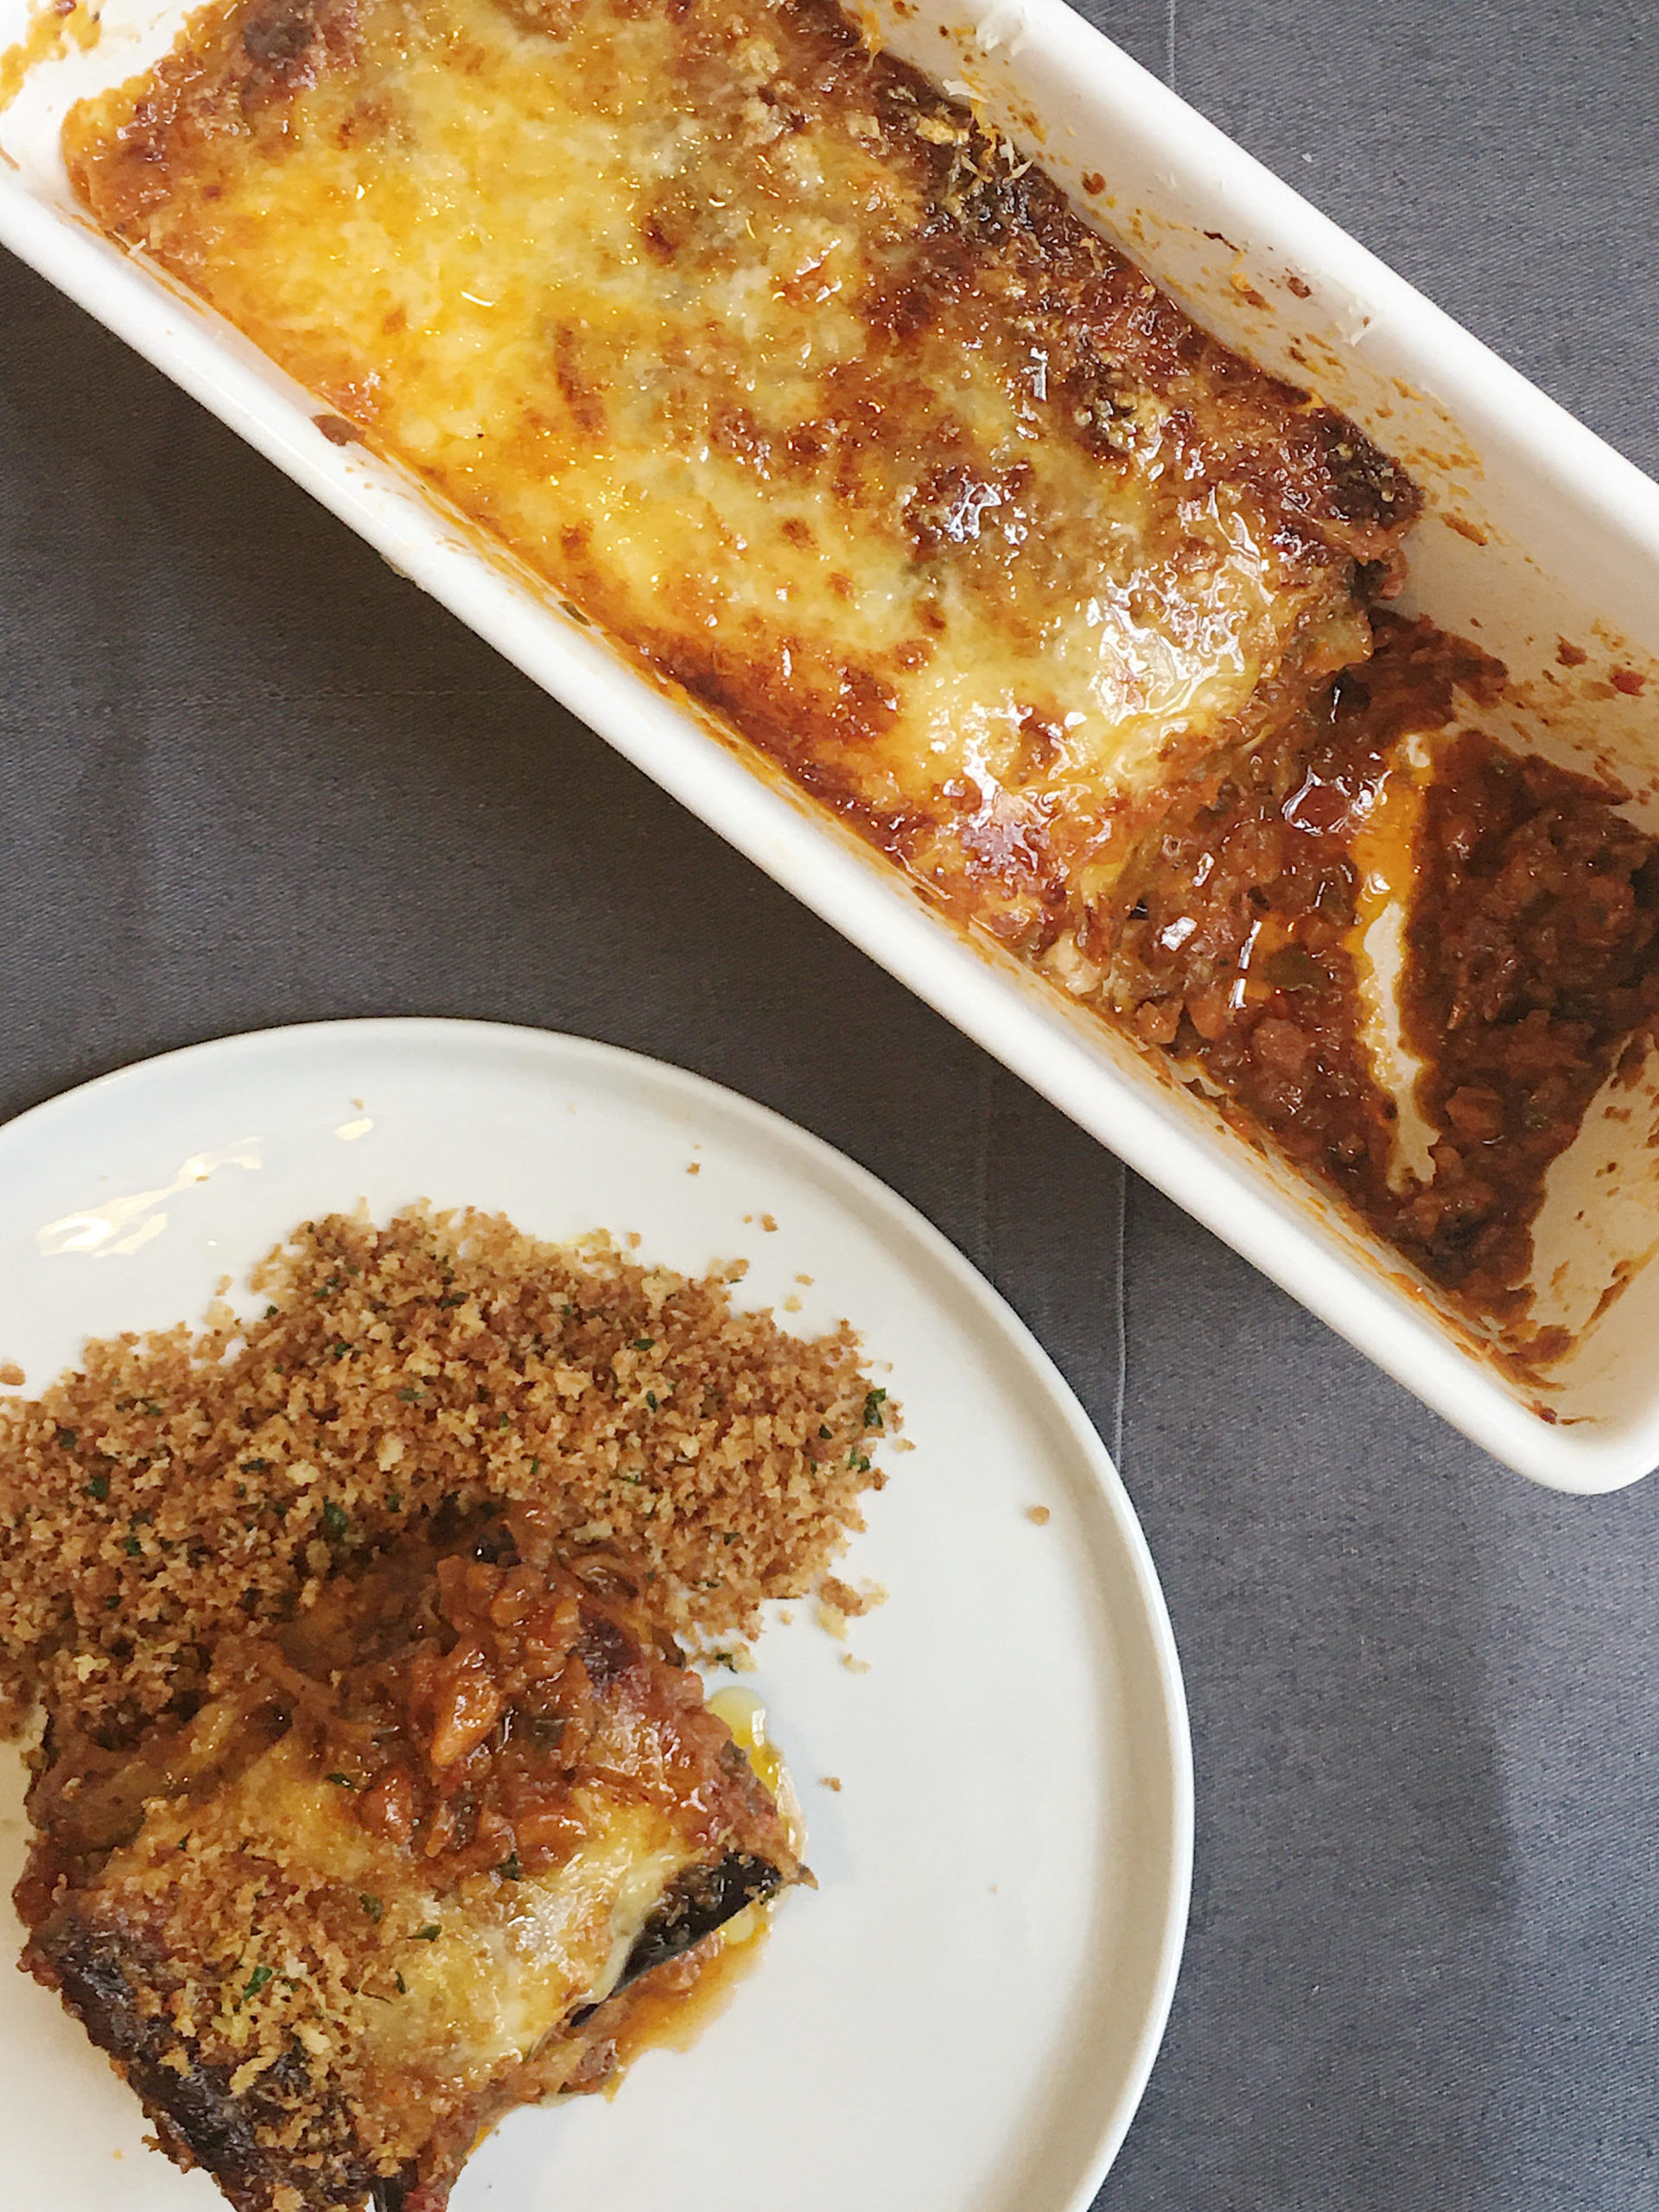
Eggplant Parmesan, by Reggie Soang (click image for video)

Eggplant Parmesan is a crowd-pleaser. My version of eggplant Parmesan doesn’t require frying breaded eggplant. I roast eggplant and then I make the breadcrumbs separately to sprinkle on. The result of this version is delightful. The tomato sauce is made with an amalgam of random vegetables, such as carrots, onions, peppers, mushrooms, and celery, and the result is excellent. I recommend making this recipe if you need to downsize your vegetable inventory. 

For the latest New Lifestyle Home Cooking Series:

Eggplant Parmesan
Serving: 4 portions

Prep Time: 20 minutes
Total Time: 2 Hours

Ingredients:
For Soffrito and Tomato Sauce:
1 cup canola oil
2 cups finely chopped celery
2 cups finely chopped carrots
2 cups finely chopped onions
2 cups finely chopped mushroom
1/2 cup finely chopped red peppers
1/2 cup finely chopped green peppers
2 tablespoons tomato paste
2 cups canned tomato sauce

For Breadcrumbs*:
3 cups Japanese Panko
1/3 cup EVOO
2 teaspoons salt
1/2 cup finely chopped parsley
2 lemon zest

*This step is optional; you could use store-bought Italian bread crumb for this dish.

For Assembling Eggplant Parmesan:
2 cups tomato sauce, from the recipe above
2 medium sized eggplant, sliced and roasted
4 cups shredded mozzarella 
1/4 cup grated Parmesan

  1. Pre-heat oven at 450F
  2. Slice eggplant to 1/2-inch thick and sprinkle salt on top and set aside for 1 hour. 
  3. Meanwhile, make soffrito and tomato sauce. Cut vegetables to a fine size. Heat up a pot on high heat and add oil. When the oil is smoking, add vegetables and stir immediately. 
  4. Cook the vegetables on high heat to evaporate the water content. Stir occasionally to avoid burning. Once most of the water is evaporated, season soffrito to taste.
  5. To complete the tomato sauce, add tomato paste to the vegetable pot and roast it until fragrant and caramelized, and then add tomato sauce to combine. Bring sauce to a simmer and season to taste. The final sauce should be thick.
  6. Going back to the eggplant. Dry eggplant surfaces with paper towels and brush them with EVOO or any cooking oil. Roast eggplant in 450F oven for 20 minutes, or until nice and soft. Turn oven down to 400F after.
  7. To make breadcrumbs, toast panko with EVOO until light golden brown. Add parsley and stir it in. Parsley should start to sizzle in the breadcrumbs. Keep tossing the breadcrumbs until they are a little more brown and toasty. 
  8. To assemble eggplant parmesan, layer in tomato sauce, shredded mozzarella, and eggplant, and repeat the steps until you finish the eggplant. My casserole is 10 x 3 x 3.5 inch in dimension, and it could fit 3 layers.
  9. Bake eggplant Parmesan in 400F oven for 15 minutes until cheese is melted on top and the sides are bubbly and golden brown. Turn on broiler and sprinkle grated Parmesan cheese on top of the eggplant dish.
  10. Melt Parmesan cheese under broiler until bubbly and golden brown. Let eggplant Parmesan rest for 10 to 15 minutes before cutting in. Sprinkle the top with breadcrumbs and Bon Appétit!
Categories
Recipes

Vegetarian Friendly – Pasta alla Norma

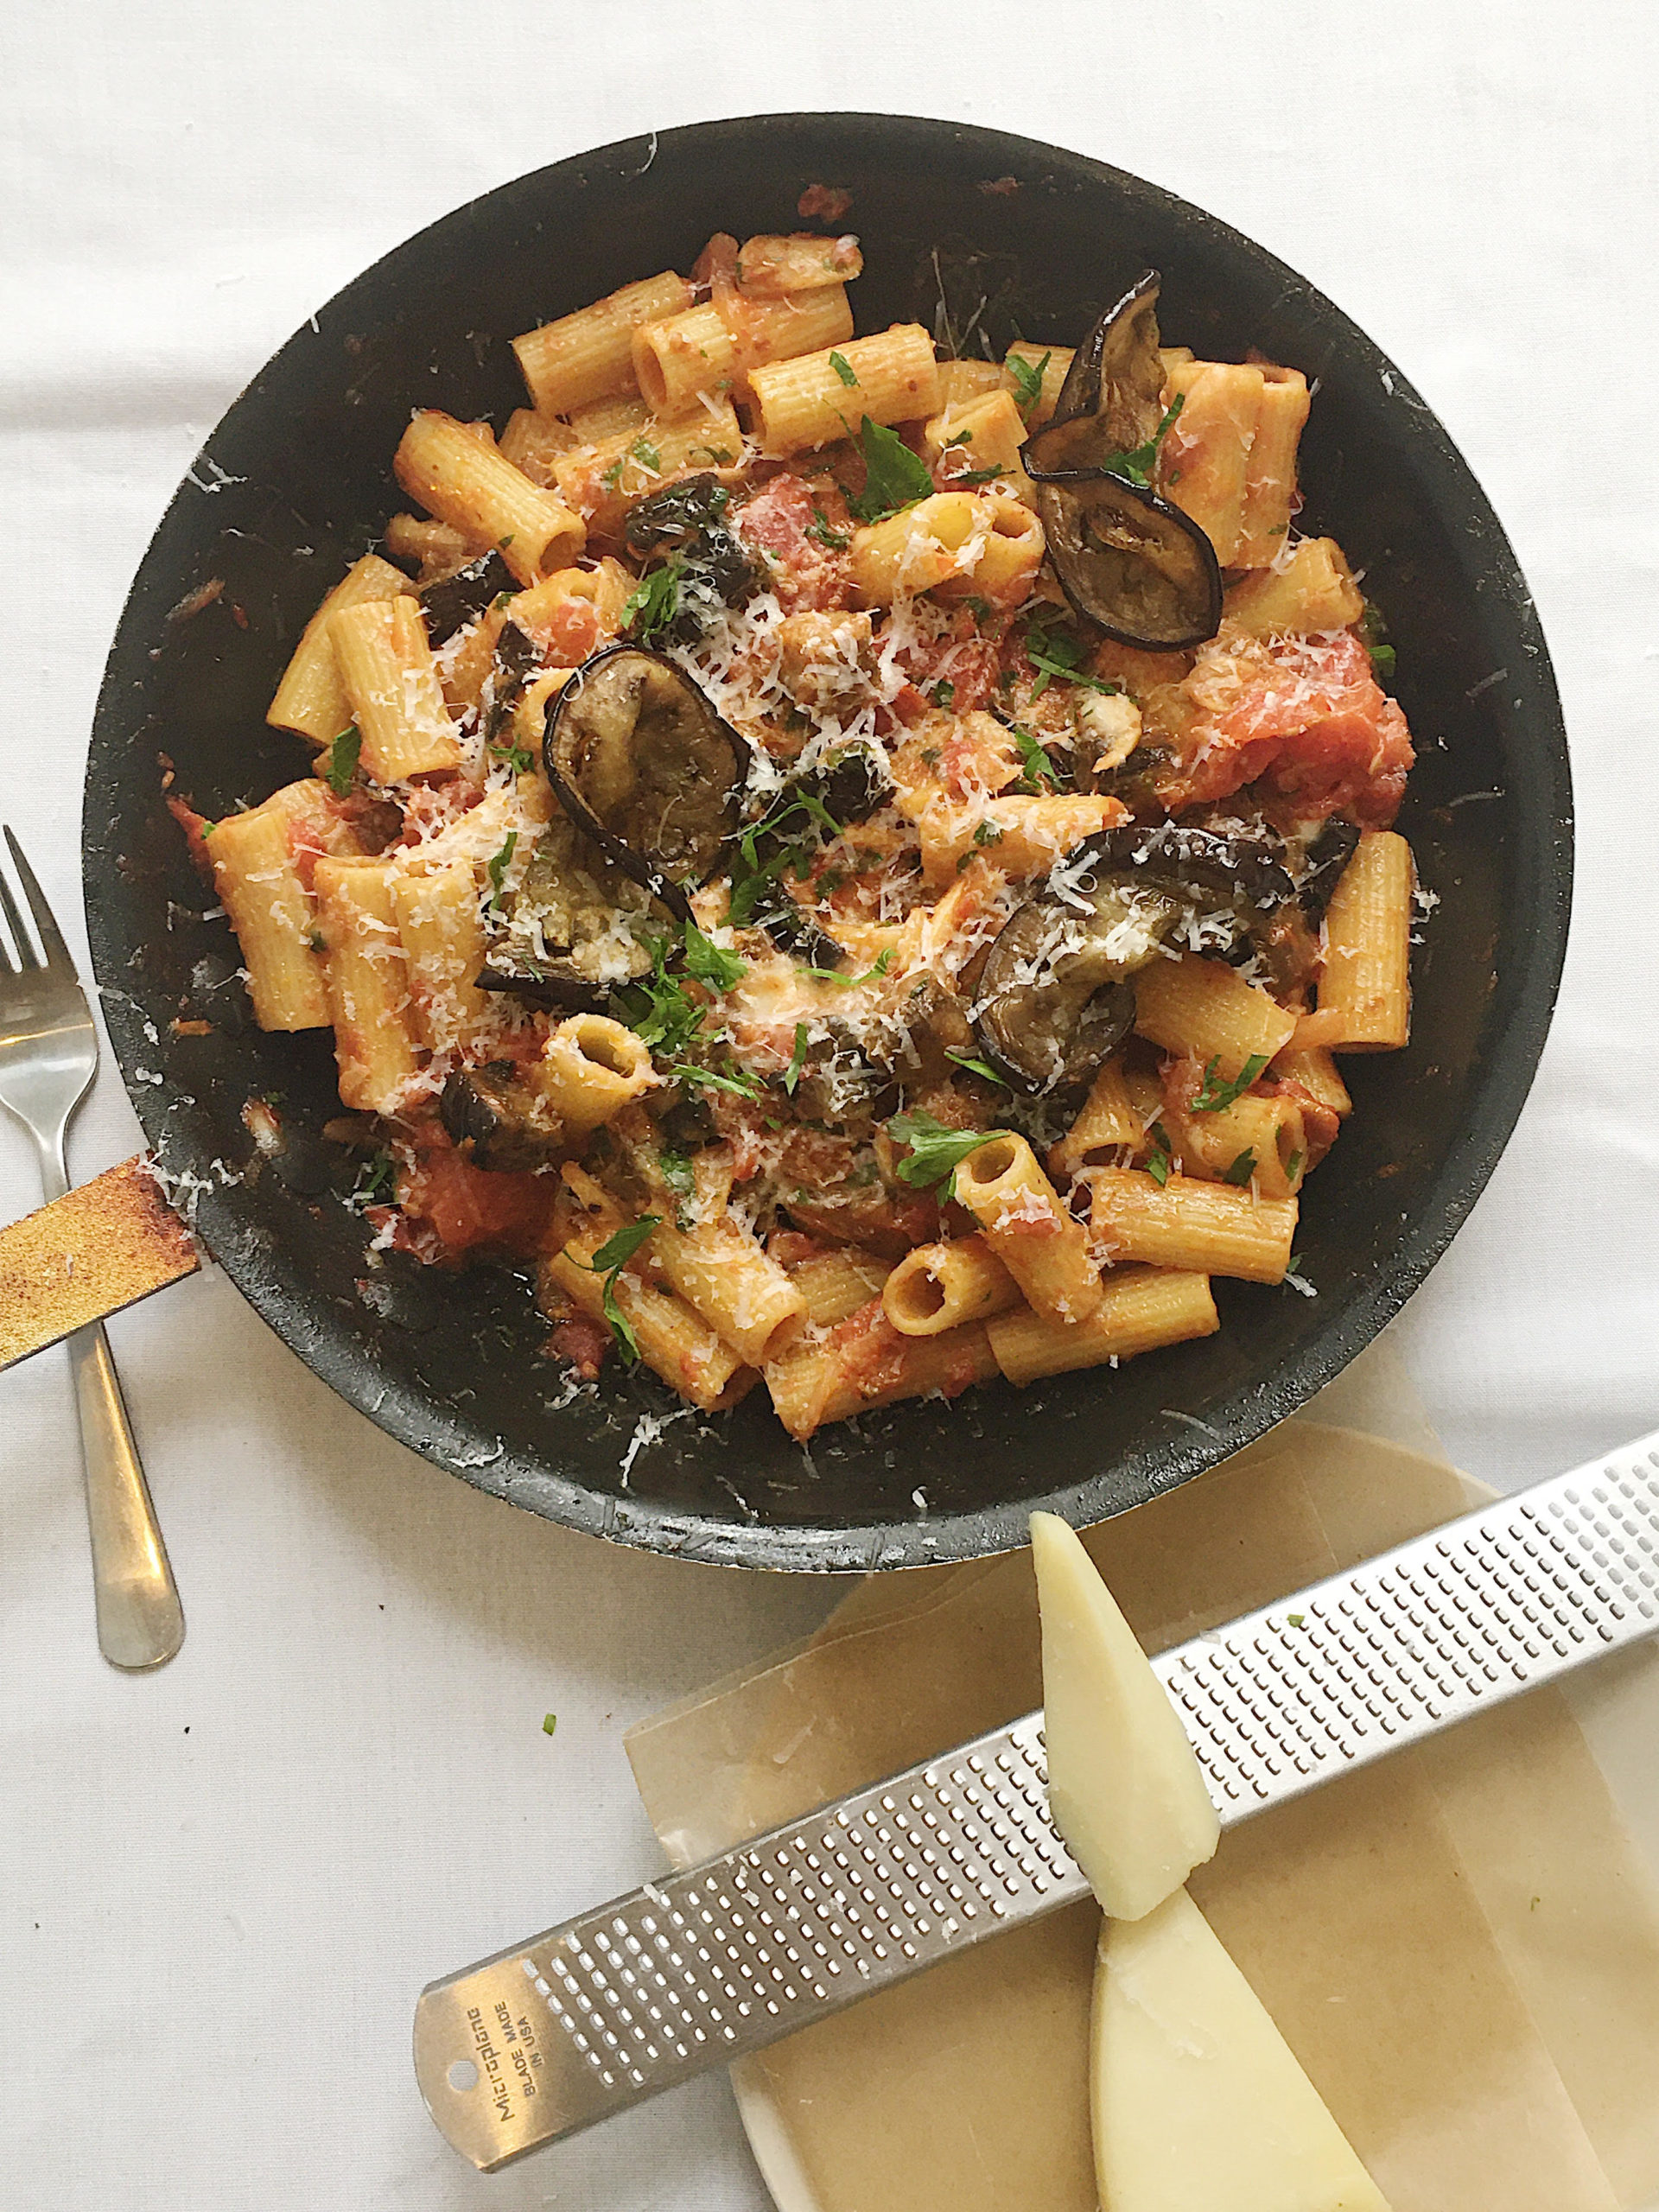
Pasta alla Norma, by Reggie Soang (Click image for YouTube video)

Pasta alla Norma reminds me so much about Chinese Stewed Eggplant with Black Beans. An excellent “Norma” (as we simply call it in the restaurant) has a rich and umami-packed tomato sauce while the Chinese dish gets its flavor from stewing eggplant with fermented black beans. Both eggplant dishes are comforting and delicious. Though “Norma” is vegetarian, eggplant and cheese add substance and great taste. While savoring the pasta, I reminisced about the past when I devoured bowls of rice and hefty scoops of Chinese Stewed Eggplant.

For the latest New Lifestyle Home Cooking Series:

Pasta alla Norma
Serving Portions: 4

Prep Time: 20 minutes
Total Time: 50 minutes

Ingredients:
For Tomato Sauce:
4 tablespoons EVOO or canola oil
1 can (28 oz.) whole peeled tomatoes
1 head garlic, sliced
1/2 piece red onions, sliced
1 teaspoon salt
1/2 tablespoon dried chili
1/2 cup water

For Roasted Eggplant:
4 cups diced eggplant
1/4 cup EVOO or canola oil
1/2 teaspoon salt
1/2 teaspoon chili
2 tablespoons of EVOO or canola oil for greasing the roasting tray

To complete the dish:
2 tablespoons EVOO or canola oil
3 cups rigatoni 
2 cups roasted eggplant
2 cups tomato sauce
2/3 cup shredded mozzarella
4 cloves garlic, sliced
1/4 cup chopped parsley

  1. To make the tomato sauce, cook red onions and garlic in EVOO over medium heat until soft. Add dried chilies to toast until fragrant. Add canned tomatoes, salt, and water, and bring it to a simmer. Use the back of a wooden spoon or a rubber spatula to break up the tomatoes. Cook the tomato sauce until thickened.
  2. Pre-heat oven to 400F and set a roasting tray in the oven during pre-heat.
  3. Toss diced eggplant with oil, salt, and chilies. Once the oven is ready, add 2 tablespoons of oil to the roasting tray and swirl around to coat. Add eggplant immediately and put the tray back in the oven. Roast eggplant until soft and juicy, about 12 to 15 minutes.
  4. Meanwhile, bring a pot of water to boil to cook pasta. Season water with salt until it tastes like the sea. Once the tomato sauce and eggplant are ready, add your pasta to the boiling water and set a timer for 8 minutes.*
  5. To complete Pasta alla Normal, cook sliced garlic with oil in a skillet until fragrant and soft. Add tomatoes sauce and eggplant and stir to combine. Drain the pasta and reserve cooking liquid. Add pasta to the sauce and toss to combine. Add tiny scoops of pasta water to help with sauce consistency. Once the pasta is nice and saucy, add shredded mozzarella and chopped parsley. Keep tossing the pan to mix everything. Add more pasta water to adjust if necessary.
  6. To serve, scoop pasta into a bowl and grate Parmesan over it, and sprinkle some more chopped parsley to garnish. Bon Appétit!

*In my experience, dried pasta (penne, rigatoni, spaghetti) takes about 8 to 10 minutes to cook, regardless of the brand, depending on your preference of the final texture.